FE-FC Holden Discussion Forum
July 03, 2025, 10:09:10 PM *
Welcome, Guest. Please login or register.

Login with username, password and session length
News: The FE-FC Holden Car Club of NSW are proud to host the 19th FE-FC Holden Nationals. Check out the announcement video for more.
 
   Home   Help Search Calendar Login Register  
Pages: 1 [2] 3 4 ... 10
 11 
 on: June 29, 2025, 09:35:58 PM 
Started by Jolls - Last post by Jolls
Hi Team,

I need to replace the shocks on the project FC ute. The posts in relation to shocks on the forum are pretty dated. I have sone a bit of research and identifed several options including: Monroe, Gabriel and Sachs at at $60-70 mark per unit, Koni at around $220 per unit and at the bottom end Repco at $50 per unit (rear only). What are your expereinces with these brands and what do you think is the best value for money option. I don't think the FC warrants Koni's!

Cheers

 12 
 on: June 27, 2025, 06:33:38 PM 
Started by Jolls - Last post by Jolls
Between work today I was able to sneak in a little effort on the ute.

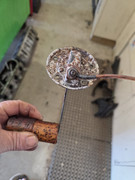
I wanted to prep te fuel tank to be sealed with POR 15, but when I went to pull out the fuel sender yesterday I found it had been sealed in with what looked like JB Weld. It was certainly harder than body filler and was grey in colour. My plan was to clean the tank to prevent a vapour explosion from sparks and then grind out the JB Weld with a an angle grinder and the dremmel. When I took it outside in the sun to start this I noticed one edge looke like it was lifting so I grabbed a cold chisel and a hammer and took to it as an experiment. It started to flake off in small chunks so I kept going and half and hour later I had exposed the cap over the sender unit and with a bit of effort I was able to pry it out. The "sealant" material did not stick to the tank itself but was bonded to the sender cover. I was able to get if off with a bit of effort on the wire wheel. I can only imagine that the fuel sender was leaking so it was sealed in.

I removed the sender unit - it was stuck solid in the empty postion. The tank insides are heavily varnished so it will take a bit of work to prep it for the POR. I put the tank aside and focussed my effort on the sender unit.


First job was to blast the crud off the outside - took a couple of minutes to do and it looked good I drilled out the rivets and separated the rheostat from the moving contact.


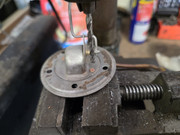
The internals were covered in varnish and stuck solid. I could not get any movement.


Not wanting to break anything I decided to stick the float and contact into some fresh fuel to "melt" the varnish. I cut off the float so it would fit in a small jar and soaked it for a while - no luck with that.

I had the twin carbies lined up to go into the untrasonic cleaner so I hit the added some more fuel to the glass jar and stuck that in with the hot water and finish dishwashing tablets amd let the untrasonic cleaner do its thing.

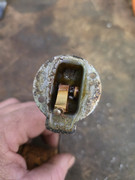
The fuel sender parts came out clean on the outside but still had varnish on the inside - but the varnish just flaked off when touched - so a couple so minutes with a pick and small falt screwdriver and the interior was clean.

The heat and vibrations had softened up the fuel varnish so I was bale to slowly get the float arm to move and finally with a few more dips in the warm fuel and a bit of carby cleaner spray the movement freed up. A quick check for continuity and then resistance readings 0.2 ohms at empty and 33 ohms at full and we had enough to make a functioning fuel sender.

So I used the MIG to weld the float arm back on and we were good to go. Hand assembled and tested it could get the full range of movement and had 0 ohms at empty and 32 ohms at full. Close enough for me so now it is a matter of finding some brass rivets of the right size and we have saved about 180 beer tokens.

As for the carbies - came out clean - still need to go over them.


 13 
 on: June 27, 2025, 01:58:17 PM 
Started by Newby13 - Last post by blacky
 How did you go Newby13 Huh Did you end up ordering one of these ? We just got back from the FB/EK Nationals and after driving for a smidgen over 7000km a steering wheel cover would be a nice to have ......

 14 
 on: June 27, 2025, 01:10:26 PM 
Started by Jolls - Last post by Jolls
I don't think the product used was JB Weld, It was hard as but I was break it off with a hammer and cold chisel. After about 1/2 hour of pain I exposed the cap and was able to lever it out. The sender unit was quite corroded on top.


The sender unit was full of varnish and seized up so time to try and bring it back to life.

 15 
 on: June 27, 2025, 12:20:04 PM 
Started by Jolls - Last post by Jolls
Craig,

I've never seen the steel rings before.   In factory springs at the closed-coil end, the spring wire changes in profile from round to rectangular, which tapers.  The part number is stamped into the rectangular-profile section.  I can't see the closed-coil ends clearly in the photo, but you may have original-equipment front springs.

In aftermarket springs (thinks Lovells or Selbys) the spring wire at the closed-coil end is round in profile.

OK.  It could be that your springs are wound from larger-diameter wire and they don't seat properly into the crossmember tower.  Maybe not.  It could be that the steel rings are a home-made "country pack" which gives an extra 1/2 ride height.  Beats me.

I have a loose pair of FE-FC ute/van/wagon front springs.  Please hold.

---------------------------------------/---------------------------------

7410727.  7-1/4 active turns of 0.540" diameter spring wire.
FE-FC sedan front springs are 7408860 and both mine have a coil broken off the bottom end.  Shop manual says 0.530" diameter spring wire.

Master parts catalog says -

FB, EK, EJ, EH wagon/ute/van and all HD king-pin front springs are 7419138. 0.560" diameter wire.
FB, EJ, EH sedan front springs are 7412465.  0.560" diameter wire.
EK sedan front springs are 7419137.  0.560" diameter wire.  Don't know why EK sedan front springs are "sui generis".

Rob

Hi Rob,

Thanks for the assistance there.

The springs are stamped 7410727, so they are standard FE/FC commercial springs. I checked the spring diameter and they are 0.547" - I expect the extra .007" is rust build up. They fit perfectly in the tower without the addtional ring.

Looking at the bigger picture the rear springs have the Rogers Overload Shock Absorber Leaves added so she was clearly a work horse in the day. Being a country ute maybe the extra 3/8" ride height made a difference. So I suspect your poor man's country pack may be on the money. Interested to see if anyone else has come across this. I don't think I will put the addtional coil back in - but will keep it aside justin.

Cheers

 16 
 on: June 27, 2025, 10:11:02 AM 
Started by Jolls - Last post by Jolls
Careful with the sparks from the Dremel. Keep the area wet will help.

If you are lucky, their surface prep was bodgy and once you get under it the JB Weld may prize out in chunks.

If it’s only a pinhole or two, mebbe use JB weld again before the POR. Saves welding in the tank and all the kablooey risk.

Cheers,
Harv

Thanks Harv,

Welding/brazing fuel tanks always makes me nervous. JB Weld and POR is my preferred method of treatment; however, I have had to do a few bike tanks as the repairs have been in areas that needed to be painted. Cleaning is the key prior to any heat application - same prior to any grinding operation (or use of a vacuum cleaner).  I'm just about to head up to the shed to see what progress can be made.

 17 
 on: June 27, 2025, 09:59:41 AM 
Started by Jolls - Last post by Jolls
Jolls ..My FC sedan 1958 Sydney build never had seperate rear blinkers ..tail/ brake lights blinked in the top red lense ..bottom lense clear but doing nothing ..I got some globe holders , EK wiring diagram , put in the extra couple of wires as per that diagram , new blinker canister , and fitted amber LED globes ...for me its a safety thing , in general traffic we see amber blinkers all the time ..people dont see a blinking brake light in red ..poor old bugger got his wiring mixed up , his brake is blinking not his blinker lense ...win/win ..Vern ..

Thanks Vern,

I have purchased some orange/white LEDs and will use the clear lower lens so I can have both the reverse lights and indicators. My original plan was for blinking red as that was how my old FC worked as well - but I saw the logic of this argument. There is still part of me that wants to keep it original though. maybe I can hide a switch to flick between the two and be the poor old bugger when I feel like it.  Cheesy Cheesy Just kidding - safety wins over!

 18 
 on: June 27, 2025, 09:03:02 AM 
Started by Jolls - Last post by my8thholden
Jolls ..My FC sedan 1958 Sydney build never had seperate rear blinkers ..tail/ brake lights blinked in the top red lense ..bottom lense clear but doing nothing ..I got some globe holders , EK wiring diagram , put in the extra couple of wires as per that diagram , new blinker canister , and fitted amber LED globes ...for me its a safety thing , in general traffic we see amber blinkers all the time ..people dont see a blinking brake light in red ..poor old bugger got his wiring mixed up , his brake is blinking not his blinker lense ...win/win ..Vern ..

 19 
 on: June 26, 2025, 10:56:36 PM 
Started by Jolls - Last post by Harv
Careful with the sparks from the Dremel. Keep the area wet will help.

If you are lucky, their surface prep was bodgy and once you get under it the JB Weld may prize out in chunks.

If it’s only a pinhole or two, mebbe use JB weld again before the POR. Saves welding in the tank and all the kablooey risk.

Cheers,
Harv

 20 
 on: June 26, 2025, 10:30:00 PM 
Started by Jolls - Last post by Jolls
From the JB Weld site:

Q: How can I remove J-B Weld after it is fully cured?

A: When fully cured, J-B Weld can only be removed by grinding or filing it off, or by directly heating the product above the 600 degree maximum temperature threshold.

Heating the tank over 600F is an option once it is cleaned etc but not prior. So I will try to grind it out and see how I go with a combination of angle grinder and Dermmel.

Pages: 1 [2] 3 4 ... 10
Powered by MySQL Powered by PHP Powered by SMF 1.1.21 | SMF © 2015, Simple Machines Valid XHTML 1.0! Valid CSS!
Page created in 0.03 seconds with 13 queries.