|
Errol62
|
 |
« Reply #120 on: December 12, 2024, 02:56:59 PM » |
0
|
Good luck Craig 👍
Sent from my iPad using Tapatalk
|
|
|
|
|
 Logged
|
|
|
|
Jolls
nsw-club
Senior Member

 Offline Offline
Model: FC
Posts: 375

|
|
« Reply #121 on: January 05, 2025, 11:46:46 AM » |
0
|
I picked up the door card yesterday. Unfortunately the top stainless trim is missing and the centre trim is bent and creased. 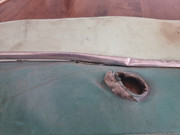 I will need to make a couple of custom dollys to work inside the damaged trim to get back into shape. I am a little concerned about working the trim cold given the depth of the crease. It doesn't look as bad in the photo as it does in real life. I have not worked on such thin stainless that is creased this badly. My current plan is to heat it with MAP and work it slowly; however, this is me thinking through the problem - not through expereience. Any experience based wisdom would be of great value before I start on this part of the process would be greatly appreciated. Cheers n Beers |
|
|
|
|
Logged
|
Cheers n Beers
Jolls
|
|
|
Jolls
nsw-club
Senior Member
Offline
Model: FC
Posts: 375
|
|
« Reply #122 on: March 05, 2025, 01:22:32 AM » |
0
|
It has been a while since I posted and update the ute. But to get to that we need to get a feel for where we are on the house reno!
The house reno is almost complete - ensuite complete, bathroom 97%, painting 90%. I have spent weeks lifting the old vinyl floor planks and stapled MDF underlay in preparation for the new flooring (which is to be laid next week). So I am up agaisnt the clock to have the skirts installed and painted this weekend. Nothing like a bit of pressure!
The best thing about the house reno coming to an end is that the FC resto can get into full swing. It will be a bit like Kingswood Country though - have to move the bikes to the get the FC off the hoist. Get the capri convertible out of one garage bay and put it on the hoist so I can work on the ute. That is much easier said than done - but it will be a great milestone to finally hit.
Despite the reno taking up most of my time I haven't been completely idle. Glenn has all of the parts and is in the process of building me up a set of FC special door cards and late model FC special seat covers, customised for a ute, in fall red and black. I have also purchased a set of stainless scuff plates from Sam Crupi to replace the rusted versions I currently have and I have a new rubber mat being made by Martin at Obsolete Rubber. However, I haven't progressed any further with the engine rebuild or any of the chrome work as yet.
I chased high and low for a second hand rotisserie and I was either too late or too far away to win any offers I put in on them, or the postage made them dearer to buy than a new one. So I bit the bullet and purchased a new one (don't have the time to build one). It will be a longer term investment as the sons and I have a couple of other projects to get stuck into once the FC is finished. Suffice to say - it was delivered last week and, sure as eggs, today one comes up at Wollongong for a few hundred beer tokens less. Always the way!
So there should be some real progess made towards the end of March - only to be interupted by a holiday doing the Darling river run over the Easter/ANZAC Day period.
Just got to take one bite at a time! We are crawling towards the end.
|
|
|
|
|
Logged
|
Cheers n Beers
Jolls
|
|
|
Jolls
nsw-club
Senior Member
Offline
Model: FC
Posts: 375
|
|
« Reply #123 on: June 12, 2025, 05:49:25 PM » |
0
|
So an exiting day today. Started on the body of the ute. The week before last saw the completion of the internal reno of the house and last weekend we had friends visit so I was busiy socialising. I took a day off work today and moved the bikes, shifted the wife's project (capri convertible) out, got the FC off the hoist and shuffled it all back around - wife's project on the hoist, bikes back in FC into the project bay. That is about where the excitement finished! I thought I would take the front subrame assembly out and mount the ute on the rotisserie. Disconnected all of the bits that I needed to, got the old girl on some stands and started on the job. Three bolts and a couple of screws on each side, two bolts each side at the bottom and pull it out complete then strip away the crossmember etc on the ground. Supported the assempby with a jack and some stands and started removing the bolts at the top - a few a little frozen bit get there with little fuss. Then to the bottom - only to find two nuts on each side. Seemed odd, one nut magically came off the other spinning on the bolt. Can't get to the bolt head as it is inside the sill area. Soaked it with some WD 40 while I had a think about it. Went back to the drivers side and tried to push the bolt in so I could get the assembly out, It would only push back a short distance - not enough to be able to prise the subframe over.  Went back to the passenger side and no luck, ended up pounding away with a cold chisel for about 1/2 hour and the nut split (so lucky). I was able to push that bolt back far enough to lever the sub frame arm out but the weight of the cross memeber made removinf the ineer bolts impossible. After wasting my time with jacks etc I removed the cross member and with a bit of persuasion and jiggling I was able to get the inner bots out. With a few more swear words I got passenger side of the sub frame out, rotated the frame a bit and was then abot to pull the assembly off the other bolt. Both side had had rust repairs done - average work to say the least as you can see throughpinholes in the welds. I expect that the bottom of the A pillars were rusted out so old mate put bolts in from the outside. Glad he didn't weld them otherwise I would be up the creek. Anyway will have to undo his repair and weld in some captive nuts so I can get it back together. Didn't get an opportunity to get it mounted on the rotisserie as I ran out of time. Maybe tomorrow. I found heaps of mud wasp nests inside the passenger side A pillar and more pinholes in the floor after using the persuader for a bit.  Still in pretty good nick for her age but now I have the guards and the like off some of the repairs coudl be better. He also welded the some of the sheet metal together instead of using screws. Looks neat but wil never be able to do a repair so I may have to chase some new bits. Once I cut out the bottom sill to remove the free spinning bolts I will have a better feel for how much work is involved. Plan is to mount the rotisserie to the spring mounts at the rear and to the upper mounting points for the subframe at the front. With a bit of luck I will be able to get the mounts made up tomorrow and start towards getting the old girl rust free and ready for paint.  |
|
|
|
|
Logged
|
Cheers n Beers
Jolls
|
|
|
Jolls
nsw-club
Senior Member
Offline
Model: FC
Posts: 375
|
|
« Reply #124 on: June 15, 2025, 08:15:42 PM » |
+1
|
I got the front mounted fine, using a level to ensure everything was good to go. I pulled the mounts for the rotisserie out and found that they aren't level but have a rise. I thought that they were raised so that the weight would pull them down to level. It didn't, but I was able to secure the front end and support it so I could get the rear end off and ready to mount. I will need to make up new mounts from the rotisserie to the front end that match the mounting system that was fabricated.
Moved the the rear end and was able to get the diff and spring shackles out pretty easily. I haven't been able to remove the front spring mounts yet; they have resisted all of my efforts. The manual simply says to knock the frotn shackle pins out, but my efforts with the brass hammer and 4ib sldge hammer with brass drift have had no effect. Any thoughts on how to approach this? I am thinking about applying a bit of heat and then bashing away with the brass hammer again but if there is a better method I'm all for it.
I have rethought the rear mounting system and have decided to it from some 5mm plate I have laying about. One for each bumprrette mount with a 100 x 100 x 5mm RHS between. I will mount cross bar to the rotisserie first and then tack it to the plates so I have the angles right. Looking forward to getting that done so I can really get stuck into the rust repairs.
|
|
|
|
|
Logged
|
Cheers n Beers
Jolls
|
|
|
Jolls
nsw-club
Senior Member
Offline
Model: FC
Posts: 375
|
|
« Reply #125 on: June 18, 2025, 09:15:57 PM » |
0
|
Made up the rear brackets today - 5mm plate and 5mm RHS off the bar mounting points. Raised it on the rotisserie and turned it over to have another crack at the front spring mounting bolts. After days with WD40 penetrating the rust I still couldn't get them out - either side. I think I will be forced to cut the bolts, remove the springs and work on what's left. Rotisserie woild well and thanks to the forum I was able to get the centre of gravity right first go.
|
|
|
|
|
Logged
|
Cheers n Beers
Jolls
|
|
|
|
ardiesse
|
|
« Reply #126 on: June 20, 2025, 04:32:51 PM » |
0
|
Front bolts for the rear springs?
They're very difficult to remove. If no joy with WD-40, then use heat. Go in hard with a MAP gas torch on the bracket where bolt head goes through. You'll need two people and two sledgehammers: one holding a hammer onto the inner bracket to act as a dolly and the second on the bolt. Unscrew the nut flush with the end of the bolt so you don't moosh the thread. With perseverance the bolt will let go. If it doesn't let go, use more heat on the inner bracket. Even up to cherry red.
(If you're not a good shot with the hammer, you may ding the sill. That's the price you've got to pay.)
Rob
|
|
|
|
|
Logged
|
Remember: if your Holden's not leaking oil, it doesn't have any.
|
|
|
Jolls
nsw-club
Senior Member
Offline
Model: FC
Posts: 375
|
|
« Reply #127 on: June 23, 2025, 05:09:07 PM » |
0
|
Front bolts for the rear springs?
They're very difficult to remove. If no joy with WD-40, then use heat. Go in hard with a MAP gas torch on the bracket where bolt head goes through. You'll need two people and two sledgehammers: one holding a hammer onto the inner bracket to act as a dolly and the second on the bolt. Unscrew the nut flush with the end of the bolt so you don't moosh the thread. With perseverance the bolt will let go. If it doesn't let go, use more heat on the inner bracket. Even up to cherry red.
(If you're not a good shot with the hammer, you may ding the sill. That's the price you've got to pay.)
Rob
Thanks Rob, I got them out - WD40 didn't work and neither did heat and two hammers initially. I ended up cutting the bolts with an angle grinder and then hitting the head out with heat, a punch and a couple of hammers. Unfortunately a waste of two perfectly good front shackle bolts as the previous owner had replaced the rubbers and bolts when he started the resto. They had been in place for over 20 years so the rubbers has started to split on the outside but apart from that were in perfect condition. The spring pack shims between the leaves were all but not existent so probably just saved the springs. The springs don't appear to be original and are beefed up from the standard ute springs shown in the manuals. The first giveaway was the addtional two bottom springs under the standard ute 6 leaf pack of 6 springs. The second being that metric nuts and bolts used in the leaf pack. Coould be a standard leaf pack that has been beefed up - not sure how to tell though. 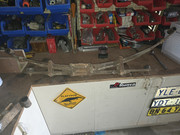 |
|
|
|
|
Logged
|
Cheers n Beers
Jolls
|
|
|
|
ardiesse
|
|
« Reply #128 on: June 23, 2025, 09:14:50 PM » |
0
|
Good that you got the springs out. I'd be mortally afraid of shattering an angle grinder disc given how little space there is between the spring eyes and the body.
Take a good look at the spring leaves in the six-leaf pack. The original leaves taper down to a couple of millimetres thick at the ends; and the ends of the leaves are curved. Aftermarket spring leaves generally don't taper in thickness toward the ends, and the ends are usually chamfered. And I wouldn't be surprised if aftermarket spring leaves are 50 mm wide instead of 2" (= 50.8 mm). You'd hardly tell the difference in width.
The rear spring centre bolt is 5/16" UNF originally, but M8 is an almost exact equivalent in diameter.
Rob
|
|
|
|
|
Logged
|
Remember: if your Holden's not leaking oil, it doesn't have any.
|
|
|
Jolls
nsw-club
Senior Member
Offline
Model: FC
Posts: 375
|
|
« Reply #129 on: June 24, 2025, 08:50:44 PM » |
0
|
Good that you got the springs out. I'd be mortally afraid of shattering an angle grinder disc given how little space there is between the spring eyes and the body.
Take a good look at the spring leaves in the six-leaf pack. The original leaves taper down to a couple of millimetres thick at the ends; and the ends of the leaves are curved. Aftermarket spring leaves generally don't taper in thickness toward the ends, and the ends are usually chamfered. And I wouldn't be surprised if aftermarket spring leaves are 50 mm wide instead of 2" (= 50.8 mm). You'd hardly tell the difference in width.
The rear spring centre bolt is 5/16" UNF originally, but M8 is an almost exact equivalent in diameter.
Rob
The leaves are 2", both the six leaf pack and the addtional two. The six leaf pack appears to be an original set from a ute/wagon as they are tapered and rounded as you would expect. 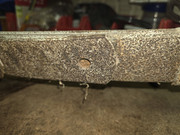 The addtional two bottom leaves do not taper and have square ends with rounded edges. I expect that they are aftermarket overload springs but haven't been able to find anything in my research. I don't have any history on the ute except that it was from the Dubbo area. When I pulled the leaf pack apart it didn't take much effort on the clamp to pull the leaves in to undo the bolts; so think that they are performing a lowering function. |
|
|
|
|
Logged
|
Cheers n Beers
Jolls
|
|
|
|
|
customFC
Moderator
Guru
 Offline
Model: FC
Posts: 5904
Ask me about microwaving cats for fun or profit.
|
|
« Reply #131 on: June 24, 2025, 10:40:18 PM » |
0
|
Hey Jolls.
Good to see the Accessory of the week section put to good use.
I also have a set that is only half the accessory spring.
Regards
Alex
|
|
|
|
|
Logged
|
|
|
|
Jolls
nsw-club
Senior Member
Offline
Model: FC
Posts: 375
|
|
« Reply #132 on: June 25, 2025, 08:09:20 AM » |
0
|
When I pulled the leaf pack apart it didn't take much effort on the clamp to pull the leaves in to undo the bolts; so think that they are performing a lowering function.
Correcting the previous post in case someone is reading this down the track regarding the springs: "When I pulled the leaf pack apart it didn't take much effort on the clamp to pull the leaves in to undo the bolts; so I don't think that they are performing a lowering function. |
|
|
|
|
Logged
|
Cheers n Beers
Jolls
|
|
|
Jolls
nsw-club
Senior Member
Offline
Model: FC
Posts: 375
|
|
« Reply #133 on: June 25, 2025, 01:43:49 PM » |
0
|
Got to work on the fuel tank and surrounds today. Tank still had a bit of fuel in it despite it being drained from the bottom of the tank. Interior and exterior look OK - I haven't removed the fuel sender unit yet to see if it is working - next on the agenda to do. While everything looked pretty good rust wise it didn't take much work with the wire brush to reveal some gremlins at the front of the tank. 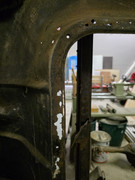 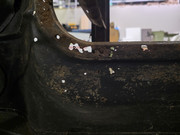 The rear looks and feels solid. Some of the holes aren't rust - looks like they have been punched with a nail or something similarr to get water out. Fortunatley both corners appear solid so I think I can cut out the rusted lips and make up a replacements with a bit of work with a hammer and anvil. The small sections around the lip I will cut out one at a time. |
|
|
|
|
Logged
|
Cheers n Beers
Jolls
|
|
|
Jolls
nsw-club
Senior Member
Offline
Model: FC
Posts: 375
|
|
« Reply #134 on: June 25, 2025, 01:46:37 PM » |
0
|
The rest of the body looks to be pretty much rust free or it has had a previous rust repairs. The unfortunatley they chose to weld repair sections in behind the rust as opposed to removing the rust so I will need to cut out some sections of the old material to save them from becoming the next problem I have to deal with. Better to do it right once than do it twice. There are also some pin holes in the welds that I should be able to touch up with the MIG to seal it all up. 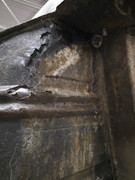 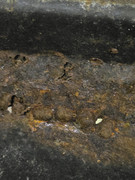 I expect I will find some more repairs to do when I go over the body inch by inch but pretty happy with what we have to work with so far. |
|
|
|
|
Logged
|
Cheers n Beers
Jolls
|
|
|
Jolls
nsw-club
Senior Member
Offline
Model: FC
Posts: 375
|
|
« Reply #135 on: June 25, 2025, 01:51:06 PM » |
0
|
The guards are a different story, both have been repaired and again the repair has been done behind the panel. I suspect that the hole in the panel has then been filled with bog. I will need to get in there and have a good look at what has ben done to determine if I do some rework or seal the back of the repairs and let them be. 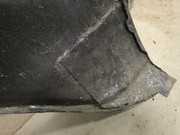 |
|
|
|
|
Logged
|
Cheers n Beers
Jolls
|
|
|
Jolls
nsw-club
Senior Member
Offline
Model: FC
Posts: 375
|
|
« Reply #136 on: June 26, 2025, 03:50:39 PM » |
0
|
Started on the front end this morning Ripped off the drums - no shoes and the brake shoe link pin bolt was missing on the driver's side. So another part to chase. The drums need to be machined, I trust that there is enough meat left in them to be of some use. One of the mounting bolts snapped off in the driver's side brake cyclnder when I wqs removing it from the backing plate, so I will need to drill it out. Both wheel cylinders are seized so still a bit of work to do there. Checked the king pins for play - driver's side was worse that the passengers but both need to be done. I have already purchased a kit from Rares so it will be off the the machine shop to get that job done. Another bolt snapped off undoing the passenger shock absorber mounting plate - so I will have to grind it out and weld in a replacement. As the crossmember is out of the ute I used a tie down strap to hold the spring under tension while I removed the upper and lower steering knuckle pins to removed the steering knuckles and stub axle from each side. Once I had the sterring knuckle removed I released the tie down to and removed the springs. Very easy solution to the problem of doing this out of the vehicle. The springs had a separate ring in addtion to the insulating spacer and shim on the driver's side. Not sure what the go is there so I posted a question in the technical thread.  The upper and lower control arms were checked for play and were fine. I removed them though as the rubbers were perished and it provided an opportunity to clean off the dirt and road grime. So all ready to go back together once I get the kingpins replaced. Ineed to wade through the rubber kit that was provided to see if I have all of the compnents I need to put it back together. If not Speeds Spares in Canberra is not too far and they are a Rare's distributor. While I was in the shed I painted the rear spring leaves - in Rustoleum Orange (had it on the shelf from another project). I'm a wests tigers supported so with the bottom of the car black and orange springs I'll be doing my bit to support them.  |
|
|
|
|
Logged
|
Cheers n Beers
Jolls
|
|
|
my8thholden
nsw-club
Senior Member
Offline
Model: FC
Posts: 863
|
|
« Reply #137 on: June 27, 2025, 09:03:02 AM » |
0
|
Jolls ..My FC sedan 1958 Sydney build never had seperate rear blinkers ..tail/ brake lights blinked in the top red lense ..bottom lense clear but doing nothing ..I got some globe holders , EK wiring diagram , put in the extra couple of wires as per that diagram , new blinker canister , and fitted amber LED globes ...for me its a safety thing , in general traffic we see amber blinkers all the time ..people dont see a blinking brake light in red ..poor old bugger got his wiring mixed up , his brake is blinking not his blinker lense ...win/win ..Vern ..
|
|
|
|
|
Logged
|
these days i'm half as good for twice as long
|
|
|
Jolls
nsw-club
Senior Member
Offline
Model: FC
Posts: 375
|
|
« Reply #138 on: June 27, 2025, 09:59:41 AM » |
0
|
Jolls ..My FC sedan 1958 Sydney build never had seperate rear blinkers ..tail/ brake lights blinked in the top red lense ..bottom lense clear but doing nothing ..I got some globe holders , EK wiring diagram , put in the extra couple of wires as per that diagram , new blinker canister , and fitted amber LED globes ...for me its a safety thing , in general traffic we see amber blinkers all the time ..people dont see a blinking brake light in red ..poor old bugger got his wiring mixed up , his brake is blinking not his blinker lense ...win/win ..Vern ..
Thanks Vern, I have purchased some orange/white LEDs and will use the clear lower lens so I can have both the reverse lights and indicators. My original plan was for blinking red as that was how my old FC worked as well - but I saw the logic of this argument. There is still part of me that wants to keep it original though. maybe I can hide a switch to flick between the two and be the poor old bugger when I feel like it.  Just kidding - safety wins over! |
|
|
|
|
Logged
|
Cheers n Beers
Jolls
|
|
|
Jolls
nsw-club
Senior Member
Offline
Model: FC
Posts: 375
|
|
« Reply #139 on: June 27, 2025, 06:33:38 PM » |
0
|
Between work today I was able to sneak in a little effort on the ute. I wanted to prep te fuel tank to be sealed with POR 15, but when I went to pull out the fuel sender yesterday I found it had been sealed in with what looked like JB Weld. It was certainly harder than body filler and was grey in colour. My plan was to clean the tank to prevent a vapour explosion from sparks and then grind out the JB Weld with a an angle grinder and the dremmel. When I took it outside in the sun to start this I noticed one edge looke like it was lifting so I grabbed a cold chisel and a hammer and took to it as an experiment. It started to flake off in small chunks so I kept going and half and hour later I had exposed the cap over the sender unit and with a bit of effort I was able to pry it out. The "sealant" material did not stick to the tank itself but was bonded to the sender cover. I was able to get if off with a bit of effort on the wire wheel. I can only imagine that the fuel sender was leaking so it was sealed in. I removed the sender unit - it was stuck solid in the empty postion. The tank insides are heavily varnished so it will take a bit of work to prep it for the POR. I put the tank aside and focussed my effort on the sender unit. 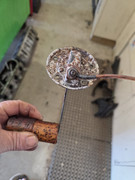 First job was to blast the crud off the outside - took a couple of minutes to do and it looked good I drilled out the rivets and separated the rheostat from the moving contact. 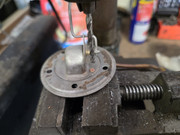 The internals were covered in varnish and stuck solid. I could not get any movement. 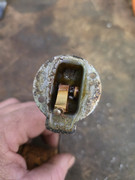 Not wanting to break anything I decided to stick the float and contact into some fresh fuel to "melt" the varnish. I cut off the float so it would fit in a small jar and soaked it for a while - no luck with that. I had the twin carbies lined up to go into the untrasonic cleaner so I hit the added some more fuel to the glass jar and stuck that in with the hot water and finish dishwashing tablets amd let the untrasonic cleaner do its thing. The fuel sender parts came out clean on the outside but still had varnish on the inside - but the varnish just flaked off when touched - so a couple so minutes with a pick and small falt screwdriver and the interior was clean. The heat and vibrations had softened up the fuel varnish so I was bale to slowly get the float arm to move and finally with a few more dips in the warm fuel and a bit of carby cleaner spray the movement freed up. A quick check for continuity and then resistance readings 0.2 ohms at empty and 33 ohms at full and we had enough to make a functioning fuel sender. So I used the MIG to weld the float arm back on and we were good to go. Hand assembled and tested it could get the full range of movement and had 0 ohms at empty and 32 ohms at full. Close enough for me so now it is a matter of finding some brass rivets of the right size and we have saved about 180 beer tokens. As for the carbies - came out clean - still need to go over them. |
|
|
|
|
Logged
|
Cheers n Beers
Jolls
|
|
|
|


