|
COL58FE
|
 |
« on: October 11, 2005, 09:58:24 AM » |
0
|
g'day, into day three of my resto, here some shot's i thought i'd share. found a couple of pin holes in headlight peak's,other than that so far so good touch wood.  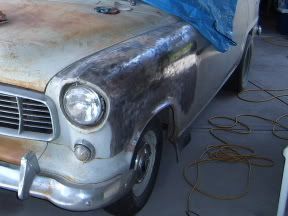 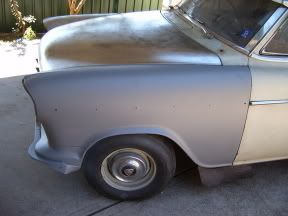 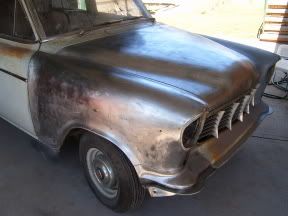 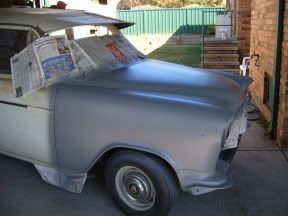 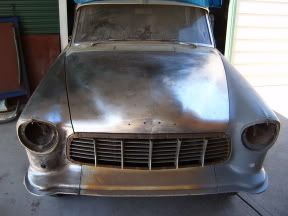 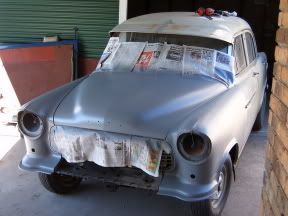  just a little concerned about these black stain mark's in the metal,will they effect final paint work (come back through).i couldn't seem to sand it out,as it's only in etch prime for now.easy to work with while still mounted,any idea's would be great. cheer's col. |
|
|
|
|
 Logged
|
|
|
|
|
mcl1959
|
|
« Reply #1 on: October 11, 2005, 10:09:17 AM » |
0
|
I think a once over with Deoxidine would do it.
Ken
|
|
|
|
|
Logged
|
|
|
|
|
20.4_seconds
|
|
« Reply #2 on: October 11, 2005, 06:39:46 PM » |
0
|
Great pics Col....I have sent you a pm about this... Nick |
|
|
|
|
Logged
|
All I want for Christmas is a Smiths clock bracket and knurled knobs
|
|
|
graham_fuller
nsw-club
Guru

 Offline Offline
Model: FE
Posts: 1988
I love YaBB 1 Gold!

|
|
« Reply #3 on: October 11, 2005, 11:47:45 PM » |
0
|
Hi Col,
Did you use paint stripper to get to this point?
Cheers,
Graham
|
|
|
|
|
Logged
|
|
|
|
|
SpeciFEcation
|
|
« Reply #4 on: October 12, 2005, 12:43:33 AM » |
0
|
Hi Col,
Did you use paint stripper to get to this point?
Cheers,
Graham Pretty much the question I asked via a PM - I thought it was too much of a 'noob' question to ask in the 'open'..... |
|
|
|
|
Logged
|
|
|
|
|
20.4_seconds
|
|
« Reply #5 on: October 12, 2005, 12:51:11 AM » |
0
|
|
|
|
|
|
Logged
|
All I want for Christmas is a Smiths clock bracket and knurled knobs
|
|
|
|
Ed
|
|
« Reply #6 on: October 12, 2005, 03:40:22 AM » |
0
|
Nice going on 3 days work Col..
...how did you strip the paint?
Cheers
Ed
|
|
|
|
|
Logged
|
in the shed
|
|
|
|
SRVLIVES
|
|
« Reply #7 on: October 12, 2005, 06:01:36 AM » |
0
|
And with the panels still on the car?
|
|
|
|
|
Logged
|
|
|
|
|
COL58FE
|
|
« Reply #8 on: October 12, 2005, 09:08:53 AM » |
0
|
thank's fella's, cheer's ken thank's again for your info.as for the stripper i chose not to use it this time,i used a linish pad on a 4 inch grinder, then a wire wheel on a hand drill and then some hard hand sanding to smooth it all off. it was amazingly pretty fast too as i stated three day's and that was between beer's. cost so far f/a. cheer's col. |
|
|
|
« Last Edit: October 12, 2005, 09:10:20 AM by dawry351 »
|
Logged
|
|
|
|
|
TorqueFC
|
|
« Reply #9 on: October 12, 2005, 09:19:37 AM » |
0
|
very very good stuff there col.
good progress, day three already and youve done all that :O:O:O
keep up the good work
regards
Darcy
|
|
|
|
|
Logged
|
tests have proven that the final words before a fatal urban car crash are "OH ****"
in a rural car crash they are " Hold my stubby and watch this for skill!"
|
|
|
|
HARKO
Guest
|
|
« Reply #10 on: October 12, 2005, 09:25:12 AM » |
0
|
I see the fats on the back have made an apearance - theres a good start  . Is a linish pad a rust and paint remover pad ? If so they are highly recomended ,Dusty but no mess of stripper and just be weary of using them on late model stuff as it warps panels - not a prob on FE FCs even with the gooey laquer |
|
|
|
|
Logged
|
|
|
|
|
COL58FE
|
|
« Reply #11 on: October 17, 2005, 10:52:14 AM » |
0
|
g'day, this is what i got done on the week end. this time it took two day's as the red lead was heap's harder and thicker to get off,but i won in the end.  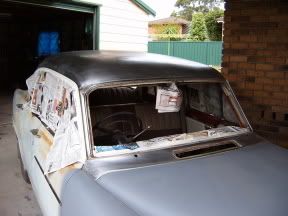 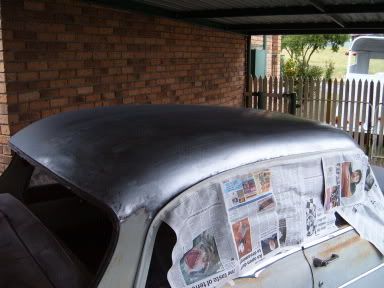 cheer's col. |
|
|
|
« Last Edit: October 18, 2005, 06:42:57 AM by dawry351 »
|
Logged
|
|
|
|
|
COL58FE
|
|
« Reply #12 on: October 29, 2005, 01:41:11 AM » |
0
|
g'day, starting to do the back 1/4er's and boot lid this week end,i'll post pic's sunday arvo.roof is etched up ready for improvement. 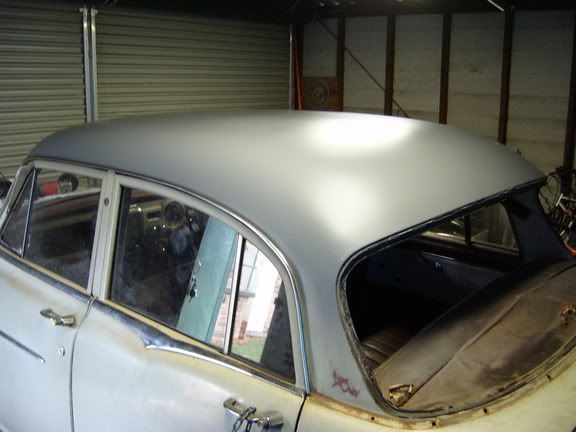 cheer's col. |
|
|
|
|
Logged
|
|
|
|
|
Blown_FC
|
|
« Reply #13 on: October 29, 2005, 04:56:28 AM » |
0
|
Col, don't tell me you are doing a Mr Bean on us now ?
What's with the chain on the Left Rear Door....is that a new type of Nasco Rear door lock ? ( ha ha ).
Cheers
Mark
|
|
|
|
|
Logged
|
|
|
|
|
COL58FE
|
|
« Reply #14 on: October 30, 2005, 08:39:14 AM » |
0
|
G'day, The chain is a security device for my son's quad, if they want the quad they have to take the FE as well, or atleast the door. Cheer's Col  |
|
|
|
|
Logged
|
|
|
|
|
COL58FE
|
|
« Reply #15 on: November 15, 2005, 10:47:58 AM » |
0
|
G'day again, here some pic's of my effort's to date,the rear end took two week end's as there was a lot of hand sanding around the tail-light's.in the end my finger's felt like the day i first got the cane at school (sore), but well worth the pain.sorry i didn't take any bare shot's this time,i came across a little bit of rust too in this round.but getting there,should i weld up or replace the headlight peak's.until next round cheer's col.  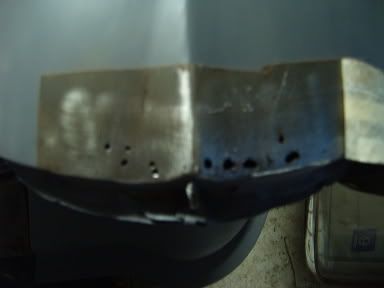 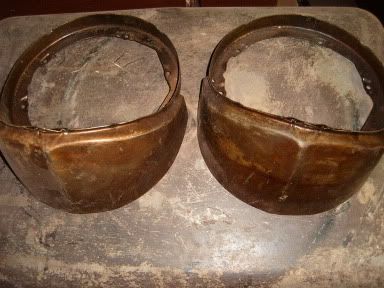 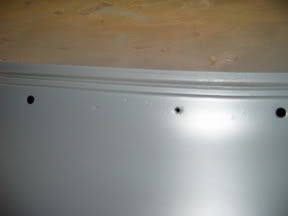 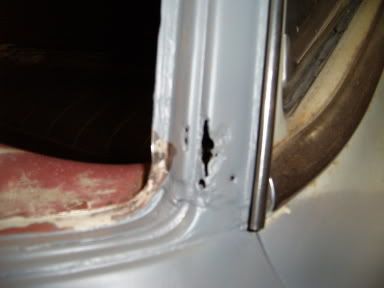 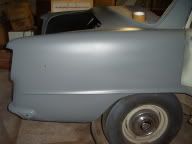 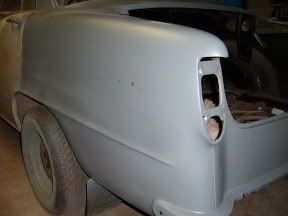 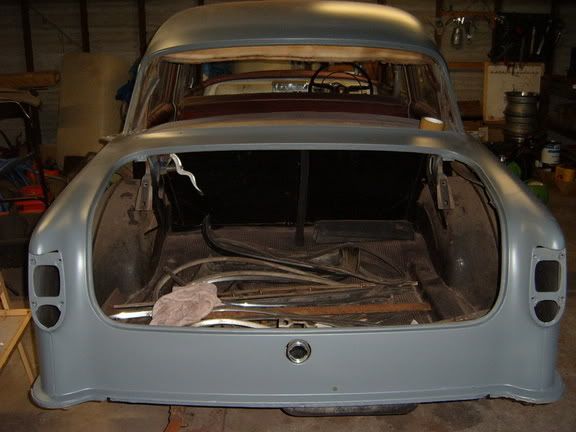 |
|
|
|
|
Logged
|
|
|
|
|
Ed
|
|
« Reply #16 on: November 15, 2005, 09:14:41 PM » |
0
|
should i weld up or replace the headlight peak's.until next round cheer's col. HEy Col, clean car you've got there. zap the holes up with a MIG then give the underside a coat with some rust proof paint. Cheers Ed |
|
|
|
|
Logged
|
in the shed
|
|
|
|
fe hotrod
|
|
« Reply #17 on: November 15, 2005, 10:25:04 PM » |
0
|
;)Good to see another good old clean fe thats going to hit the road!!!i wouldnt be using those headlight peaks for that amount of rust in those gaurds,id be mig weld filling them and putting those rust repair sections back on the shelf,maybe for the next project??must say you have got it looking real sweet ;)jamie |
|
|
|
|
Logged
|
|
|
|
|
20.4_seconds
|
|
« Reply #18 on: November 15, 2005, 11:11:06 PM » |
0
|
Looking really good there Col, you are showing some of us the way Keep those pics and updates flowing Nick |
|
|
|
|
Logged
|
All I want for Christmas is a Smiths clock bracket and knurled knobs
|
|
|
|
COL58FE
|
|
« Reply #19 on: November 16, 2005, 06:07:17 AM » |
0
|
thank's fellas, no worries look's like the mig a go then, by the way has anyone got a good piece for that left front A-pillar rust hole as it's a bit to big to fill with weld i think.anyway back to it. col. |
|
|
|
|
Logged
|
|
|
|
|


