Jolls
nsw-club
Senior Member

 Offline Offline
Model: FC
Posts: 381

|
 |
« Reply #160 on: July 21, 2025, 08:35:29 PM » |
0
|
There are many methods of timing gear replacement. Here is one from Cowell, SA, featuring the panelbeater and his friend, the John Deere mechanic.
...
All in all, a great success. A major engine problem on a Friday afternoon at Port Lincoln, fixed in a day.
Rob
Love that story and the picture it paints of country Oz. I know the panel beater in town - no John Deer store though! I'll let you know how I get on - just had another thought. I'm sure that I have a two piece bearing puller up in the shed - will pull it out and see how that goes before taking to the cam with an angle grinder. I will use progressive steps of violence until the job is done! |
|
|
|
|
 Logged
|
Cheers n Beers
Jolls
|
|
|
|
Errol62
|
|
« Reply #161 on: July 22, 2025, 09:17:17 AM » |
0
|
I remember removing a broken fibre gear from a black 202 in my VK Berlina. Grinding, chiselling and heat all came to play. The failure actually occurred between Port Augusta and Iron Knob, but we towed the car back up to Leigh Creek for the repair, some 300km.
Sent from my iPhone using Tapatalk
|
|
|
|
|
Logged
|
|
|
|
Jolls
nsw-club
Senior Member
Offline
Model: FC
Posts: 381
|
|
« Reply #162 on: July 22, 2025, 07:43:23 PM » |
0
|
A bit of grinding, the bearing puller and a tad of MAP heat got the job done. Had to do it pretty much one handed as I have a tendonitis in my left shoulder and am off from work for the week.
Cam, alloy timing gear and cam followers, plus one spare, are off to Clive to work his magic. Spoke with Masterstroke Enginering and the head will be picked up Monday or Tuesday next week. I have a funeral on Thursday in Sydney so will take the opportunty to visit some relos/friends before I head back over the weekend/ and head back on the weekend. I had planned to get some more rust work done this week - but I guess that is on the back burner. I will probably start work on the steering and pedal box tomorrow so we are at least progressing.
|
|
|
|
|
Logged
|
Cheers n Beers
Jolls
|
|
|
Jolls
nsw-club
Senior Member
Offline
Model: FC
Posts: 381
|
|
« Reply #163 on: July 28, 2025, 12:30:27 PM » |
0
|
Got word back on the FB motor today. The good news was that it was still the original bore, crank etc. That was the end of the good news.
Nothing was in spec. The bores were so worn that they are going straight to 60thou over. Everything else to the next over/undersize. Block will be surfaced while they are at it. Probably would have been slightly cheaper to buy a donk that had already been done. But where is the pain in doing that?
Combine that with the head and reground cam I expect that we will be pretty well matched with the 3 36 diff centre we picked up last week.
Oil pump is now good to go and the fuel pump, after an hour in the ultrasonic cleaner, is ready to put back together for testing. Diaphragm is good so I trst all I will need is to make a fuel bowl gasket to have it serviceable.
Having troubles finding the missing front brake components. What I have found available so far is in the form of complete front ends at the end of long drives to pick up.
It is a patience game so I expect something will turn up in due course.
Starting to hand over the construction business to my sons so look forward to having some time on my hands to get stuck into the old girl.
Sent from my SM-S938B using Tapatalk
|
|
|
|
|
Logged
|
Cheers n Beers
Jolls
|
|
|
|
ardiesse
|
|
« Reply #164 on: July 28, 2025, 07:46:35 PM » |
0
|
Craig,
What front brake components do you need?
Rob
|
|
|
|
|
Logged
|
Remember: if your Holden's not leaking oil, it doesn't have any.
|
|
|
Jolls
nsw-club
Senior Member
Offline
Model: FC
Posts: 381
|
|
« Reply #165 on: July 28, 2025, 09:50:57 PM » |
0
|
Craig,
What front brake components do you need?
Rob
Hi Rob, The front brakes were missing, from the GMH Shop Manual (Fig 5.1 page 5-1): - Item 6. Bolt and Spacer Assembly - Brake Anchor;
- Item 7. Link Brake Shoe; and
- Item 8. Pin Assembly - Brake Shoe Link.
The rest, springs and retainers etc., I think I can scrape up from the spares that came with the ute. Cheers Craig |
|
|
|
|
Logged
|
Cheers n Beers
Jolls
|
|
|
Jolls
nsw-club
Senior Member
Offline
Model: FC
Posts: 381
|
|
« Reply #166 on: July 28, 2025, 09:57:26 PM » |
0
|
Craig,
What front brake components do you need?
Rob
Here is an extract from the manual I am using. 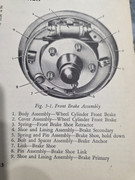 |
|
|
|
|
Logged
|
Cheers n Beers
Jolls
|
|
|
|
ardiesse
|
|
« Reply #167 on: July 29, 2025, 07:56:53 PM » |
0
|
Craig,
I have the links and pins, and am pretty certain I have the anchor bolts and spacers. Do you need one side or two sides?
Rob
|
|
|
|
|
Logged
|
Remember: if your Holden's not leaking oil, it doesn't have any.
|
|
|
Jolls
nsw-club
Senior Member
Offline
Model: FC
Posts: 381
|
|
« Reply #168 on: July 29, 2025, 08:06:01 PM » |
0
|
Craig,
I have the links and pins, and am pretty certain I have the anchor bolts and spacers. Do you need one side or two sides?
Rob
Hi Rob, I need both sides. If you have some that you could spare it would be awesome. Let me know how many beer tokens and I'll sort something out with you. Cheers Craig |
|
|
|
|
Logged
|
Cheers n Beers
Jolls
|
|
|
Jolls
nsw-club
Senior Member
Offline
Model: FC
Posts: 381
|
|
« Reply #169 on: August 15, 2025, 02:41:25 PM » |
0
|
I am finishing up work and in the process of winding up the building company. So I have had a bit more time to spend on the ute - not as much as I would like but we are heading in the right direction. I may be working for the boys to help build a couple fo sheds over the next month or so but then I am definitely out of the business except for guest appearances. More of a Scott Cam type role. Anyway, so the progress. I got the cam back from Clive Cams last Friday so it was taken into Phillip Head Services who are doing the machining to ensure all of the bearings are correct etc. I had an alloy timing gear that I had planned to use but as couldn't determine how it was going to mate with the existing gear I decided to put is aside for now and oder in a matched set. I don't want to have to pull the engine back down to play around with mismatched timing gears. When I redo the tired old original FC engine, which I trust just needs a hone and rings, I will see if I can use it then. The head is being finished up at the moment and I expect to get it back late next week. If you have followed the recent thread on resleeving brakes ( https://forum.fefcholden.club/index.php?topic=28669.0 you will know that I was missing some front brake parts. Rob has generously provided the missing parts so that can progress. Thanks so much for your advice and support Rob. I started on the rear brakes yesterday and had heaps of trouble trying to get the drums off. The adjusters ware rusted solid. After several soaks in WD40 and a bit of persuasion with a hammer I was able to get them to rotate and loosen off the shoes; but, still couldn't get the drums off despite them rotating reasonably freely. After much effort with a couple of small pry bars and the application of some brute force with the hammer I was able to get the shoes to show and with a combination of hammer and lever work got them off. They had been down to bare metal several times on both sides by the looks of it and the step in the drums was so deep I couldn't get it over the shoes. To remove the passenger side the friction material had to be broken away. The depth of the step in the drums is 2.7mm on one side and 2.6mm on the other (so 5.4mm and 5.2mmm over respectively). This works out to be around 9 7/32" diameter so I don't think they are salvagable. On the good news front the 3.36 diff I picked up for $30 is in excellent condition. I will replace the wheel bearings and all of the seals etc before I put is into service though. I will head off to Speeds Spares (Rare Spares dealer in Canberra) to pick up the seals, bearings and a later model uni joint and U bolts. I did have a bit of a scare as for the life of me I couldn't find the tailshaft. I also couldn't remember if I had picked one up with the ute when I bought it so I had no idea if I needed to buy one or find one. After a bit of angst and a lot of searching I eventually located it hidden in behind a few spare VY/VX tailshafts leaning up against the shed wall. Not sure how it got there as all the FC parts were in one location. I will blame it on Son 2 tonight! Anyway, I have a good spare original FC diff if anyone is in need. The fuel tank has been prepped for POR and the pinholes filled with fuel rated JB Weld. With a bit of luck I will knock this over on the weekend. When I put the fuel pump back together the diaphragm split so I need to purchase in a kit to bring it back to all of its glory. I am using an FB/EK style fuel pump as I'm not using the vacuum wipers. I completed an audit of the wiring harness and ordered additional cables and joiners from Vintage Wiring to repair what I have and to run the addtional circuits that weren't included in the comercial vehicles - indicators, radio, heater etc. They are in the post. I have come up with a first draft design for a 3D printable screw together fusr holder that is close to what the originals looked like. I need to curve the ends to look the part (beyond my current skill level) but I will get there. Now I have to convince SWBO that "we" need a 3D printer!  No progress on the bodywork unfortunatley so she is still on the rotisserie just hanging around. Plan for next week is to look at the steering box - it is out laying on the garage floor screaming at me to give it some attention. Any tips on what I should be aware of before I dive into it? Cheers n Beers |
|
|
|
|
Logged
|
Cheers n Beers
Jolls
|
|
|
|
ardiesse
|
|
« Reply #170 on: August 16, 2025, 09:51:47 AM » |
0
|
Craig,
The upper bearing surface on the steering shaft (aka wormshaft) will probably be pitted from lubrication failure, as will the bearing race pressed into the steering box housing. If you're unlucky, the same will be true of the lower wormshaft bearing and race (pressed into the big adjuster nut). This is not a game-stopper. Apparently there's a guy in Smithfield who can regrind the bearing surfaces. One of the NSW club members has recently had his steering box reconditioned by him.
To remove the bearing race from the adjuster nut, lay a nice big fillet of weld on the inside of the race. As the weld cools, it'll shrink the race, which will then drop out.
If you're super unlucky, the threaded part of the wormshaft (where the recirculating balls run) and the ball nut will be pitted too. This means game over.
The sector shaft tends to wear right close to the sector, and the sector shaft bushes also wear out. Rare Spares may have replacement sector shaft bushes. Otherwise Statewide Bearings in Smithfield has the right size bronze bushes, but they will require line-reaming after installation.
Another trick on reassembly is to turn the ball nut upside-down. This makes the teeth mesh on an unworn part of the ball nut.
Pull the sector shaft out, remove the adjuster nut, slide the steering shaft and ball-nut out as an assembly, and post lots of close-up photos.
Rob
|
|
|
|
|
Logged
|
Remember: if your Holden's not leaking oil, it doesn't have any.
|
|
|
Jolls
nsw-club
Senior Member
Offline
Model: FC
Posts: 381
|
|
« Reply #171 on: August 16, 2025, 06:10:51 PM » |
0
|
Thanks Rob,
Thanks for the advice, I'll let you know wha tI find tomorrow.
Cheers
|
|
|
|
|
Logged
|
Cheers n Beers
Jolls
|
|
|
Jolls
nsw-club
Senior Member
Offline
Model: FC
Posts: 381
|
|
« Reply #172 on: August 18, 2025, 08:53:29 AM » |
0
|
So I have pulled down the steering column most of the way. I haven't been able to remove the selector tube. I has been repaired in situ as I had to file the weld off the selector bolt to undo it. The repair makes it selector sube wider than the column (see photo). Unless there is some magin trick to removing it I think I need to cut the repair off, without damaging the column, and remake it so it can be re-installed. Have I got this right or is it rewelded correctly and I simply don't understand how to remove the selector tube (see photo below).. 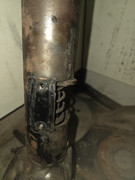 The rest of the components are useable though. All were well lubricated with moly based grease, show no pitting and are quite tight for an old girl. 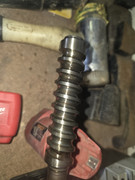 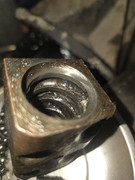 The runing gear I am looking at over in Wagga on Wednesday comes with a complete steering column as well so I can use the best of them and retain the other as a spare. |
|
|
|
|
Logged
|
Cheers n Beers
Jolls
|
|
|
|
ardiesse
|
|
« Reply #173 on: August 18, 2025, 10:20:34 AM » |
0
|
Craig,
You got very lucky with the steering box.
The attachment of the lower gearshift lever to the gearshift tube is a known weak point in FE-FCs. Yours has definitely been repaired. Normally, you'd remove the bolt attaching the lower lever, remove the lower lever, then slide the tube out of the column.
If the lower shifter lever mates up correctly with the gearshift tube and the bolt holds it firmly in place, then there's no need to remove the gearshift tube from the column. Clean the sliding surfaces and lubricate well, then you should be good to go.
One other recommendation is to use an EK-HR lower selector lever, complete with nylon "half-moon" trunnions. It'll give you much improved gearshift action. (This is the one which screws onto a stud protruding from the column jacket.)
Post a photo of the lower levers so I can identify them . . .
Rob
|
|
|
|
|
Logged
|
Remember: if your Holden's not leaking oil, it doesn't have any.
|
|
|
Jolls
nsw-club
Senior Member
Offline
Model: FC
Posts: 381
|
|
« Reply #174 on: August 18, 2025, 09:22:41 PM » |
0
|
Hi Rob, Thanks for the advice. The lower levers are shown below: 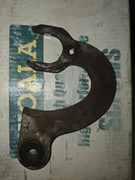 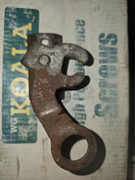 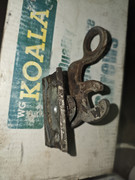 |
|
|
|
|
Logged
|
Cheers n Beers
Jolls
|
|
|
|
ardiesse
|
|
« Reply #175 on: August 19, 2025, 11:22:00 AM » |
0
|
Craig,
All stock FC lower levers. Couldn't make it out too well, but I hope the lower shift lever isn't too worn where the "fingers" of the selector lever bear on it. I'd suggest an EK-HR lower selector lever.
Advanced Gearshift Upgrade: EK-HR lower shift lever, but you also need the special cup washer that goes with it. *But* you'd have to raid an EK-HR gearshift tube for the collar (brazed on) and swap it over to the FC gearshift tube. The collar would have to be jigged into place so it's square and correctly positioned.
As you can tell, I'm exploring these options for "Found Object" (if'n'when I get back to it . . . )
Rob
PS - I have a few spare FE-FC brake drums. There might even be a serviceable pair among them.
|
|
|
|
|
Logged
|
Remember: if your Holden's not leaking oil, it doesn't have any.
|
|
|
Jolls
nsw-club
Senior Member
Offline
Model: FC
Posts: 381
|
|
« Reply #176 on: August 19, 2025, 12:03:40 PM » |
0
|
Thanks Rob,
The levers both look to be in good shape and not too worn. The linkages on the other hand are in terrible conditions and need to be built up and filed back round. Should be no trouble with the MIG.
I am off to Wagga tomorrow afternoon to have a look at a complete front end, diff and steering gear. It may have a good selector tube and soem usable brake drums. Perhaps I'm being a little too positive given the age of the parts.
I just came a cropper with the fuel pump resto - picked up the kit only to find that what I have isn't a grey motor pump. I expect that it is a red motor version, so will do a run into town and change the kit over.
For a couple of extra sheckles I could have bought an aftermarket red motor fuel pump with glass bowl and for a few sheckle less an after market red motor pump with no bowl.
I do have the original fuel/vacuum pump on the other grey if I need to use it- decisions, decisions.
Wiring harness extension cables and connectors arrived from Vintage Wiring today so that is another parts piece ticked off. I have put that aside as I won't even look at that until the paint is done.
Cheers
|
|
|
|
|
Logged
|
Cheers n Beers
Jolls
|
|
|
Jolls
nsw-club
Senior Member
Offline
Model: FC
Posts: 381
|
|
« Reply #177 on: Yesterday at 11:35:42 PM » |
0
|
Picked up the running gear from a sedan from Wagga this evening. The gear came out of a running 58 model that is having a heart transplant to a supercharged blue motor. I pulled the two drums off the diff and they are in good nick so I didn't inspect any further and took the bundle of parts that were on offer. In addtion to the drums being in good nick the brake linings look almost new so the shoes are probably useable. The front end appears to have good king pins, wheel bearings and tight steering linkages. I'm looking forward to pulling the front drums to see if I have a couple of spare drums and another set of usaeble shoes. When I inspected the steering column it looks like the selector tube is unmolested. I will pull it down and use it as a template to undo the repair on the one I have and re-repair it to the correct dimensions. With luck the bearing race and worm drive will be in good nick as well. In addtion to the brake drums, as part of the deal, I picked up three FE/FC hub caps in average to good condition and one HR? one, a set of sedan rear leafs, and four rims with tyres. So overall I'm pretty happy with the find. Rob, once I check the front end I trust that I'll be able to send the bake parts you sent down back. Thanks all for the advice - I think that I now have all of the machanical components sorted. As to progress today: - 3.36 centre is now in the housing and the oil seals have been fitted. My press is a little too short to press the bearings and collars back onto the shafts so Son 2 will get them sorted at one of his mate's workshops (he's a spanner turner by trade).
- Son 3 was able to change the FB/EK fuel pump kit for a red 6. We'll see how that goes together tomorrow.
Cheers n Beers |
|
|
|
|
Logged
|
Cheers n Beers
Jolls
|
|
|
|
ardiesse
|
|
« Reply #178 on: Today at 11:20:51 AM » |
0
|
Craig,
You've done well with that lot. On FC front suspensions, the lower control arm shafts can get loose in the crossmember.* You can only tell when the front springs have been removed.
Sooo - if it turns out that "Found Object's" front suspension has loose lower control arm shafts, I'll give you a call.
*How do I know? Bitter experience. On my grey FC, it took a lot of work with a welder and a file to fix the holes in the crossmember. There are more than a few Holdens with the lower control arm shafts welded in place. That makes replacement even more frustrating.**
**How do I know? Experience, again. This time an HD Premier I restored.
Rob
|
|
|
|
|
Logged
|
Remember: if your Holden's not leaking oil, it doesn't have any.
|
|
|
Jolls
nsw-club
Senior Member
Offline
Model: FC
Posts: 381
|
|
« Reply #179 on: Today at 04:30:49 PM » |
0
|
So today I picked up the engine and its associated goodies and got it mounted back on the stand ready to start the rebuild. Rope seals in an oil bath at the moment in preparation for getting to work on it tomorrow afternoon. Pulled down the steering column; the first thing I noticed was that the end cap came off as soon as I undid the screws as the lash adjustor was not engaged.pitman shaft gear was rubbing against it. I will need to check the end clearance when it goes back together to see if it is worn. If it is I will build it up and then cut it back to spec. It also has a good worm drive and bearing surfaces; again because it was well greased, but using a GP grease as opposed to moly. I think that the selector shaft is in good condition and the selector connection is sound. 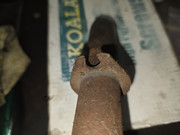 On closer inspection of the one I had already it appears that a washer has been welded onto the shaft to stop the selector from being prised off the shaft. I assume that there was some issue there at one time. I will grind the washer off the back and remove the selecotr shaft tomorrow. The indicator mechanism and horn contact came with it an are also in good used condition. 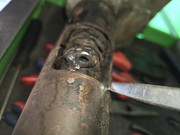 My plan at this stage is to determine which selector shaft is best, clean up the original one and put it all back together, then repair/reinforce the original selector shaft and put the other one back together as a spare. I did not get to stripping down the front end today but it does look in pretty good nick. Rob, I'll let you know what I find in relation ot the control arm shafts when I get to that bit. |
|
|
|
|
Logged
|
Cheers n Beers
Jolls
|
|
|
|


