Jolls
nsw-club
Senior Member

 Offline Offline
Model: FC
Posts: 374

|
 |
« Reply #140 on: July 02, 2025, 10:32:24 PM » |
0
|
So today I completed the leaf packs - new bolts, spring liners and a lovely orange rustoleum finish (Wests Tigers underbody colour scheme  ) The front springs have been rubbed back and repainted to match. 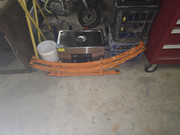 The old girl is now completely stripped less the wiring from the cab to the tailights. I have left them in place so I can pull a draw wire through next time I am out there. The wiring harness is missing a few components so I will need to do an audit on the harness to order the missing components and cables in the right colour schem. That will be a fun task! As it was a commercial vehicle I will need to add the missing bits that I will be adding: - Reverse lights
- Radio
- Cigar Lighter
- Dome light switches
- Brake Warning Light
- Glove Box Light
- Ignition Switch Light and
- Indicators (including converting the brake light indicator to a combination reverse (white) and indicator (orange) LED
I bit the bullet and purchased a rotisserie for this build - why I didn't fork out the $ previouslyis beyond me. It is so much easier to work on. 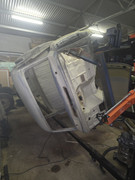 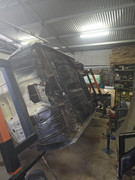 I think I spun her around a dozen times to get most of the dirt and dust out. It is still coming out of the rails so I will need to get some air/leave on rust converter and fish oil in them. Found some addtional rust under the cowl - not too bad and identifed some "bog" based panel damage repairs just behind both doors - so I will have to sand out the bog, beat the dents out a little prep for paint. The rest of the body is straight. I identified a little more rust to be repaired but pretty straight forward repairs. The most challenging being aroudn the fult tank. the POR is in the post so I will get some fuel rated JB weld to deal with any pinholes I find. I found that there wouldn't have been room to pein over solid rivets in the fuel sender. I have riveted it using blind rivets with a standard gun and will seal the rivets with POR to prevent leaks. Progressing slowly but surely! |
|
|
|
|
 Logged
|
Cheers n Beers
Jolls
|
|
|
my8thholden
nsw-club
Senior Member
Offline
Model: FC
Posts: 863
|
|
« Reply #141 on: July 03, 2025, 07:28:35 AM » |
0
|
Jolls ..I had to clean out the fuel system on a fire fighting pump , left in a shed for ages and probably had E10 fuel go dry ...Citrus based paint stripper , can't recall the brand , but it was in a orange coloured tin , did a brilliant job ... Vern ..
|
|
|
|
|
Logged
|
these days i'm half as good for twice as long
|
|
|
Jolls
nsw-club
Senior Member
Offline
Model: FC
Posts: 374
|
|
« Reply #142 on: July 03, 2025, 10:26:40 AM » |
0
|
Jolls ..I had to clean out the fuel system on a fire fighting pump , left in a shed for ages and probably had E10 fuel go dry ...Citrus based paint stripper , can't recall the brand , but it was in a orange coloured tin , did a brilliant job ... Vern ..
Thanks Vern, Great tip - I think I know the one you are referring to. Will give it a crack while I'm wating for the POR to arrive. Cheers |
|
|
|
|
Logged
|
Cheers n Beers
Jolls
|
|
|
Jolls
nsw-club
Senior Member
Offline
Model: FC
Posts: 374
|
|
« Reply #143 on: July 11, 2025, 05:14:55 PM » |
0
|
So where are we up to: I had rust in 2/3 of the lip around the fuel tank that was beyond saving. I was in the process of doing the research to purchase a bead roller so I could make a replacement. I had thought about it overnight and was going to place an order late last week when I wandered past a damaged door from Son 2's VZ crewman project. I noticed that it had a moulded line down in the middle of the door. It looked close to the lip I needed to create in the rusted sections I had to cut out. I cut it out the section with a grinder and hey presto; almost identical form. That was the inspiration I needed. So armed with a grinder and some cutting discs I went to work on the rusted sections, leaving the reinforced corners so I had something to weld to. I tacked in the straight bits in then sliced some smaller sections through the back so I could bend them to the corner profiles and tacked them in. Once that was done the back of the curved sections were reinforeced and the missing wedge sections plug welded. Back then to finishing the welds on the new lip and one major job completed. From there I plated some rust sections in the rear floor. I still need to go back and plate them from the other side and weld a couple of rusted flange sections of the cross member in place. All in all happy with the progress. 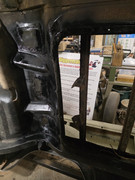 Prepping the cam to go off and be reground I found one of the cam followers was damaged - so I am on the hunt of a replacement (just one). The one I require is to suit a 10 5/16" pushrod. The intenal depth of the lifter is 1 13/16" (1.852"/47.04mm) as opposed to 1 5/8" on the later version. I have posted on FB chasing a replacement - but if you have a spare handy I'd be happy to part with a few beer tokens.  Prepping the engine to go off for a refresh and I found that the oil pressure relief valve in the oil pump was rusted in place. With some advice from Rob I set out to extract it using a a nut and bolt by cutting a thread into the internal of the valve and then using a nut to extract it. The process itself failed but in cutting the thread the valve came loose and I was able to remove it. I need to purchase a new 9mm tap to replace the damaged one but at least the oil pump was saved from the tip. I ordered an oil pump rebuild kit from Auto Surplus (was cheaper on ePay than it was on their site - unusual). So the motor is now good to go to the machine shop to be inspected and we will make a plan for the refresh once we know what needs to be done. The concept at the moment is to up the compression a little, what size slug and from where will depend on the assessment of the block, shave the head a little and machine it to accept 202 valves. I was thinking of lightening the flywheel a bit but have scrapped that idea as I plan to run a .355/.336 diff centre and the mass will be helpful there. I have a set of twin strombergs and triple SU's to handle the fueling side of the house, no decision on which solution as yet, and the extractors have already been purchased. The king pins are in being done so that is the start of the steering refurb. POR arrived during the week so next on the list is to seal the fuel tank and get back to work on the rust issues and reinforcing the floor pan for seat belts. I'm not going to fit the seat belts until after I get the old girl registered to save on having the engineer the whole setup. |
|
|
|
|
Logged
|
Cheers n Beers
Jolls
|
|
|
|
Errol62
|
|
« Reply #144 on: July 12, 2025, 08:44:50 AM » |
0
|
Go the SUs Jolls, you wont be sorry. As long as the throttle shafts are in good condition, floats, needle and seats and new jets and hopefully already got the right needles and springs for your tune, they are simple, robust and efficient.
Sent from my iPhone using Tapatalk
|
|
|
|
|
Logged
|
|
|
|
|
ardiesse
|
|
« Reply #145 on: July 12, 2025, 06:39:26 PM » |
0
|
Craig,
A.t.m. I only have the later cam followers. But the service note says you're OK to use them in the earlier engines if you use a late follower with a short pushrod.
If you have no luck finding an earlier follower I'm happy to send you a late follower plus short pushrod.
Rob
|
|
|
|
|
Logged
|
Remember: if your Holden's not leaking oil, it doesn't have any.
|
|
|
Jolls
nsw-club
Senior Member
Offline
Model: FC
Posts: 374
|
|
« Reply #146 on: July 12, 2025, 07:06:57 PM » |
0
|
Go the SUs Jolls, you wont be sorry. As long as the throttle shafts are in good condition, floats, needle and seats and new jets and hopefully already got the right needles and springs for your tune, they are simple, robust and efficient.
Sent from my iPhone using Tapatalk
The SUs are in good condition and I am fortunate to have a good friend who has a business restoring carbs a few of properties over. I was keeping hold of the twins just in case there is an issue in getting her past the initial blue slip. Not sure how that would be viewed. Once finished she will be a "work ute" in the excavation side of our business. Work as in mobile advertising! This is the first draft of the advertsing concept - not done by me. It is a bit over the top. The Scooby mobile swirls and the modern book now thing will defeintely not get a run and the writing will be less over the top but you can get the gist.  |
|
|
|
|
Logged
|
Cheers n Beers
Jolls
|
|
|
Jolls
nsw-club
Senior Member
Offline
Model: FC
Posts: 374
|
|
« Reply #147 on: July 12, 2025, 07:08:02 PM » |
0
|
Craig,
A.t.m. I only have the later cam followers. But the service note says you're OK to use them in the earlier engines if you use a late follower with a short pushrod.
If you have no luck finding an earlier follower I'm happy to send you a late follower plus short pushrod.
Rob
Thanks Rob, I appreciate the offer. I think I have secured a couple of the right followers on their way on Monday. Cheers |
|
|
|
|
Logged
|
Cheers n Beers
Jolls
|
|
|
|
ardiesse
|
|
« Reply #148 on: July 12, 2025, 08:28:02 PM » |
0
|
Craig,
I just read your post in "Parts Wanted". Cam follower with a piece missing from the side . . .
So your engine had a stuck valve at some point.
You'd be surprised how many grey motors have cam followers with pieces missing from the sides. Doesn't affect how the engine runs at all.
Check pushrod carefully to ensure it's not bent; or that it has been straightened successfully.
Rob
|
|
|
|
|
Logged
|
Remember: if your Holden's not leaking oil, it doesn't have any.
|
|
|
Jolls
nsw-club
Senior Member
Offline
Model: FC
Posts: 374
|
|
« Reply #149 on: July 12, 2025, 08:49:17 PM » |
0
|
Craig,
I just read your post in "Parts Wanted". Cam follower with a piece missing from the side . . .
So your engine had a stuck valve at some point.
You'd be surprised how many grey motors have cam followers with pieces missing from the sides. Doesn't affect how the engine runs at all.
Check pushrod carefully to ensure it's not bent; or that it has been straightened successfully.
Rob
Hi Rob, Thanks, yes checking pushrods and the lifter bore for damage. Cheers Craig |
|
|
|
|
Logged
|
Cheers n Beers
Jolls
|
|
|
Jolls
nsw-club
Senior Member
Offline
Model: FC
Posts: 374
|
|
« Reply #150 on: July 15, 2025, 09:53:02 PM » |
0
|
Hi Rob,
Thanks, yes checking pushrods and the lifter bore for damage.
Cheers
Craig
Checked and all good. |
|
|
|
|
Logged
|
Cheers n Beers
Jolls
|
|
|
Jolls
nsw-club
Senior Member
Offline
Model: FC
Posts: 374
|
|
« Reply #151 on: July 15, 2025, 10:16:38 PM » |
0
|
Some big muscle movements today - but not all great news
The FB bottom end is now in with Phillip Head Services to be thoroughly checked so we can come up with a refresh plan. We expect to know how it measures up by the end of next week.
Head has been stripped and we are now waiting for a courier from Masterstroke Engineering to pick it up to have the head work done.
Oil pump kit arrived in the post so that will be rebuilt tomorrow.
Two second hand cam followers in the post from QLD (one replacement and one spare). Once they arrive the cam and followers will be posted off the Clive Cams for a regrind.
I dropped into Quenabeyan to have a chat about the chromework - that is where the plan unravelled a bit. Electroplating Technology is not taking work on as they have a government contract and even if they did they are no longer doing any pot metal plating. So I need to rethink that solution - any recommendations to get the bright bits done?
|
|
|
|
|
Logged
|
Cheers n Beers
Jolls
|
|
|
|
Errol62
|
|
« Reply #152 on: July 15, 2025, 10:24:57 PM » |
0
|
Unfortunately a lot of places are giving up on rechroming the crappy old pot castings cheapskates at GMH used in the day. Too many warranty claims. Things like door handles you can get new from rares. As to the rest I rely on the best used stuff I can find.
Sent from my iPad using Tapatalk
|
|
|
|
|
Logged
|
|
|
|
|
Errol62
|
|
« Reply #153 on: July 15, 2025, 10:35:51 PM » |
0
|
$250 will get you a front pair of handles from Kingswood country or Rare Spares.
Sent from my iPad using Tapatalk
|
|
|
|
|
Logged
|
|
|
|
Jolls
nsw-club
Senior Member
Offline
Model: FC
Posts: 374
|
|
« Reply #154 on: July 16, 2025, 09:02:37 AM » |
0
|
Unfortunately a lot of places are giving up on rechroming the crappy old pot castings cheapskates at GMH used in the day. Too many warranty claims. Things like door handles you can get new from rares. As to the rest I rely on the best used stuff I can find.
Sent from my iPad using Tapatalk
I have collected over the last couple of years all of the bits I need and hve them pulled down and boxed up to be rechromed - had I been more aware I would have collected different parts. For example I have commercial headlight and tail light surrounds as they didn't need to be stripped etc. Not a huge issue - but definitley a step backwards and time wasted. I have repaired some damaged chrome parts so still ned to get those done - no problem I can get by with what I have and replace them as I find better components. I was looking into the home chroming kits last night - not sure of the quality of the finish and my ability to do all of the prep work required to get a decent job. Rares will help of course. Cheers |
|
|
|
|
Logged
|
Cheers n Beers
Jolls
|
|
|
|
Errol62
|
|
« Reply #155 on: July 16, 2025, 09:07:49 AM » |
0
|
I actually like the painted tail light surrounds
Sent from my iPad using Tapatalk
|
|
|
|
|
Logged
|
|
|
|
Jolls
nsw-club
Senior Member
Offline
Model: FC
Posts: 374
|
|
« Reply #156 on: July 21, 2025, 05:19:15 PM » |
0
|
The cam followers arrived on Friday so today I was prepping the cam to be sent off to Clive's Cams to be reground. The fibre gear had damaged teeth so I have already sourced an allowy gear as a replacement. I thought it best to remove the fibre timing gear to make it easier to post. I was going to follow Harv's guide on removing the timing gear using a press but couldn't get the cam to mount safely. Not to be deterred I opted to try a two legged puller bolted through the timing gear as an option - this just resulted in the timing gear separating from the steel centre - I probably should have gone straight to Harv's alternate method of grind and hammer. No great loss as with the fibre gear seaparated in two I an already part way through the grind/hammer method. 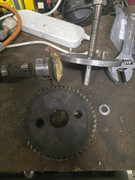 Tomorrow I will cut through the timing gear centre and try to split it with a cold chisel and get it in the post. I will send the alloy gear with the cam hand have it pressed on as opposed to me having to do it with a block of wood and some feeler guages. I spent the rest of the afternoon searching for the front brake components so I can start on getting them sorted. I know I have them bundled and put in a safe place. You would think it would be with the rest o the components I stripped out and bagged at the same time - but no. So the search will continue tomorrow - I know I am short some parts as the passenger side brake shoes were hanging off and the pivot point was missing. But that will have to wait until I fain all the bits and figure out if anything else is missing. A lot of effort today for not much outcome; still a very very small step closer to the end goal. |
|
|
|
|
Logged
|
Cheers n Beers
Jolls
|
|
|
|
Errol62
|
|
« Reply #157 on: July 21, 2025, 08:13:06 PM » |
0
|
Sounds like a lot of my days Craig.
Sent from my iPad using Tapatalk
|
|
|
|
|
Logged
|
|
|
|
|
ardiesse
|
|
« Reply #158 on: July 21, 2025, 08:20:06 PM » |
0
|
Craig,
There are many methods of timing gear replacement. Here is one from Cowell, SA, featuring the panelbeater and his friend, the John Deere mechanic.
Sooo - coming back from a WA trip in 2006, my father and I decided to drive down and up the Eyre Peninsula. As we left Port Lincoln, the engine made a low-pitched half-engine-speed thud, reminiscent of a shot big-end. We pulled over to investigate. Other people also pulled over. In half an hour, we had the name and phone number of the Port Lincoln car club president and a helpful lead to the panelbeater at Cowell, who was an old Holden nut. The RAA guy turned up unbidden, attached a tow rope to his HiAce and towed us up to the North Shields caravan park. He knew the proprietor, who rented us a cabin and let us use a concrete pad for an on-site van for repairs. This was a Friday afternoon.
I set to work, dropped the sump and ruled out loose big-ends. But turning the engine over by hand, I noticed it tended to bind, with slightly less than two turns of free movement. I pulled the timing case off, and in the bottom of the timing case was a gear tooth. Valve train out, fuel pump off, camshaft out. The timing gear was missing two teeth - but the engine still ran.
Pause for an excellent dinner at the North Shields pub a short walk up the beach from the caravan park.
Options at this stage were:
Buy replacement timing gear from Rares at Adelaide and have it freighted to North Shields: three to five working days.
Fly to Adelaide, buy timing gear, fly back. If flights permit.
Contact the panelbeater at Cowell.
Saturday morning, we made contact with the panelbeater. He said he had a second-hand timing gear in good condition in a box of parts "somewhere", but if that failed, we could rat a grey motor for a camshaft plus gear.
Now the problem was how to get to Cowell (~60 km away). Our "neighbour", a long-term resident of the caravan park, offered to drive us up there, as long as his dog, an enormous but very well-natured animal, could come too. Who were we to argue? We met the panelbeater and pulled the camshaft out of a very neglected-looking EJ Premier parts car. Then he found the timing gear. Better to use my camshaft as I don't have to swap camshafts back after I get home.
How to replace the timing gear? He's a panelbeater and doesn't have a press in his shop. Not to worry. His mate at the John Deere dealership does have a press. A phone call, a few minutes' wait and we walked down to John Deere with a camshaft and a gear. The press work was done in a few minutes.
Now, you mentioned block of wood and feeler gauges. The John Deere mechanic said to me, "Move the thrust washer around as I press the gear on and tell me when I'm getting close." I couldn't even start to voice the word "now" when the thrust washer jammed solid. "Too slow," he said, "but never mind. I'll take the shaft out of the press, you hold it upright by the gear." He placed a drift on the camshaft hub and delivered a well-calibrated "whang" onto the drift with a hammer. The result was "free sliding fit with minimal end-play" in engineering-speak.
The John Deere mechanic refused payment for his services. On a Saturday. The panelbeater refused payment for engine parts. He also lent us a 1/4" drive Sidchrome socket set for the thrust washer screws. I asked him if he was concerned we were going to make off with his socket set and he said, "No, I know you'll come back. Plus I get to see your FX too."
On the Saturday afternoon I had the engine reassembled and did a victory lap of the North Shields caravan park, to the applause of the locals.
All in all, a great success. A major engine problem on a Friday afternoon at Port Lincoln, fixed in a day.
Rob
|
|
|
|
|
Logged
|
Remember: if your Holden's not leaking oil, it doesn't have any.
|
|
|
|
ardiesse
|
|
« Reply #159 on: July 21, 2025, 08:31:19 PM » |
0
|
And while I'm on a roll here -
Warren and Brown of king-pin reamer, valve seat refacing equipment and Scope soldering iron fame also made a camshaft timing gear extraction and replacement kit, so you can do the work in-situ. I saw one of these in WA at a collector of anything grey-motor related. In brief:
Drill a hole, concentric and axially true, down the camshaft hub and tap it 3/8" Whit x 1" deep.
Screw extractor drift onto camshaft hub and, using it as a guide, drill three holes into the steel hub of the camshaft gear. Tap them to the size of the supplied bolts.
By the use of threaded rod and other sorcery, pull timing gear off camshaft.
Installation of the new gear only requires the use of threaded rod, a nut and a socket.
Rob
|
|
|
|
|
Logged
|
Remember: if your Holden's not leaking oil, it doesn't have any.
|
|
|
|


