JOX515
vic-club
Senior Member

 Offline Offline
Model: FC
Posts: 745

|
 |
« Reply #180 on: February 10, 2019, 09:35:20 PM » |
0
|
G'day Cam  |
|
|
|
|
 Logged
|
|
|
|
|
camxsmith
|
|
« Reply #181 on: February 10, 2019, 09:43:26 PM » |
0
|
G'day Cam I know, I know, I hit the ENTER button a bit earlier.. Luck i could go back and edit the post...  Thought I might get away with it. |
|
|
|
|
Logged
|
|
|
|
JOX515
vic-club
Senior Member
Offline
Model: FC
Posts: 745
|
|
« Reply #182 on: February 10, 2019, 09:49:36 PM » |
0
|
|
|
|
|
|
Logged
|
|
|
|
|
Errol62
|
|
« Reply #183 on: February 10, 2019, 11:29:20 PM » |
0
|
Very neat job on the drain cam.
The butt clamps are great arent they.
Sent from my iPad using Tapatalk
|
|
|
|
|
Logged
|
|
|
|
|
camxsmith
|
|
« Reply #184 on: February 12, 2019, 05:13:01 PM » |
0
|
|
|
|
|
|
Logged
|
|
|
|
|
Errol62
|
|
« Reply #185 on: February 12, 2019, 07:52:07 PM » |
0
|
Its pretty essential if you run wide rubber specially if lowering cam. Years ago I managed to pull the non rolled lip out where the tyre contacted it on full lock. I was running 185 65 14 tyres on 6 rims set in as close to the top ball joint as I would dare on HR disc front.
Sent from my iPhone using Tapatalk
|
|
|
|
|
Logged
|
|
|
|
|
FireKraka
|
|
« Reply #186 on: February 13, 2019, 10:48:48 AM » |
0
|
Nice work Cam keep the photos coming mate I really like seeing builds on the forum it is a pity we are not seeing more. I had an issue with my front tyres when I finished my Sedan and bought a guard roller off of ebay used a heat gun to gentle warm the paint so it didn't crack and again gentle rolled the guard out slightly, no more rubbing issue.  Neil |
|
|
|
|
Logged
|
|
|
|
waynos
Senior Member
Offline
Model: FC
Posts: 787
patience grasshopper
|
|
« Reply #187 on: February 16, 2019, 09:42:30 PM » |
0
|
no real need for the lipped rear guard ..the inner guard pretty much sits out/in more than the lip
|
|
|
|
|
Logged
|
The grinder is mightier than the sword.
|
|
|
|
camxsmith
|
|
« Reply #188 on: February 17, 2019, 05:36:03 PM » |
0
|
no real need for the lipped rear guard ..the inner guard pretty much sits out/in more than the lip
Your right there Wayno Will just clean it up then |
|
|
|
|
Logged
|
|
|
|
waynos
Senior Member
Offline
Model: FC
Posts: 787
patience grasshopper
|
|
« Reply #189 on: February 17, 2019, 09:16:36 PM » |
0
|
Your right there Wayno Will just clean it up then
depends what tyre youre gonna run. im gonna try and get some more guard clearance seeing how close i can get that inner to the quarter panel. seeing as though i got my 1/4 panel off i can check pretty easy i will get back to you on that one. anway youre doing great with the build .keep it up!!!! |
|
|
|
|
Logged
|
The grinder is mightier than the sword.
|
|
|
|
Errol62
|
|
« Reply #190 on: February 17, 2019, 10:03:49 PM » |
0
|
I cant help anticipating that you might want to tidy up and improve that inner wheel well area while you have such good access to it Wayno. It is pretty common to bend the seam up and move the tub wall in for an additional 20mm or so clearance as you are more than likely aware.
Sent from my iPad using Tapatalk
|
|
|
|
|
Logged
|
|
|
|
|
Errol62
|
|
« Reply #191 on: February 17, 2019, 10:11:25 PM » |
0
|
Apologies for hijack Cam. What I was going to say about the wheel arches, I agree you dont gain any clearance as the inner guard is in the same plane so to speak. On the other hand you see it on a lot of cars, mainly the type that crawl over speed humps etc. they run wheels that just sit under the outer edge and look great. Hard cornering and unexpected bumps cause the tyres to rub occasionally.
Sent from my iPad using Tapatalk
|
|
|
|
|
Logged
|
|
|
|
|
camxsmith
|
|
« Reply #192 on: February 22, 2019, 03:23:15 PM » |
0
|
Thanks for all the feed back guys. After some in vestigating I was reward with some of my old friend. mr rust. . So I have to make a decision on the cut out and how much.  |
|
|
|
|
Logged
|
|
|
|
|
camxsmith
|
|
« Reply #193 on: February 22, 2019, 07:37:20 PM » |
0
|
|
|
|
|
|
Logged
|
|
|
|
Stewy
sa-club
Senior Member
Offline
Model: FE
Posts: 883
FErgus 1957 FE Special Station Sedan

|
|
« Reply #194 on: February 22, 2019, 10:31:21 PM » |
0
|
There are only 4 in FE/FC glovebox. Holden Special on the FE specials Special on the FC specials Station Sedan on FE/FC station sedans and a plain solid bar with 3 markings, the centre and each end. on the standards, commercials and business sedans. 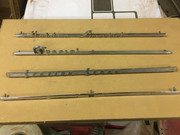 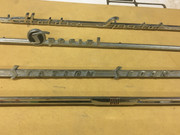 Cheers Stewy  |
|
|
|
|
Logged
|
No matter how much you push the envelope, It'll still be stationery
|
|
|
|
camxsmith
|
|
« Reply #195 on: February 23, 2019, 09:01:32 AM » |
0
|
There are only 4 in FE/FC glovebox. Holden Special on the FE specials Special on the FC specials Station Sedan on FE/FC station sedans and a plain solid bar with 3 markings, the centre and each end. on the standards, commercials and business sedans. Cheers Stewy Thanks Stewy Thats just what I was looking for. |
|
|
|
|
Logged
|
|
|
|
|
camxsmith
|
|
« Reply #196 on: March 25, 2019, 06:08:50 PM » |
0
|
Hi all Just some seat belt plate work this week. Cut out plates to spec's 150x75 , 100x75 and 75x50, > 5mm radius corners  Got my 7/16 UNF nuts grade 8 and weld them on, (I have also converted to copper based weld thur paint compared to the zinc which spatters alot more)   Used a length of wire to pull the B pillar plate up to its position. Helps that the bottom of the B pillar is off.. Then used a long bolt to pull it into position before spot welding into position.    Also welded up the outer hole on the B Pillar.  |
|
|
|
|
Logged
|
|
|
|
|
Errol62
|
|
« Reply #197 on: March 25, 2019, 06:57:16 PM » |
0
|
Nice work Cam. Have to do the b pillar on my ute but it is a lot easier as it is wider, there are access holes, and the inside is covered by the head lining, so the plate can be screwed or pop riveted in place.
So which plate goes where? Im guessing the larger plate on the buckle side and the narrow one must go in the top of the pillar. By the way it looks like the long plates at the top might be 150x35, not 75.
Cheers
Clay
Sent from my iPad using Tapatalk
|
|
|
|
|
Logged
|
|
|
|
|
camxsmith
|
|
« Reply #198 on: March 25, 2019, 07:31:48 PM » |
0
|
You got me Clay
They are 150 x 35 and they go at the top of the B pillar. 75 x 50 at the bottom and the 100 x 75 are for the double point in each side of the tunnel.
|
|
|
|
|
Logged
|
|
|
|
waynos
Senior Member
Offline
Model: FC
Posts: 787
patience grasshopper
|
|
« Reply #199 on: March 25, 2019, 08:01:33 PM » |
0
|
so the b pillar plate has enough surface area..ive been going to make mine pretty soon and was wondering what size to do. thanks for saving my time on google and this forum looking it up! always hated that bolt head sticking outside the car made sure i chopped my roof either side of that hole so i didnt have to fill it  |
|
|
|
|
Logged
|
The grinder is mightier than the sword.
|
|
|
|


