|
NES304
|
 |
« Reply #20 on: January 26, 2015, 11:07:47 PM » |
0
|
Drop ya front end out and make a cardboard template. Then get out Gary Grinder to help you on a piece of 3mm I did mine out of 50mm rhs. 200 in materials  |
|
|
|
|
 Logged
|
|
|
|
|
fe350chev
|
|
« Reply #21 on: January 27, 2015, 12:12:43 AM » |
0
|
I'm sure he would like the measurements of my kit too (@Frankie) lol. The one that you have. Yeah I found these the other day and forgot to tell you. Easy if I just get a large bit of thin cardboard and spray them with weld through primer and send it dry to you guys as a template. I can see my poor mum becoming Frankies postal service and storage lol. Next thing you will want the smiths heater.
|
|
|
|
|
Logged
|
Deano
Current Rides: 1958 "Black and White Taxi" FC special Sedan, 1957 FE special Sedan, BA Futura, 2015 VF Commodore, 1956 Austin Tipper Truck
|
|
|
|
Frankiej
|
|
« Reply #22 on: January 27, 2015, 12:53:35 PM » |
0
|
Nah Deano got one already that I might want to sell lol, and a good service it is mate.
|
|
|
|
|
Logged
|
|
|
|
|
59wagon
|
|
« Reply #23 on: January 27, 2015, 02:42:19 PM » |
0
|
Thanks Dean & NES. Dean, thanks for the template offer, I'll PM you.
Sorry if I'm asking dumb questions, but I can't find any pic's of these bits mounted on a car, so
1) Do the plates have to be bent to follow the kick down of the k frame legs and,
2) Are they welded to the subframe from where the front end mounts are to the "Y" bit. It looks like the larger holes fit over the front end rubber mounts, so I'm wondering that if not welded, any movement might cut into the rubber mounts? (and if they do need to be bent, they would try to straighten if stressed). Hope this makes sense. Thanks, John
|
|
|
|
|
Logged
|
|
|
|
|
fe350chev
|
|
« Reply #24 on: January 27, 2015, 02:54:47 PM » |
0
|
|
|
|
|
|
Logged
|
Deano
Current Rides: 1958 "Black and White Taxi" FC special Sedan, 1957 FE special Sedan, BA Futura, 2015 VF Commodore, 1956 Austin Tipper Truck
|
|
|
|
59wagon
|
|
« Reply #25 on: January 27, 2015, 03:04:29 PM » |
0
|
Wow, that was quick. Awesome Dean, thanks.
|
|
|
|
|
Logged
|
|
|
|
|
fe350chev
|
|
« Reply #26 on: January 27, 2015, 03:40:48 PM » |
0
|
The bits you mention are the tie in subframe members. Thanks for copying the pics. The pics will give you an idea of trouble spots to look for. What you could do is go along your tie ins with a large set of multi grips and do a crush test rather than screwdriver etc. I think that works better and tapping areas to hear the sound it makes. I'm no expert either though. I'll find more pics that I have somewhere for bracing but you really don't need to be too fussy with yours. As you can see mine was folding in on itself, very bad. Just weld to body mate then grind off later. It's more a common sense thing. You really gotta put doubts aside and methodically do the build in sections. Always ask yourself "do I need to do that now over this" etc. I have learned so much on here but sometimes it can cause self doubt or stifle your own creativity. But I think the more opinions the better.
|
|
|
|
|
Logged
|
Deano
Current Rides: 1958 "Black and White Taxi" FC special Sedan, 1957 FE special Sedan, BA Futura, 2015 VF Commodore, 1956 Austin Tipper Truck
|
|
|
|
59wagon
|
|
« Reply #27 on: January 27, 2015, 07:07:29 PM » |
0
|
Thanks Dean, I've saved the pic's. Did you get my PM? I'm hoping my sub-frame's ok. I was told by the seller, who'd done nothing with it, that the previous owner had installed the new HR disc front end, and the sub-frame, firewall etc. had been repainted and look ok. However, when I removed the K-frame from the car and stood it on its end, I got a nice little pile of rust scale and dirt come out (see pic) - there's still some in there. You've got me a bit worried now, though, and probably should get the paint off and have a good look. I was also told the floors were all good, with a few patch repairs, but my Stanley Screwdriver didn't think so. I've ended up buying all 4 floor panels and replacement L & R cross members (the ones that go across the car from the front of the sills). The outer sills look like newish ones. I used Gary Grinder to get the drivers side one off to check what it was like inside and it looks pretty good. The inner sills had been repaired in places using thicker flat sheet rather than with the replacement ones that have the pressed circles in them. Looks strong enough - not sure if I'll replace them. There's been some pretty serious work around the front of the sills where the outer k-frame legs attach - looks like all new brackets, etc. in there (similar to what you've done). I'm hoping this is all good, as the car was a roller when I got it and the door gaps seemed pretty good. I had a look at your build, really nice work, but my head couldn't keep up with all the ideas and changes you talk about. I'm glad you know what you're talking about  How did you, or anyone else reading, do your bracing when replacing floor pans, sills, etc. Dean, yours looks something like 30mm x 3mm square tube tack welded to tie in the A, B & C pillars, and then some cross pieces? How did that work for you? I was thinking of making and bolting brackets to the door hinge bracket / strike plate mounting points and then welding tube onto these, rather than welding tubes onto the body itself - bit of a confidence thing with me I guess. Cheers, John 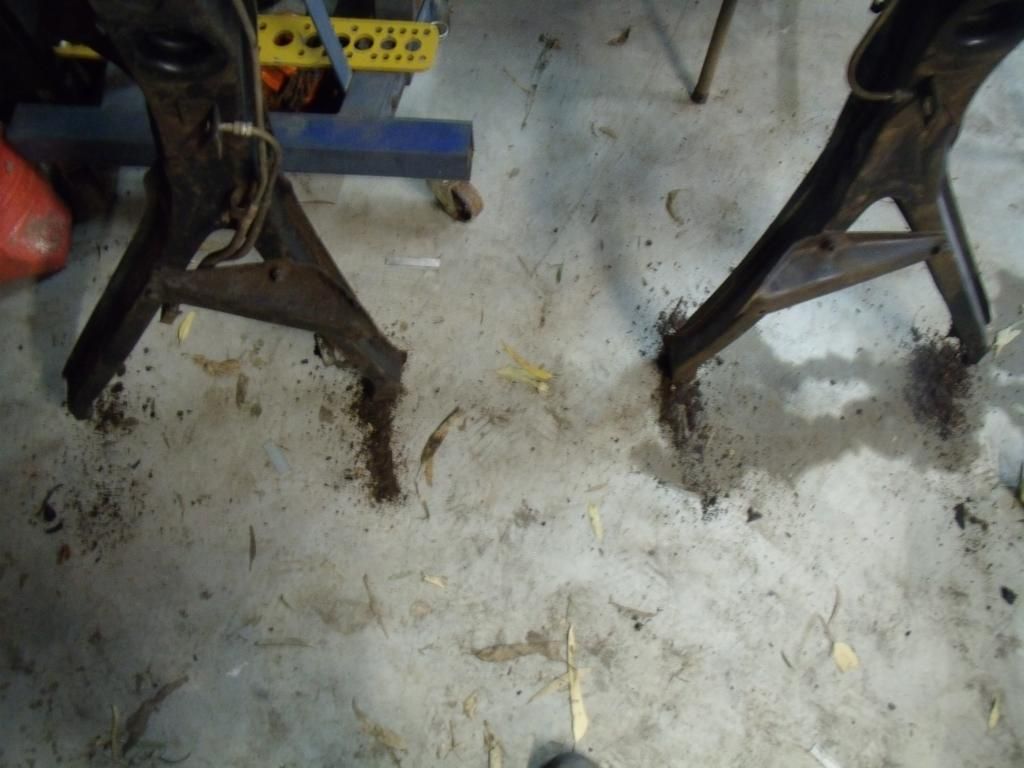 |
|
|
|
|
Logged
|
|
|
|
|
fe350chev
|
|
« Reply #28 on: January 27, 2015, 10:58:56 PM » |
0
|
Yes that's right. A, b and c. It also depends if you are doing one bit at a time or not with floor pieces. You can create a reference point from a centre b pillar cross bar and then with some rods attached however you wish, go diagonal to a lower a pillar or corner spot of your choice and Mark it up so that you can keep an eye on it as you go for twist etc but if you try to follow the article that's in the technical section on the club home page you will get an idea if you are concerned. A rod put through across to a central point as in the pics I'll pm you will give you an idea of important areas. But pls let me know if you share those. http://www.fefcholden.org.au/techinfo/index.html |
|
|
|
|
Logged
|
Deano
Current Rides: 1958 "Black and White Taxi" FC special Sedan, 1957 FE special Sedan, BA Futura, 2015 VF Commodore, 1956 Austin Tipper Truck
|
|
|
|
FireKraka
|
|
« Reply #29 on: January 28, 2015, 01:52:08 PM » |
0
|
Hi John;
Better to strip your sub chassis and make sure there are no issues better now than later mate you might have been very lucky and if they had done repairs elsewhere they may have taken care of any in the chassis.
I got the pressure washer and blasted up all the K legs etc with the one I'm using for my ute they get so much dirt and crap up there and then it get wet and just starts to rot them out as I said to you the other day I have a couple of rust repair bits that you are welcome to if you need them.
Regards
Neil H
|
|
|
|
|
Logged
|
|
|
|
|
59wagon
|
|
« Reply #30 on: January 28, 2015, 02:35:23 PM » |
0
|
Thanks, Neil. Yeh, I think I'll get it blasted when I do the body. Anything special I need to check other than a bare metal visual and attacking with my Stanley screwdriver rust finder? Cheers, John
|
|
|
|
|
Logged
|
|
|
|
|
FireKraka
|
|
« Reply #31 on: January 28, 2015, 02:54:31 PM » |
0
|
Mate I think Stanley does a great job
Have a look under the radiator support, around the area where the sway bar bolts, underneath of the K legs and under the battery box if you have one not sure if you told me yours was still there.
Regards
Neil H
|
|
|
|
|
Logged
|
|
|
|
|
59wagon
|
|
« Reply #32 on: January 28, 2015, 08:15:41 PM » |
0
|
Hi All, Can anyone please tell me what the 3 small holes (~3/32") are for in the "C" pillar of the FC wagon? Looks like they take self tappers. I'm going to try and fit seatbelts here as done by CoolFCWagon in the Blue Standard as it looks pretty neat. Just wondering what the holes are for prior to drilling and cutting.  Need to cut slot between pillar and seat catch fitting, and make brackets and backing plates. The belts are from a VS commodore and just so happens that the inertia reels work at this angle. The tongue's facing the wrong way, so I'll have to get that sorted. 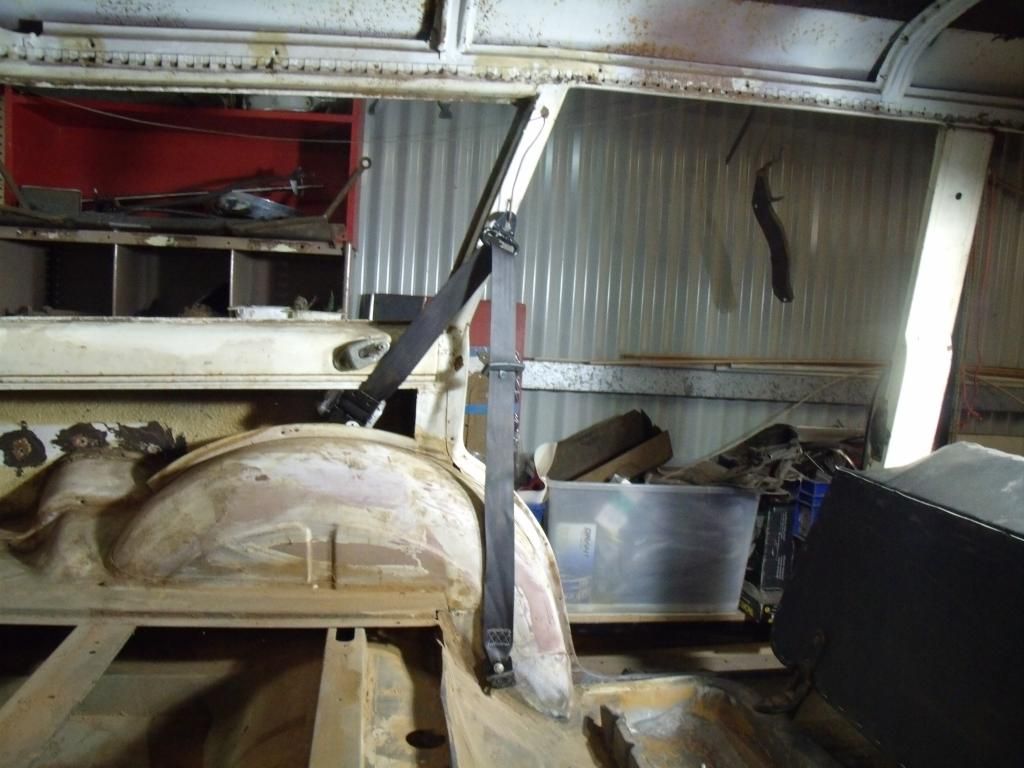 |
|
|
|
|
Logged
|
|
|
|
zulu
nsw-club
Guru

 Offline Offline
Model: FE and FC
Posts: 1867
Old Boonah Ambo

|
|
« Reply #33 on: January 28, 2015, 08:43:09 PM » |
0
|
The holes are for the screws that hold the painted trim piece that goes there
|
|
|
|
|
Logged
|
|
|
|
|
GMHwagoon
|
|
« Reply #34 on: January 28, 2015, 08:48:48 PM » |
0
|
john
zulu's right its the same as the front pillar trim
metal trim with a dogleg shape
|
|
|
|
|
Logged
|
|
|
|
|
mcl1959
|
|
« Reply #35 on: January 28, 2015, 08:49:31 PM » |
0
|
A metal trim goes from the wheel tub to the roof. It is painted body colour.
Ken
|
|
|
|
|
Logged
|
|
|
|
CoolFCWgn
Junior Member
Offline
Model: FC
Posts: 68
|
|
« Reply #36 on: January 28, 2015, 10:19:56 PM » |
0
|
Here's another image in my wagon that may help. Let me know if you need any other info. 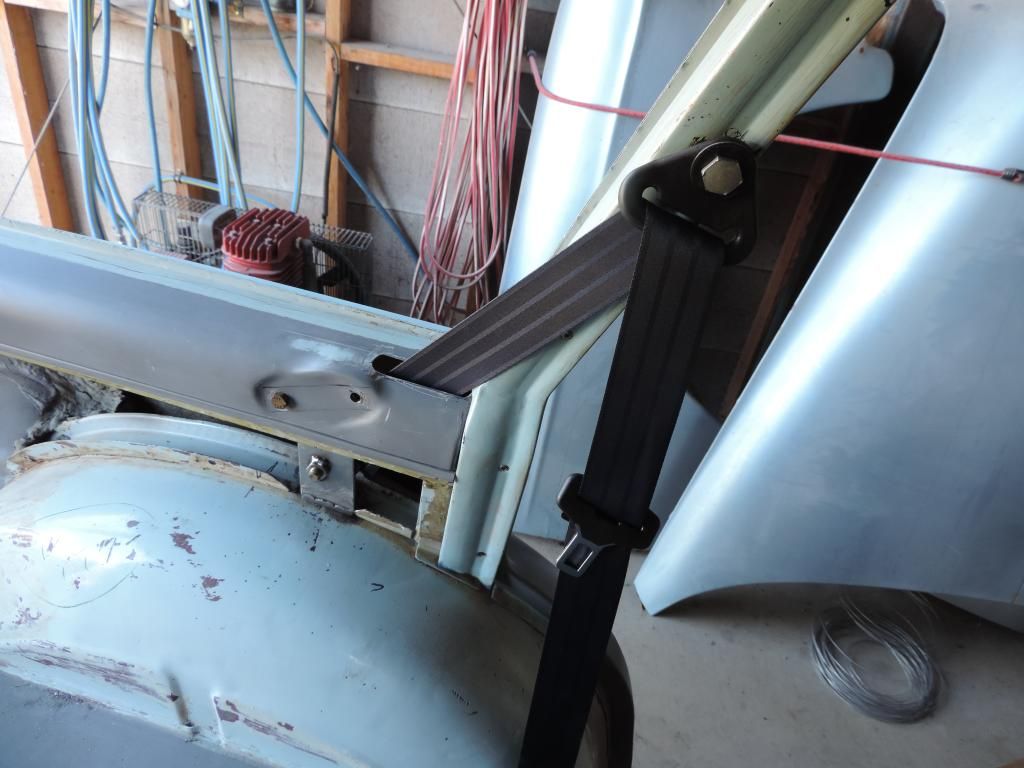 |
|
|
|
|
Logged
|
|
|
|
|
59wagon
|
|
« Reply #37 on: January 29, 2015, 02:20:06 AM » |
0
|
Thanks for the replies, fellas. Does anyone have a pic of the trim? I've been plowing through photo galleries, but can't seem to find any decent close ups (could be my eyes), so have no idea what they look like. Are new or repo ones available, or if I see one are they too difficult to make?
CoolFCWagon, congrats again on your car. I think the car looks great even without the trim. Venetians will be cool, too.
Hey, with your seatbelt installation, a few tips would be handy:
1) Did you end up putting some sort of protection in the slot to stop the belt fraying?
2) How did you get the backing plate in? I was thinking about cutting a slot to make the opening bigger where the wiring harness comes through the pillar above the wheel arch, and then either pulling it up with fishing line or flipping the car over on the rotisserie and lowering it in.
3) I've cut some backing plate at 22mm wide which is a guesstimate, is that about right? It's pretty narrow in there.
4) It looks like you've welded nuts onto the custom bracket (very nice) to attach the seat catch to and give more support to the bracket. Does that mean you've removed the original nuts behind the panel? If so, how did you do that?
5) Have you been cruisin' around in your new girl, with the elbow hangin' out?
Thanks & cheers,
John
|
|
|
|
|
Logged
|
|
|
|
|
mcl1959
|
|
« Reply #38 on: January 29, 2015, 05:12:38 PM » |
0
|
John, the pic posted by coolfcwgn has the trim in place. It's main purpose is to hold the wind lace in place.
Ken
|
|
|
|
|
Logged
|
|
|
|
CoolFCWgn
Junior Member
Offline
Model: FC
Posts: 68
|
|
« Reply #39 on: January 29, 2015, 08:56:51 PM » |
0
|
John, 1) I used a pinchweld from Clarkrubber to go around the slot . I'll postup some finished images . 2) Yes as you have described, I opened up the hole and pulled it up with a thin wire. 3 ) I'm pretty sure my plates were around 22mm x 6mm. 4) I drilled out the existing nuts for clearance , then ground the remainder of the nuts off using rotary burrs in a drill.( Awkward job). 5) Yep, loaded up the family and went for a cruise last night , thanks . Ian. |
|
|
|
|
Logged
|
|
|
|
|


