Crumpsnr
Senior Member

 Offline Offline
Model: FC
Posts: 286
Shellharbour NSW

|
 |
« Reply #40 on: July 25, 2013, 07:49:12 PM » |
0
|
Hi Pedro and Dave. I hadn't looked at it like that but you're both spot on. I was just going to straighten the poorly fitted motor and go for a respray, now I'm in way deeper than I'd planned. This one was going to be a quick profit on the way to a tidy wagon with a V8 (Sorry Pete, I've got a red motor in this project and going to a V8 in the next. Someone has to use the motors you won't touch!  ) Plus I keep getting new ideas. Went to Motorex and walked away with some good (read $$$) ideas. Shoulda stayed chatting to you Dave, woulda been cheaper! Regards, Martyn |
|
|
|
|
 Logged
|
|
|
|
|
FCRB26
|
|
« Reply #41 on: July 25, 2013, 08:27:29 PM » |
0
|
I have a RED stashed just in case one day i lose the plot and fit it to something.  If you need cowl vent section i have 3 bitsa cars here i can meticulously hack out of one for ya. Pete |
|
|
|
|
Logged
|
|
|
|
Crumpsnr
Senior Member
Offline
Model: FC
Posts: 286
Shellharbour NSW
|
|
« Reply #42 on: July 25, 2013, 10:48:05 PM » |
0
|
Much appreciated Pete, I just might take you up on that. I already have a lead on one that might be suitable but if not, then I'll definitely get back to you. I'd like to get you to do an alloy version of my wiper motor block at some stage too if you have time. Regards and thanks, Martyn
|
|
|
|
|
Logged
|
|
|
|
|
fe350chev
|
|
« Reply #43 on: July 26, 2013, 06:16:21 PM » |
0
|
Yeah I would like an alloy block too using a vk motor, but I think somehow so I can french it in a bit and recess it to suit the Small block chev. Whateva you think  Make 2 then put two on ebay |
|
|
|
|
Logged
|
Deano
Current Rides: 1958 "Black and White Taxi" FC special Sedan, 1957 FE special Sedan, BA Futura, 2015 VF Commodore, 1956 Austin Tipper Truck
|
|
|
|
FCRB26
|
|
« Reply #44 on: July 26, 2013, 06:26:20 PM » |
0
|
Im fiddling with a few small jap ones ill see how i go.
|
|
|
|
|
Logged
|
|
|
|
Crumpsnr
Senior Member
Offline
Model: FC
Posts: 286
Shellharbour NSW
|
|
« Reply #45 on: November 30, 2013, 09:36:45 PM » |
0
|
Hi all, it's been a while since my last post. Had too many characters in this rant, so I'll put up another with the text that was going in this one. Regards, Martyn The mount for the rotisserie. It seems a common practice to use the bonnet hinge mounting points but I only wanted to use points that didn't have nuts fixed to the body. That way I could use free nuts and bolts and not worry about stripping something that was hard-mounted to the car. Plus, I figured the subframe mounting points would probably be stronger and there was a split in the firewall adjacent to one of the bonnet mounting points. 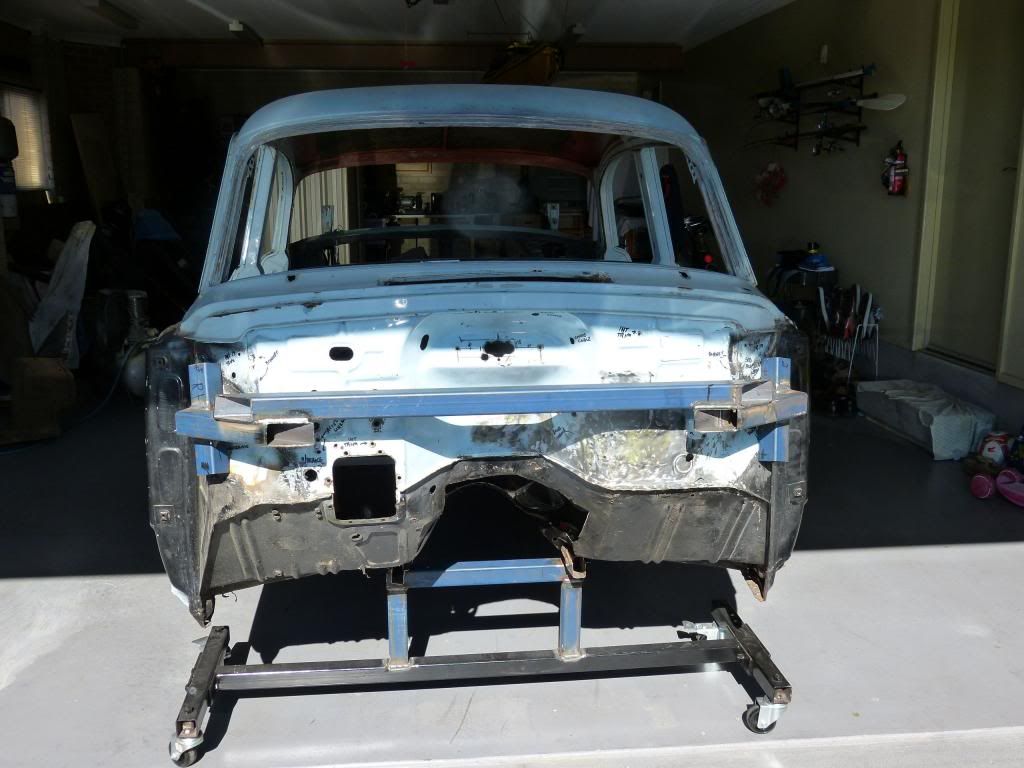 The vertical section is checked into the section that fits in the channel. 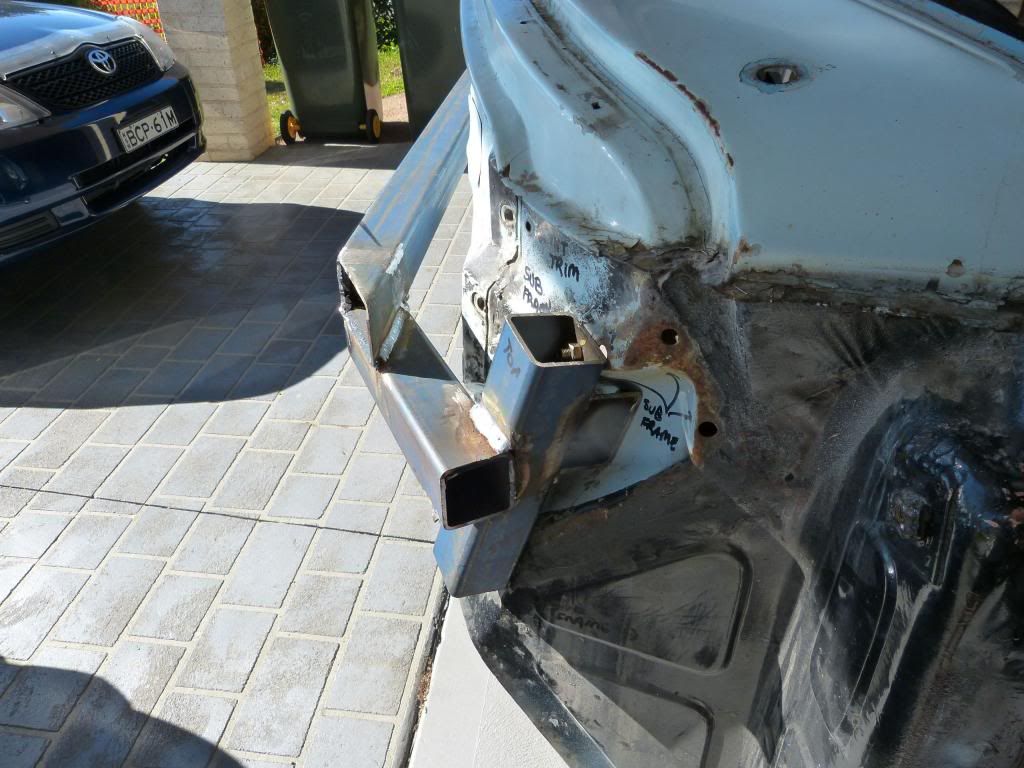 This area straightened up nicely with a bit of panel beating. See a previous post with a photo of the accident damage. 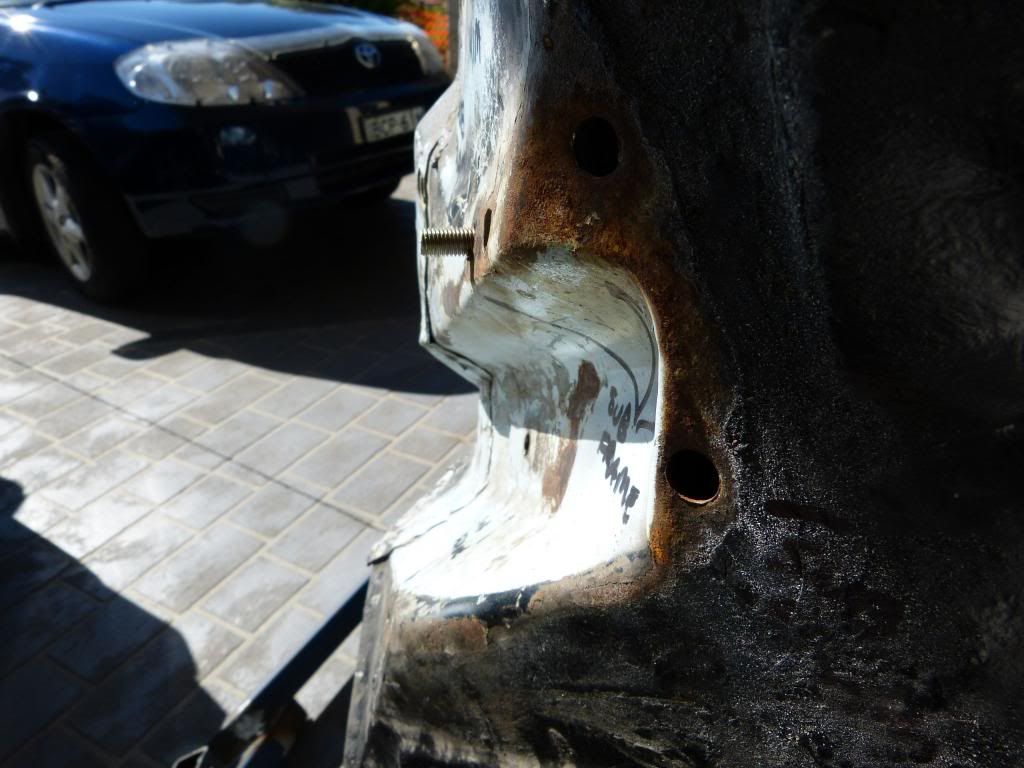 As luck would have it, went to mount the rear rotisserie bracket, and a nut was loose inside the rail. There had been a bad rust repair in this section anyway so I took out the repaired section to get access. 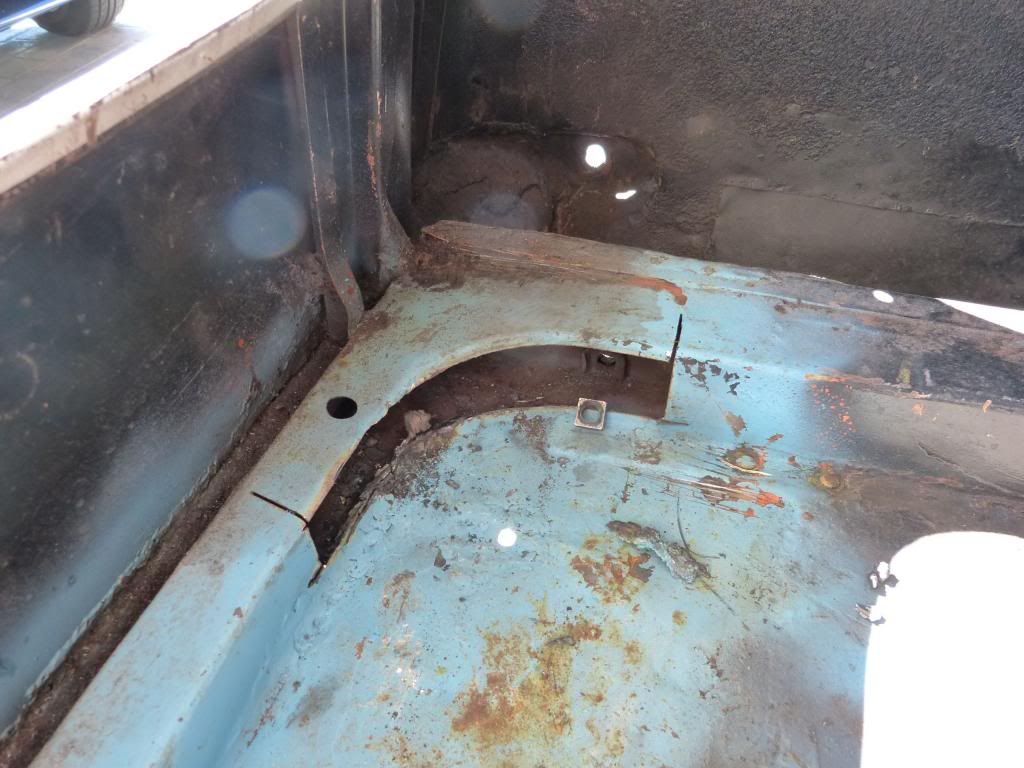 This was on the inside of the section I removed.  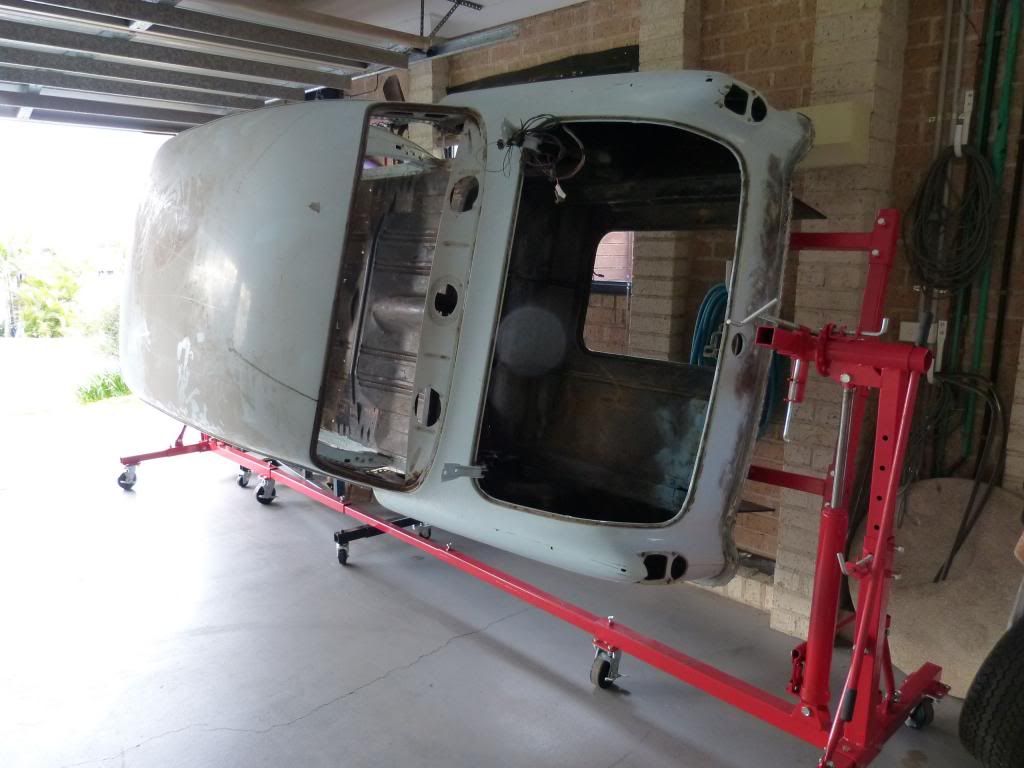 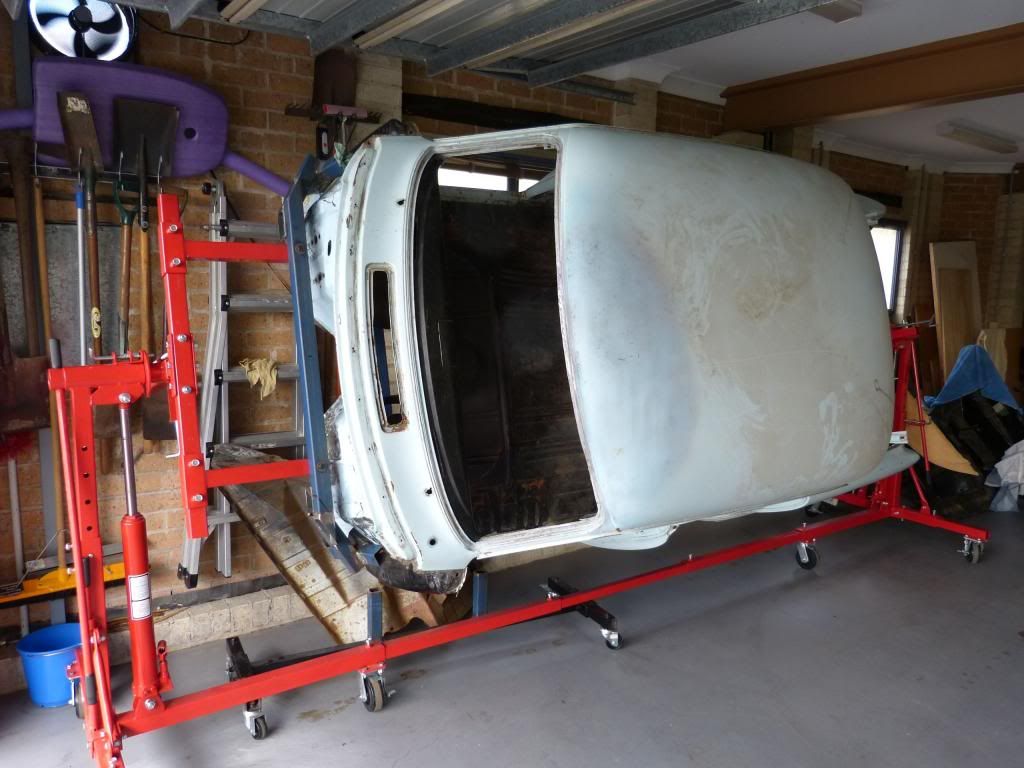 The blue bar is a brace until the firewall and new floor sections have been put in place. I cut the top off the trolley that you can see in the first photo, leaving the bar between the subframe mounts. 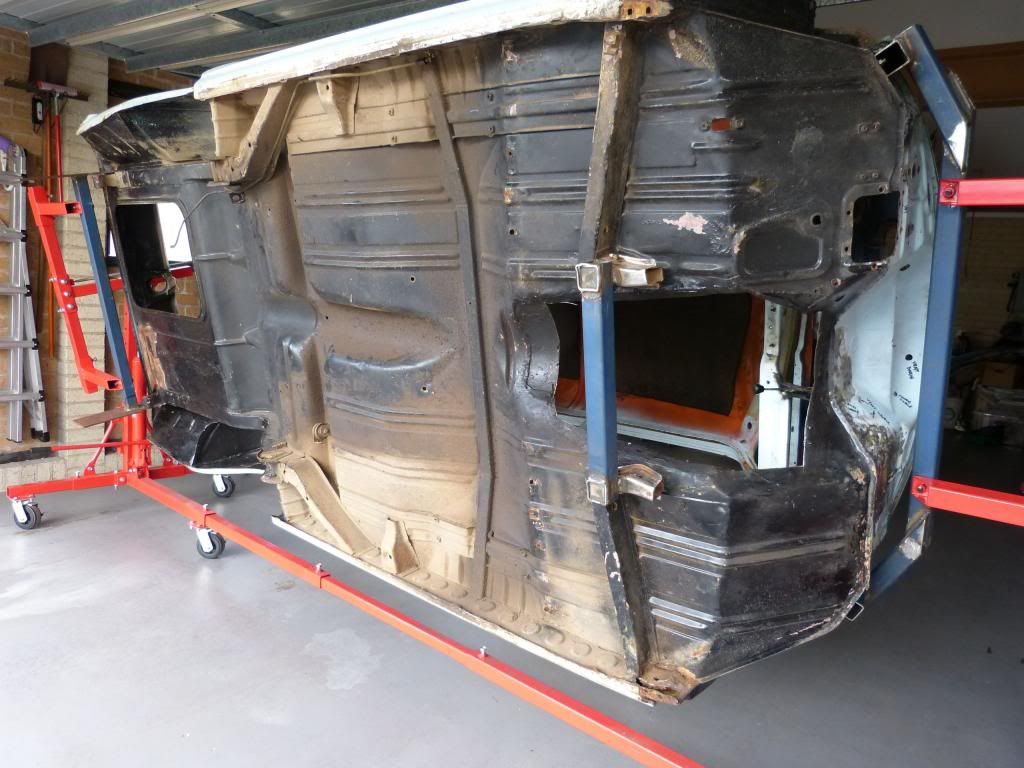 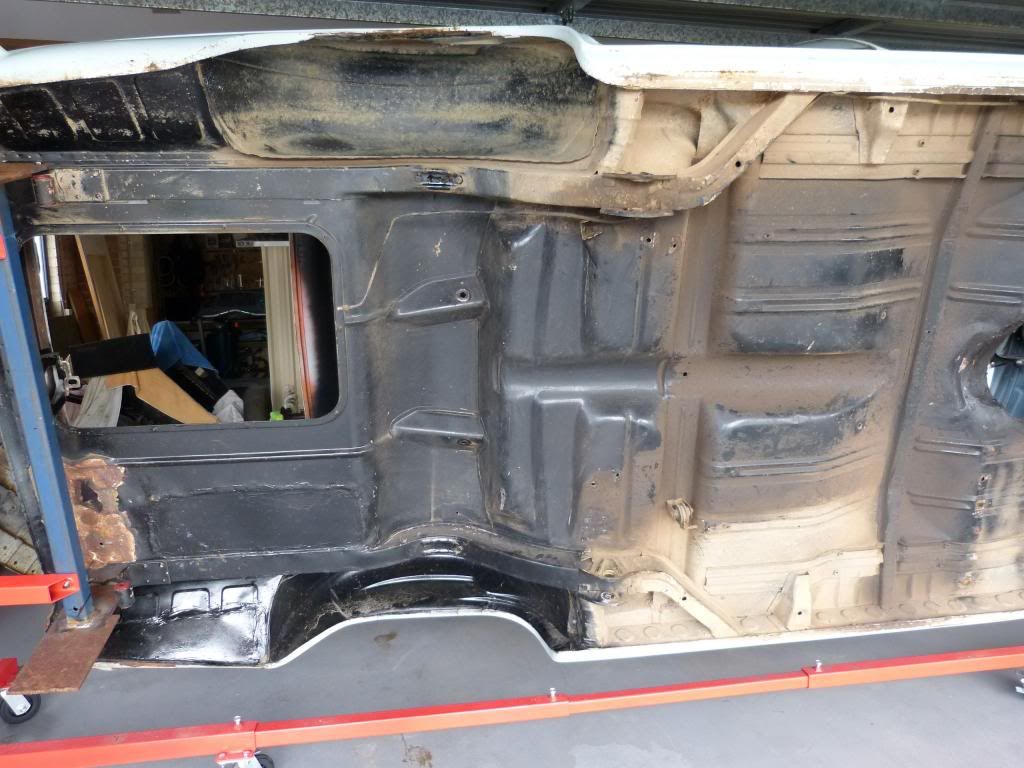 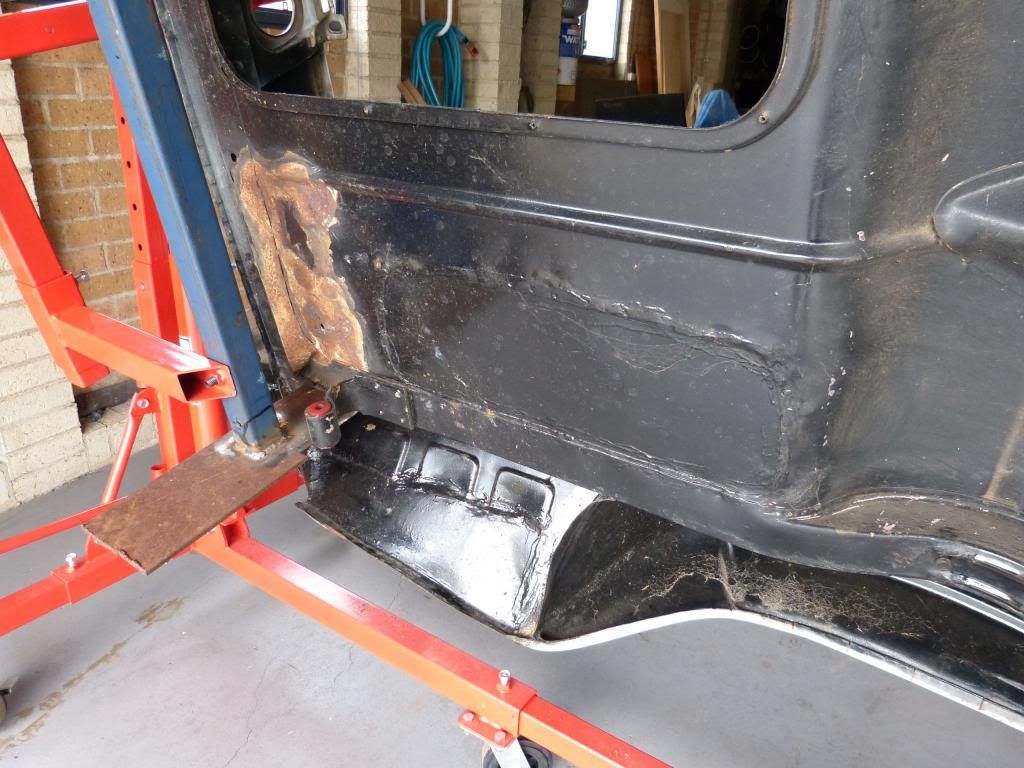 This had been hammered flat and a plate welded over the top, meaning the outer subframe leg was pulled out of alignment. 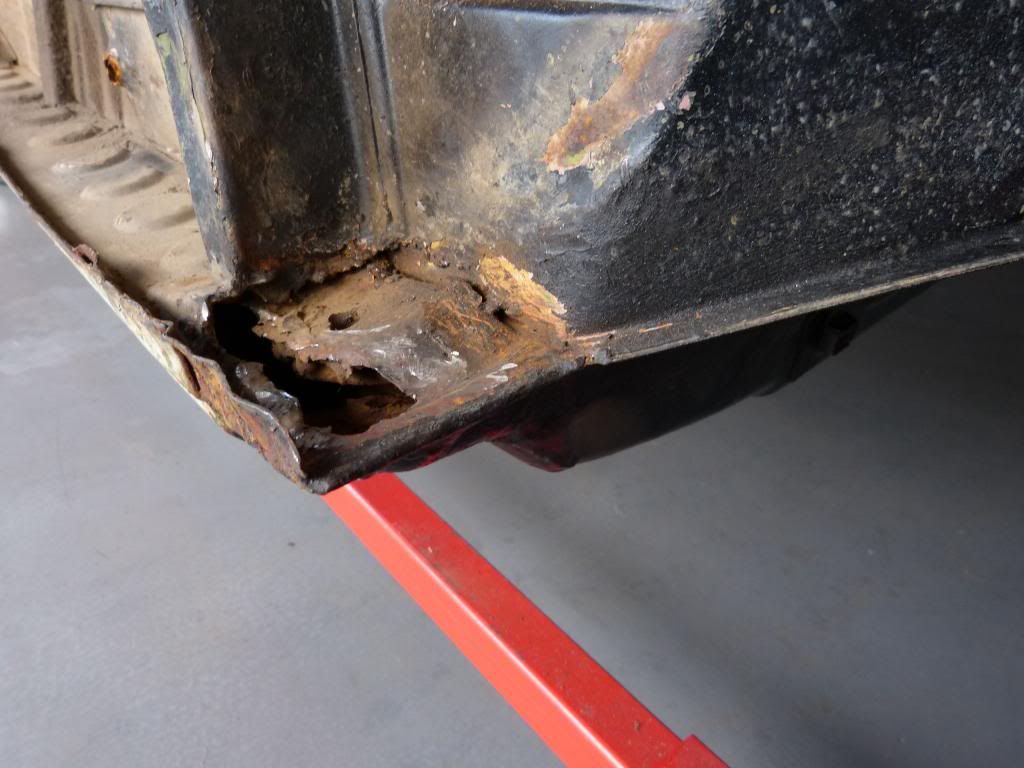 Looks a bit better after a cleanup. 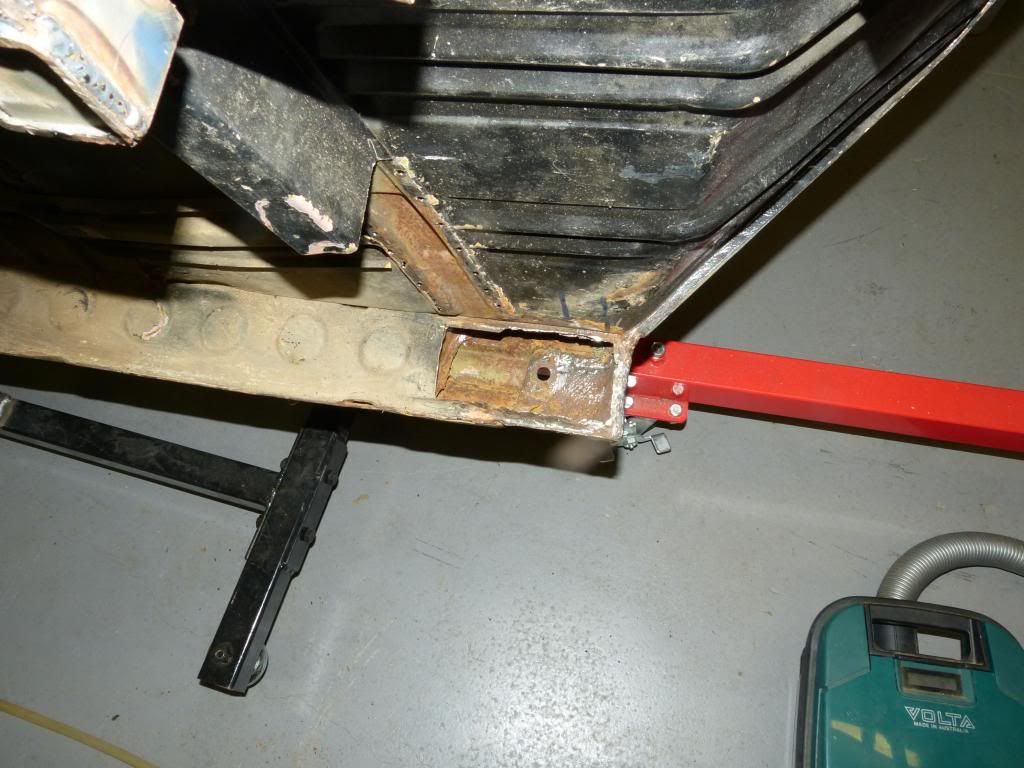 Just ground out the bad bit until l I had good metal. I could feel behind it that there was no corrosion on the back.  The tool I developed for sucking crap out of sills. Much easier when there's a big rust hole to work through! 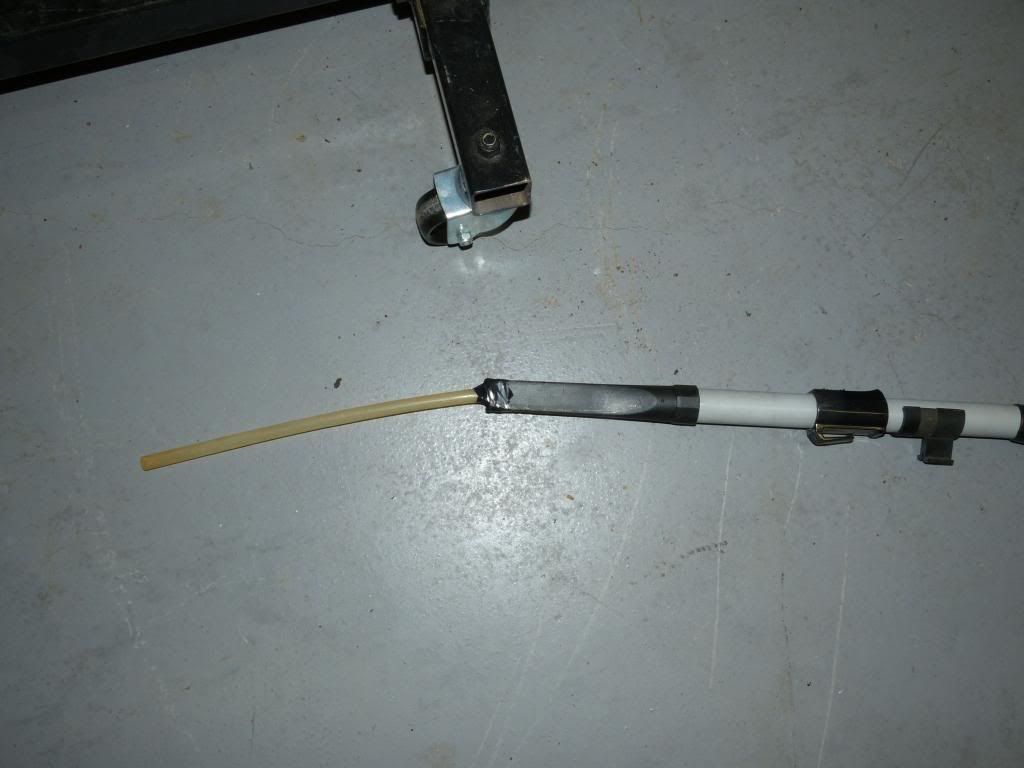 And now repaired. First job on the car completed! 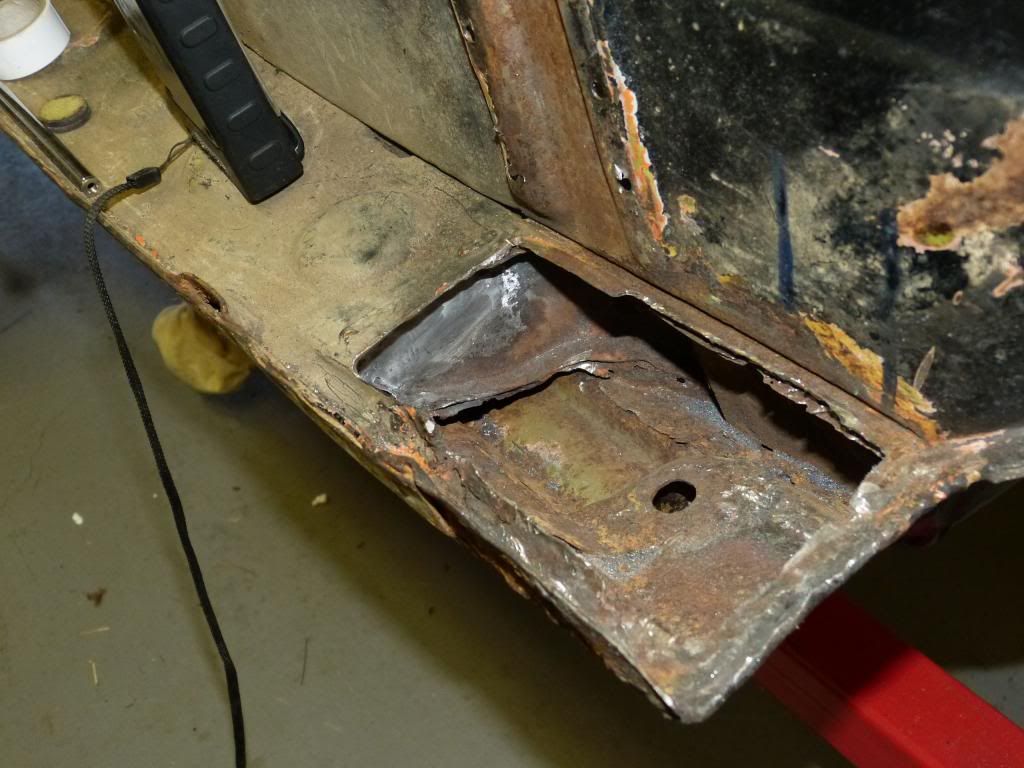 My new best mate. So good for working in tight and confined spaces. 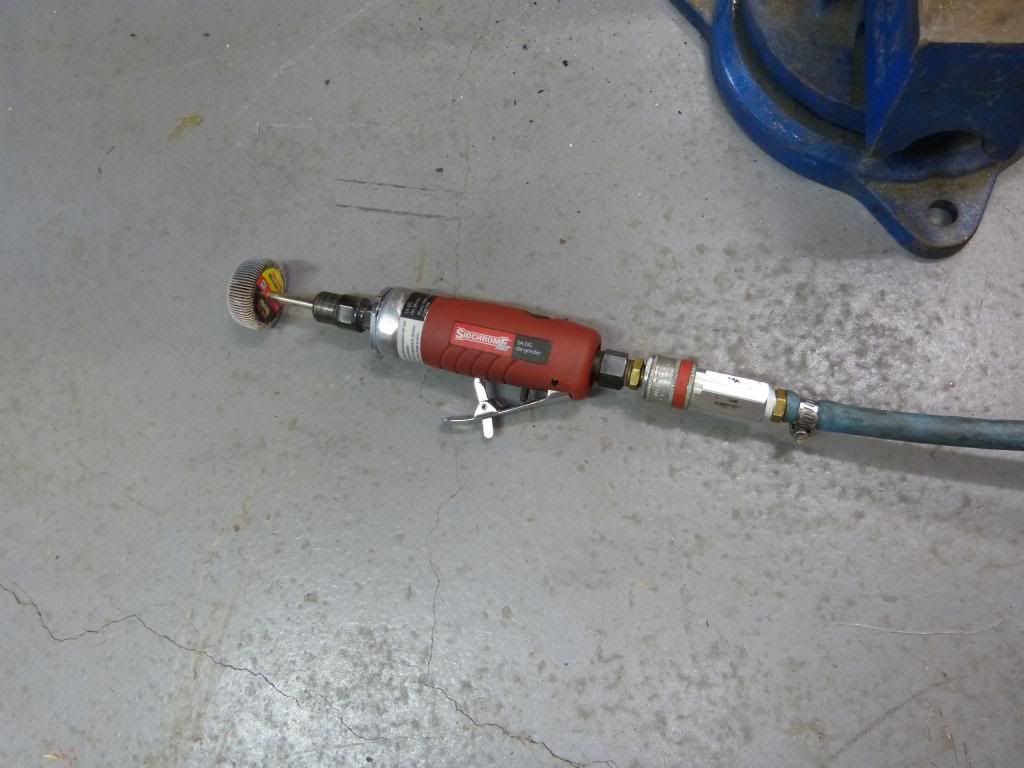 |
|
|
|
|
Logged
|
|
|
|
Crumpsnr
Senior Member
Offline
Model: FC
Posts: 286
Shellharbour NSW
|
|
« Reply #46 on: November 30, 2013, 09:38:18 PM » |
0
|
This is what would have been in the previous post: Hi all, it's been a while since my last post. I haven't been idle but have been pretty busy with work and other things. The car is now on the rotisserie. I'm glad to have such easy access to all parts, but I'm not impressed with the design and functionality of the rotisserie. I can show why in another post if anyone's interested. Most of what I have to fix is not rust, but poor previous repairs. Underneath the car is in excellent condition rust-wise, so I'm thankful I don't have too much to do there. I'll be restoring the spare wheel well that was removed, and fixing up a couple of rust repairs to the rear end that are a bit hard on the eye. Pete, you mentioned you might have a cowl for sale. I'd like to take you up on that if you still have one. After grinding the bog out of the firewall it's not beyond repair, but it's a much easier option to put in another one. Thanks to FC Dave I have one. I've started to tackle the rust in the left inner sill at the junction with the outer sub-frame arm. It had been repaired badly and was quite rusty. All of the work I've done on the car over the last couple of years has been to strip it and find more problems. Happy to say last night I actually put something back on the car with a small rust repair. It was a bit hard to reach inside the inner sill but I didn't want to cut away any more than I had to. The die grinder my neighbour lent me has been quite handy. I've also scored an Aussie 4 speed with shifter and A/C bracket for a red motor, so I'm starting to get a store of bits that will be used later. Next job: Finish repairing the corner shown in this post and put new outer channels and replacement tunnel section in, then tackle putting in the replacement firewall. Regards, Martyn |
|
|
|
|
Logged
|
|
|
|
FCV08
Senior Member
Offline
Model: FC
Posts: 692
FE FC Club of QLD
|
|
« Reply #47 on: November 30, 2013, 11:20:06 PM » |
0
|
Martyn Thanks for the update. All progress is good progress. R Craig D |
|
|
|
|
Logged
|
|
|
|
|
FC Dave
|
|
« Reply #48 on: December 01, 2013, 10:26:02 AM » |
0
|
Glad some bits went to a good use.
|
|
|
|
|
Logged
|
|
|
|
Crumpsnr
Senior Member
Offline
Model: FC
Posts: 286
Shellharbour NSW
|
|
« Reply #49 on: December 04, 2013, 11:50:25 PM » |
0
|
|
|
|
|
|
Logged
|
|
|
|
|
hsv-001
|
|
« Reply #50 on: December 05, 2013, 09:16:04 AM » |
0
|
Just done a small rust hole on the front outer ps sill on my old van its the first rust to appear in the more than 25 years that I've owned it . It had 26k original miles when I bought it . Any way I would guess that lots of the rust found at the front of the sills in these old cars can be put down to quick refits of front guards . The hard to get to top bolt , up near the windshield corner, and I'm sure there was rubber that was between the guard and the pillar . Was it part of the original door rubber , its been a long time since I've pulled an originally fitted front guard off ? Just looking at your photos and it got me thinking . Its very important to seal around these bolt holes .Cheers Haydn
|
|
|
|
|
Logged
|
|
|
|
|
fcwrangler
|
|
« Reply #51 on: December 05, 2013, 04:08:03 PM » |
0
|
looking good so far, what are you going to do with the boot floor? looks funny without the spare wheel carrier. I saw on one of the other posts that an early chev tub will fit!!!, also Slim had a complete rear floor for sale a while ago on ebay, may be worth a look.
Regards Jim
|
|
|
|
|
Logged
|
on the seventh day: God Made Holden
|
|
|
Crumpsnr
Senior Member
Offline
Model: FC
Posts: 286
Shellharbour NSW
|
|
« Reply #52 on: December 05, 2013, 06:39:18 PM » |
0
|
Hi Haydn,
Yep, there was a separate rubber from memory that was a high thin rubber with a round section that went around the screw that fixed it. Hard to describe but I'll certainly separate the guard and the body when the time comes.
Jim, I was lucky the previous owner did a very neat job of taking out the spare wheel well and it came with the car so it's going back in. I'd like to have been a fly on the wall when they had the small fire next to the fuel tank from welding rust repairs above. That'll get tidied up too.
|
|
|
|
|
Logged
|
|
|
|
|
hsv-001
|
|
« Reply #53 on: December 05, 2013, 07:54:51 PM » |
0
|
Year, I'm sure water runs in there and down the pillar if left without something to replace that rubber . Haydn
|
|
|
|
|
Logged
|
|
|
|
|
FC Dave
|
|
« Reply #54 on: December 05, 2013, 08:52:22 PM » |
0
|
I bought a set of mudguard bolts from a bloke on evilbay called earlybits. He supplied a rubber grommet type seal with the bolt.
|
|
|
|
|
Logged
|
|
|
|
|
fe350chev
|
|
« Reply #55 on: December 07, 2013, 01:02:45 PM » |
0
|
Progress is progress.
|
|
|
|
|
Logged
|
Deano
Current Rides: 1958 "Black and White Taxi" FC special Sedan, 1957 FE special Sedan, BA Futura, 2015 VF Commodore, 1956 Austin Tipper Truck
|
|
|
|
FireKraka
|
|
« Reply #56 on: December 09, 2013, 01:04:07 PM » |
0
|
Hi Martyn;
The FC ute I picked up recently (now nick named Rusty) has the rubber between the guard and the body I hadn't noticed it before until I saw your comment.
I cannot find a chassis number on Rusty and the engine is a later engine so I had assumed the front had been changed maybe the rubbers were put back in or the whole front end has not been off.
Regards
Neil H
|
|
|
|
|
Logged
|
|
|
|
Crumpsnr
Senior Member
Offline
Model: FC
Posts: 286
Shellharbour NSW
|
|
« Reply #57 on: December 10, 2013, 06:54:16 AM » |
0
|
Hi Rusty. I think my rubbers are still stuck to the guards. They're in storage so I'll have to check next time I'm at my parts shed. Cut open a pushbike tube and I think a narrow section would make a pretty good substitute. I'll be putting some on the top of the subframe where the guard screws down too. Regards, Martyn
|
|
|
|
|
Logged
|
|
|
|
Crumpsnr
Senior Member
Offline
Model: FC
Posts: 286
Shellharbour NSW
|
|
« Reply #58 on: December 04, 2014, 10:29:45 PM » |
0
|
Wow, nearly a year since the last post. And about the same time since working on the car too. Have been too busy on the Fargo (see the posts in other vehicles under construction). Pete, did you still have a good cowl section available? I'd like to keep the vent in mine, even though it's gonna get A/C.
Regards,
Martyn
|
|
|
|
|
Logged
|
|
|
|
|
Frankiej
|
|
« Reply #59 on: December 07, 2014, 10:25:53 AM » |
0
|
Hey crumpsnr I am going to remove mine from the fe to make it smooth, and the whole lot is in perfect condition not a speck of rust cheers frankiej
|
|
|
|
|
Logged
|
|
|
|
|


