|
1201
|
Galleries / Project Cars - FEs and FCs Under Construction / Re: "Why don't you take the FC on?"
|
on: May 30, 2013, 10:26:20 AM
|
The rest of the story can now be told . . . One complication for me was this: Dad kept bees, on the carport roof. I'm allergic to bee stings. I couldn't go anywhere near the wreckage until the hives were patched up and moved. That was about a week. Cleaning up was slow and painful. Getting rid of the tree branches was easy enough, but the tree trunk itself and the remains of the carport had to be propped up enough to "make safe". Both my parents' cars were written off. My three were in the back of the carport, which made extracting them a challenge. The 48 was at the right rear of the carport, the part which didn't collapse. Mum's i30 shunted it into another tree, dinging the rear bumper; and the i30's front bumper snagged the 48's LHF overrider, and bent it when removed. But - no panel damage. The tree hit the FC's LHR quarter panel, and one of the carport roof beams came down on the FC's roof.  The only practical way of extracting the FC was to jack the tree up enough to free the car, then winch the car out sideways. And once out of the carport, we could gauge the extent of the damage. 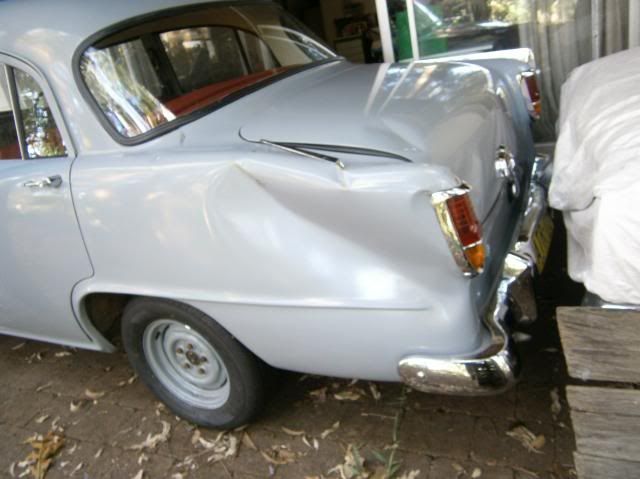 The rear quarter panel was way beyond my abilities to repair, but the structure of the car didn't seem bent. 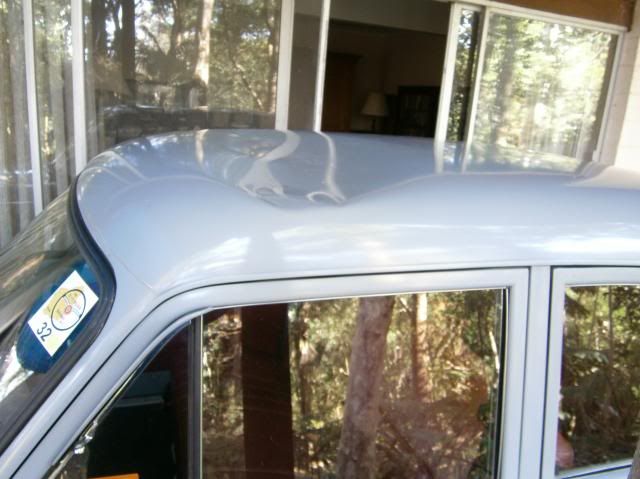 The roof was pushed in quite a way. Maybe if you got something like a giant swiss ball and inflated it inside the car, the roof would pop back out, and need only minor work to get rid of the crease. And because the car sat in the rain with sodden covers over it for a few days, the paint humidity-blistered. Time for a complete strip and rebuild. Again. Rob |
|
|
|
|
1206
|
Technical Board / General Technical / Re: Rocker Gear
|
on: April 15, 2013, 05:36:06 PM
|
|
Keith,
I think H279 means August 27th, 1959. So you have a 1962 block with a 1959 head and early FJ rocker gear. The FJs ditched the complicated cup-and-spring arrangement the FXs had, for a hex brass fitting. And then somewhat later the oil hole was moved to the top of the rocker to improve lubrication to the tip of the valve stems.
At some stage in the motor's history it went through a major rebuild, and was assembled with whatever was within easy reach.
Rob
|
|
|
|
|
1208
|
Technical Board / General Technical / Re: Rocker Gear
|
on: April 12, 2013, 01:43:25 PM
|
|
Keith,
Your EJ motor has FJ-to-early FC rocker gear on it. That's really odd. A recommended upgrade for FX-FJ owners has long been the late-model rocker gear with two long bolts on each pedestal. The early pedestals were quite prone to breaking because the stress of holding the valve springs open is taken on the short-bolt side.
Just for info's sake - where is the oil hole on the rocker arms - right on the top, or closer to the adjusting locknut? Similarly, what does the oil pipe fitting look like? Is it brass and hexagonal, or is it cast, with a screw in the side? Even among "early" rocker gear, there were variations.
Does the cylinder head on the EJ motor have provision for just a temperature sender, or a sender plus a heater outlet as well? If it's a "single-outlet" head, it may be that the motor has had an early-series head fitted, complete with early rocker gear.
Maybe you could read the date code off the head, and that'd put us all out of our misery . . . The date code will have a single digit, a letter, and two digits. I forget the order, but it will tell you when the head was cast.
Rob
|
|
|
|
|
1209
|
General / General Board / Re: Original steering box grease 57 FE
|
on: April 02, 2013, 01:20:04 PM
|
|
John,
Or, you can use CV joint grease. Last time(s) I've overhauled Holden steering boxes I've used Castrol CV joint grease. It's formulated for high speed, high pressure applications, it stains everything black within a mile radius, but does the job well.
Rob
|
|
|
|
|
1211
|
Technical Board / General Technical / Re: Diff Centres
|
on: March 07, 2013, 09:59:16 AM
|
|
For the EH and later diffs the rear uni joint is the same as the front.
Me too. I run a 3.36 diff in my sedan. Maybe a little slower off the mark. I don't have to slip the clutch any more than with a 3.89, but it's a far more relaxed cruise at highway speeds with a 3.36.
Rob
|
|
|
|
|
1214
|
Technical Board / General Technical / Re: window regulators
|
on: December 17, 2012, 03:13:20 PM
|
How hard could it be? Just remove the splined shaft and pinion and put the motor and gearbox in its place . . . Who's got a spare HK-T-G-Q-J-X-Z power window setup they want to donate to a worthy cause?  Rob |
|
|
|
|
1215
|
Technical Board / General Technical / Re: window regulators
|
on: December 17, 2012, 01:30:43 PM
|
Where were we? Most of the way through a teardown. Step 6. Disassemble the donor window regulator in exactly the same manner as the RHF. 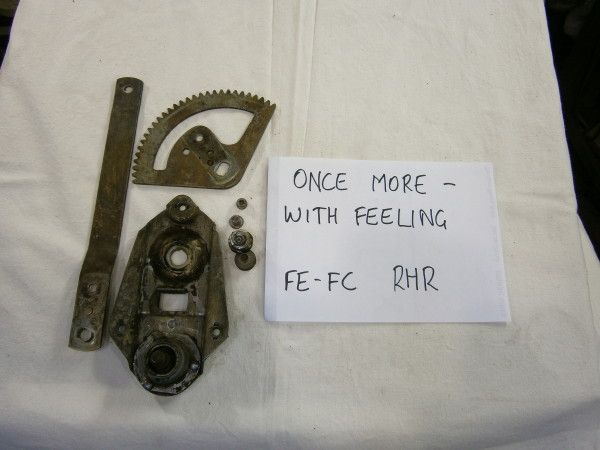 All these parts except the lift arm will be re-used. 7. Reassemble lift pin and sector gear to the RHF lift arm. 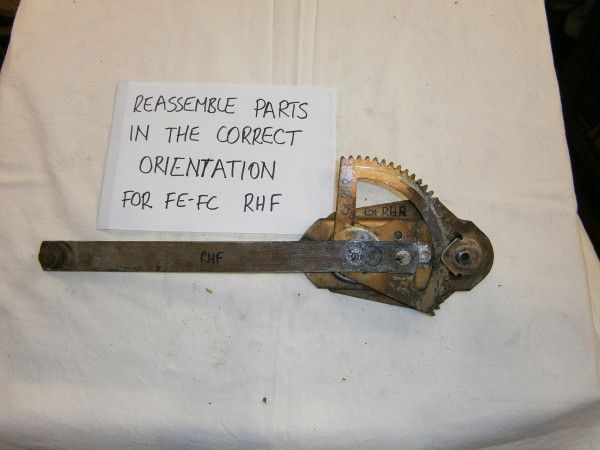 Reassemble the donor lift pin and roller to the lift arm, being careful to put it on the right way. When re-using the old rivets, its a good idea to make a chamfer in the lift arm with a ½ drill. The marks on the old RHF sector gear will tell you which way to assemble the donor sector gear to the RHF lift arm. Grease the recess around the pivot hole, install the sector gear and lift arm to the regulator body, tap the pivot stud into place, and peen it over well. 8. Lubrication, assist spring, limit rivet. 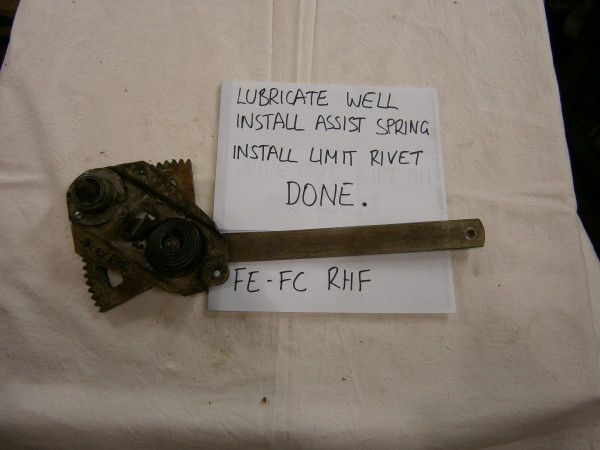 Grease the sector gear well. Grease the assist spring well. Force the grease down between the coils so the spring wont do the familiar groan. Install the assist spring on the pivot stud, the correct way around, and then engage the pinion teeth with the sector. When you hold the window regulator the same way as its in the drivers door and operate it, the down direction should be hard and the up direction should be easy. Once you are satisfied that the assist spring is in the right way around, re-install the limit rivet. Youll have to make the flared end of the rivet straight in a vice, and chamfer the hole in the regulator body to make the rivet start in the hole. Job Done. But before installing the rebuilt regulator into the drivers door, check that the window slides freely in the bailey channel. If the drivers window is stiff, youll only chew out your newly rebuilt regulator. Adjust the division channel, and replace bailey channels if needed. Rob |
|
|
|
|
1216
|
Technical Board / General Technical / Re: window regulators
|
on: December 17, 2012, 01:29:12 PM
|
At long last the documented window regulator how-to guide. Thanks to zulu for providing a rear door window regulator. Here is how to convert a rear window regulator into a drivers. Required components are a RHF window regulator and a rear door window regulator. The rear door regulator will provide all the components except the lift arm from the RHF regulator. All the other parts of the RHF window regulator will most likely be good for the bin only. The first couple of images show representative FE-FC and FB-EK window regulators. Somewhat naively I thought theyd be exactly the same, but theyre not. To tell them apart, FE-FC regulators are yellow zinc-plated, while FB-EK regulators are bright zinc plated. FB-EK sector gears are different from FE-FC; FB-EK regulator bodies have two holes for the limit rivets compared with one for FE-FC. Finally, the FB-EK front window lift arms are just different enough from FE-FC that they cant be interchanged the locating boss is in a different place. 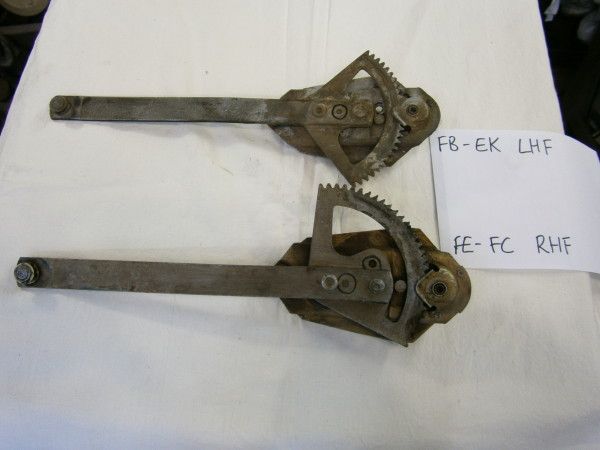 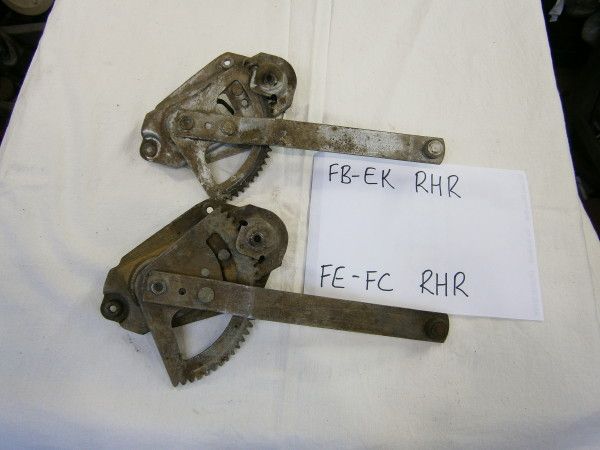 Im using FE-FC hardware here, but the procedure is valid for FB-EK too. 1. Remove limit rivet. 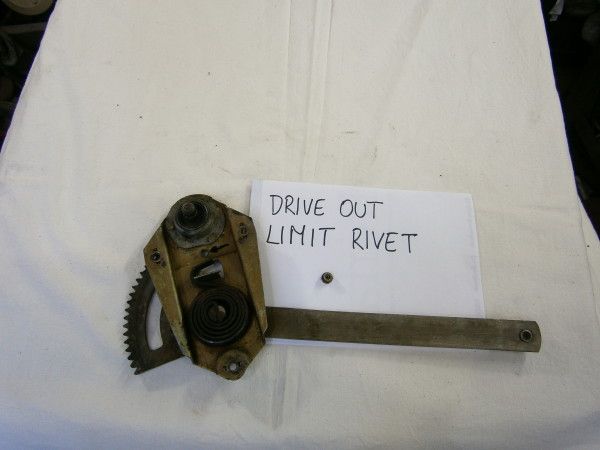 Just drive it out with a hammer and pin punch. The metal will distort around the hole. Tap the metal flat again with a pin punch and suitable dolly. 2. Remove the assist spring. 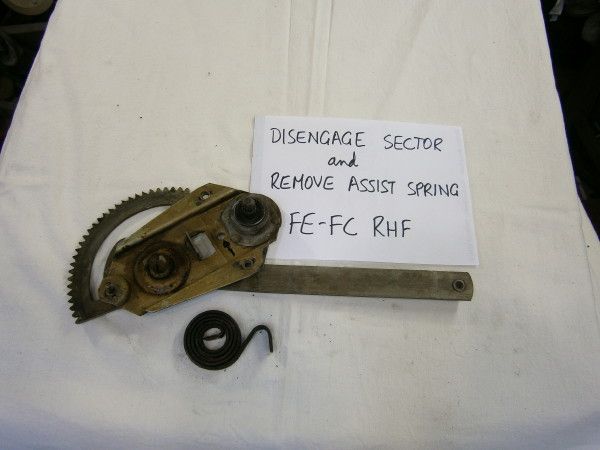 Using a window winder handle, wind the window up thats in the easy direction until the sector gear disengages from the pinion. Rotate the arm until the assist spring is free, then remove the assist spring. 3. Remove the pivot stud. 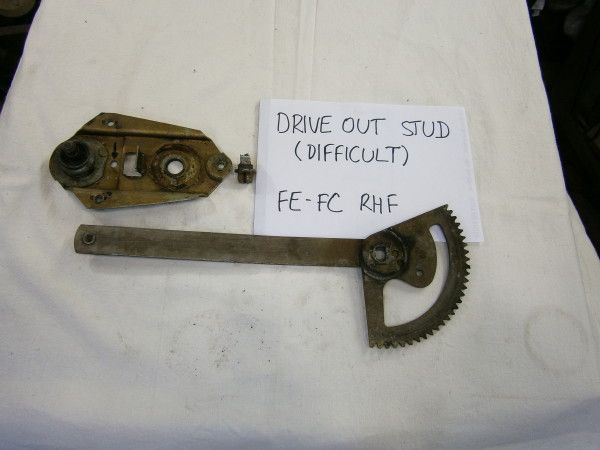 This is a difficult operation. The pivot stud is high-tensile steel. I couldnt make it budge with a hammer and pin punch, so instead I used a vice as a press, with a 7/8 socket over the large end of the stud and a 5 mm hex socket head driver bit as the drift. Most of the pivot studs shoulder will break off. Option: grind the peened-over part of the pivot stud off and use a pin punch. Youll have to weld the pivot stud back on if you go this way. Remove the sector gear and lift arm from the window regulator body. 4. Separate the lift arm from the sector gear. 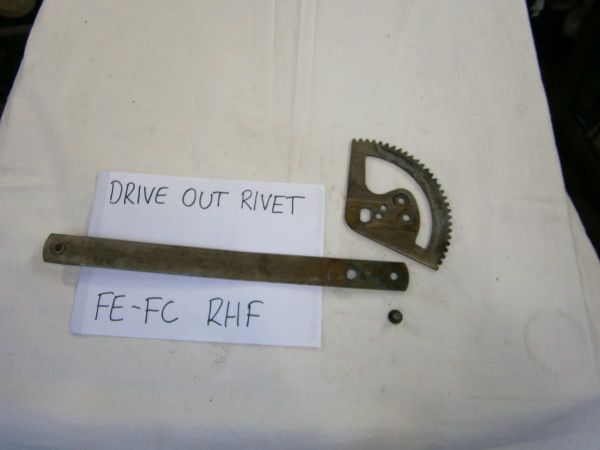 The rivet holding the lift arm to the sector gear is not easy to remove. I used a vice, a 12 mm socket, and a 5 mm hex socket head driver bit. Option: use a grinder and pin punch, but youll need to weld the rivet back in. 5. Drive out the lift pin and roller. 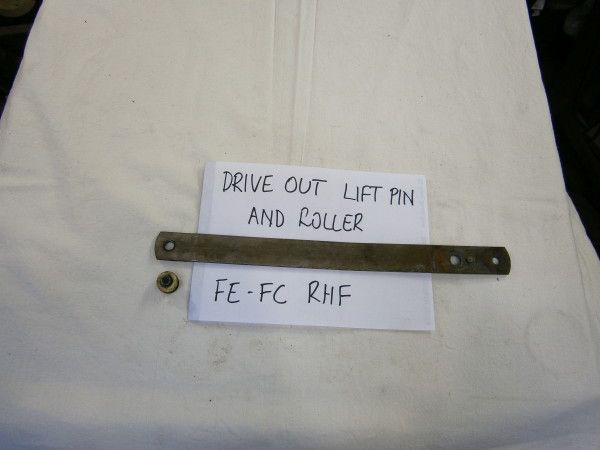 If its a drivers window regulator, the plastic roller will long since have worn out, so use the one from the rear door regulator. Thats the RHF window regulator disassembled. The only part to salvage is the lift arm. And it looks to me as if the lift arm is subtly asymmetric the rivet holes are not exactly dead centre, and the arm has a slight bend in it. Which means you cant just use a LHF lift arm on the drivers side (rats). Bugger. 5000-character limit exceeded (again). Stay tuned. Rob |
|
|
|
|
1217
|
Technical Board / General Technical / Re: window regulators
|
on: November 30, 2012, 09:57:30 PM
|
|
Sorry, I got distracted a bit in the last week. If I can buy an FE-FC rear window regulator from one of the NSW people on the weekend (Christmas bash at Gledswood Estate on Sunday), I'll have a shot at doing the conversion, and taking some photos too . . .
Rob
|
|
|
|
|
1218
|
Technical Board / General Technical / Re: window regulators
|
on: November 24, 2012, 08:25:29 AM
|
Correction 1: window regulator lift arms are the same for both sides, but differ front to rear. Correction 2: FE-FC and FB-EK window regulators are not exactly the same. I think the rears can be interchanged between model series, but the fronts can't. The main difference is in the sector gear. The FE-FC sector gears have two holes, and the lift arm is riveted to either hole depending on front or rear. The FB-EK sector gear has one hole, used for both front and rear FB-EK, and which corresponds to rear FE-FC. The parts I have for comparison are EK LHF, LHR and RHR window regulators; and FC RHF (sector gear worn out). @NES232: No, the spring doesn't look like a broom, instead it's more like a screwdriver jammed between the window and the belt weatherstrip. Does much the same thing though. Rob |
|
|
|
|
1220
|
Technical Board / General Technical / Re: fe drum brake upgrade
|
on: November 23, 2012, 05:16:03 PM
|
|
And here's another thought: If you are allowed to use an EH rear axle complete, then try finding HR ute/van rear backing plates, because the HR commercials used 2-1/4" rear brakes too.
Rob
|
|
|
|
|


