|
abletec
|
 |
« on: June 18, 2020, 06:35:02 PM » |
0
|
I am using the red GMH Shop Manual FE and FC Series reference page 227 steering wheel and related parts. My question is how can I connect the horn switch contact wiper behind the steering wheel on a 59 FC wagon? I see that there is an insulated hole in the base of the wheel assembly for item 5, contact and spring assembly - horn connector, and I have the contact with the spring. How do I fit these and what rides over the surface the contact surface of item 3, contact and cable assembly - horn? Which way up does the horn contact go? What holds the contact and spring in position? Also what gives the horn blowing ring the spring back effect? I feel that I might be missing a part but cannot find it on the diagram. Your assistance is appreciated.
If you don't have access to the stated manual this might not make any sense.
|
|
|
|
|
 Logged
|
|
|
|
|
ardiesse
|
|
« Reply #1 on: June 18, 2020, 08:24:20 PM » |
0
|
The horn contact wiper is like a brush from an electric motor, but cylindrical instead of rectangular. It has a flexible lead, a spring and a sort of cap soldered onto the lead, holding everything together. The contact slides over the contact ring when the steering wheel is turned. Item 15 holds the contact wiper in place. It's a Belleville spring washer with holes in it to accommodate the various parts which hold the horn ring on. The outside edge of the spring washer sits on the black part of the steering wheel, and so is insulated from ground. This is the piece that has the "springiness" when you push the horn ring. A Bakelite spacer (item 6) goes over the spring washer. Its purpose is to stop the horn ring from being "live" electrically. The spacer has three notches in it to accommodate the horn ring mounting spacers (16), which are also made of Bakelite. The mounting screws (17 and 18) sandwich the horn ring between the mounting spacers and the contact spacer (6).
When you push on the horn ring, the Belleville washer (15) springs the other way, and its inside edge makes contact with the metal hub of the steering wheel, making the horn circuit. The current flows from the battery through the horn, up the contact wire into the steering column, onto the contact ring, then to the contact wiper, the Belleville washer, the steering wheel hub, the steering shaft, through the steering shaft bearings to the steering box case, and then to ground.
Assembly goes like this (and wear a towel over your lap to catch the small parts which you will drop during these operations):
Disconnect the battery. Put the insulator (14) into the hole in the steering wheel. It sounds like it's already in place. Follow it in with the contact (5), with spring and cap outermost. Vaseline the sliding surface of the contact before installing. Put the Belleville washer (15) in place on the steering wheel, lining the holes or cutouts up with the screw holes in the steering wheel. Then put the Bakelite spacer (6) over the Belleville washer (15), again lining the cutouts up with the screw holes in the steering wheel. Thread each horn contact mounting spacer (16) with a screw (17) and lockwasher (18). Grab one spacer-screw-lockwasher set and put in place in the horn ring. Line the horn ring up with the steering wheel and start the screw (17) into its hole in the steering wheel, but do not tighten. Install the other two spacer-screw-lockwasher sets into the horn ring and start the screws into their holes in the steering wheel. When all three screws 17 are in place, tighten them. Check the operation of the horn ring to ensure that it has a positive "springy" feel. Reconnect the battery and test the operation of the horn. When everything's satisfactory, disconnect the battery again and install the horn button. Reconnect battery.
Rob
|
|
|
|
|
Logged
|
Remember: if your Holden's not leaking oil, it doesn't have any.
|
|
|
|
Errol62
|
|
« Reply #2 on: June 18, 2020, 09:40:56 PM » |
0
|
Here are most of the basic components    Sent from my SM-G973F using Tapatalk |
|
|
|
|
Logged
|
|
|
|
|
Errol62
|
|
« Reply #3 on: June 18, 2020, 09:48:10 PM » |
0
|
The top photo shows an alternative style of sweeper brush contact what have you, missing small spring that fits over inner part and inside cylinder to provide preload between the spring washer and circular fixed contact.
Sent from my iPad using Tapatalk
|
|
|
|
|
Logged
|
|
|
|
my8thholden
nsw-club
Senior Member

 Offline Offline
Model: FC
Posts: 851

|
|
« Reply #4 on: June 19, 2020, 07:11:44 AM » |
0
|
also mate , make all components very clean ,really carefully clean without damaging surfaces ,to ensure a good contact when steering wheel is in any position ,I had a problem with mine a FC ,and a re clean fixed it ...Vern
|
|
|
|
|
Logged
|
these days i'm half as good for twice as long
|
|
|
|
abletec
|
|
« Reply #5 on: June 19, 2020, 06:13:05 PM » |
0
|
Thanks everyone for your help on this. It seems that I am missing the cap for the horn contact. All I have for the contact is the T shape split pin and the spring. I need a cylindrical cap. Are these available or maybe I could make one from a piece of brass tubing. I haven't worked our how to post photos yet.
|
|
|
|
|
Logged
|
|
|
|
|
ardiesse
|
|
« Reply #6 on: June 19, 2020, 06:44:54 PM » |
0
|
Rare Spares used to sell the horn contact, but there may be problems with suppliers. Maybe some generous soul on the forum will take pity on you and sell you one.
Brass is not the right material to use. The contact is most likely oiled sintered phosphor bronze.
I've wondered about using a brush from an electric motor, trimmed to size.
Rob
|
|
|
|
|
Logged
|
Remember: if your Holden's not leaking oil, it doesn't have any.
|
|
|
|
Wookie 66
Guest
|
|
« Reply #7 on: August 23, 2021, 12:33:37 PM » |
0
|
Hi all
Found this and need to jump in
Ive read through this a few times and I have connected all the parts Im not getting the contact part
Have power it all fits when I depress the horn blow ring no sound if I sort a screw driver over the steering wheel locking nut and the contact button or the horn contact switch the horns work.
Im not seeing where Im going wrong
Any assistance appreciated
|
|
|
|
|
Logged
|
|
|
|
|
ardiesse
|
|
« Reply #8 on: August 23, 2021, 02:26:36 PM » |
0
|
Do you have all the small parts, in their correct order? First part in is the horn contact. Next comes a diaphragm spring. It's a couple of inches in diameter and sits in a shallow recess in the black part of the steering wheel hub. Then there's a Bakelite washer with three bites taken out of the outside, then the horn ring. Finally, three machine screws with plastic insulators hold everything together.
When you push on the horn ring, the diaphragm spring "inverts" and makes contact with the steering wheel hub. (The hub needs to be clean metal around the centre boss.)
If you seat the diaphragm spring in position on the steering wheel over the horn contact, and push the centre in with your thumbs, the horn should sound.
Rob
|
|
|
|
|
Logged
|
Remember: if your Holden's not leaking oil, it doesn't have any.
|
|
|
my8thholden
nsw-club
Senior Member
Offline
Model: FC
Posts: 851
|
|
« Reply #9 on: August 24, 2021, 08:18:57 AM » |
0
|
Wookie ..I had a problem with my horn , the problem was in the steering wheel itself ,if you see in the images above , the circular dished contact ring ,with the 3 large holes and 6 smaller holes , that disc sits neatly in a recess in the wheel its self , that recess is in itself an insulator , part of it had broken / decayed away over the years ,so on assembly the metal center of the wheel was in contact with that disc , so I removed the rest of that recess edge , machined up a plastic washer if you like and sat it in the recess ...bingo functional horn ...keep well Vern ..
|
|
|
|
|
Logged
|
these days i'm half as good for twice as long
|
|
|
zulu
nsw-club
Guru
Offline
Model: FE and FC
Posts: 1867
Old Boonah Ambo
|
|
« Reply #10 on: August 24, 2021, 12:19:45 PM » |
0
|
This may help, the hardest bit to get if you've lost it is the cylindical bakelite insulator that sits in the wheel hub, although you can have one turned up in plastic 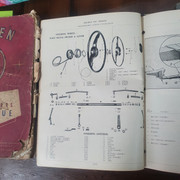 |
|
|
|
|
Logged
|
|
|
|
|
Wookie 66
Guest
|
|
« Reply #11 on: August 25, 2021, 07:21:32 AM » |
0
|
Hi Zulu
I have the same book and all the parts shown in the diagram the bakelight disk does it sit on top of the metal discs or under it looks like it sits on top in the diagram
|
|
|
|
|
Logged
|
|
|
|
|
Errol62
|
|
« Reply #12 on: August 25, 2021, 07:34:43 AM » |
0
|
Sits on top between the metal disc and horn bar.
Sent from my iPad using Tapatalk
|
|
|
|
|
Logged
|
|
|
|
zulu
nsw-club
Guru
Offline
Model: FE and FC
Posts: 1867
Old Boonah Ambo
|
|
« Reply #13 on: August 25, 2021, 02:50:43 PM » |
0
|
Without undoing mine, pretty sure its as per the image
|
|
|
|
|
Logged
|
|
|
|
|
Wookie 66
Guest
|
|
« Reply #14 on: August 26, 2021, 08:00:20 AM » |
0
|
Morning all
Ok Im not understanding how it works
When you press down on the horn ring what metal parts touch to make the power connection
Everything is connected as per the book with power going to the horn contact button but when I depress the horn ring I hear a
click and then nothing
What am I missing all the parts are in place
|
|
|
|
|
Logged
|
|
|
|
|
Errol62
|
|
« Reply #15 on: August 26, 2021, 08:03:59 AM » |
0
|
The flat steel disc contacts the center metal of the steering wheel.
Sent from my SM-G973F using Tapatalk
|
|
|
|
|
Logged
|
|
|
|
|
Wookie 66
Guest
|
|
« Reply #16 on: August 26, 2021, 08:12:26 AM » |
0
|
I pop off the centre cap
Undo the 3 little screws and take out the 3 little Bakelite spacers
Remove the horn ring
Remove the Bakelite ring
Remove the metal disc with the holes in it
The horn contact button is exposed
Run a test light from the steering centre bolt to the horn contact button it lights up
Short the contact button to the steering centre bolt the horns sound loud and clear
Reverse this process for installation depress the horn ring a click and no sound
These little things are driving me nuts
|
|
|
|
|
Logged
|
|
|
|
|
mcl1959
|
|
« Reply #17 on: August 26, 2021, 09:29:43 AM » |
0
|
So the trail of power is as follows
Battery to horn
Horn to connector at steering column
Wire goes up steering column to brass ring
Contact set with little spring etc rubs around the brass ring in constant contact
The contact set protrudes a mm from steering wheel and is in constant contact with circular ring
When button is pushed the ring pops in and contacts the centre of the steering wheel and horn blows.
From your description it sounds to me like the last step is not happening right, is ring damaged or corroded at all so that it is not earthing on the steering wheel centre properly, or not touching the contact properly.
As you say, if you short the contact to the wheel centre it works, so thats all I can think of.
|
|
|
|
|
Logged
|
|
|
|
DougT
Junior Member
Offline
Model: FE
Posts: 86
|
|
« Reply #18 on: August 26, 2021, 10:12:40 AM » |
0
|
Here's my two cents worth.
Have you put the metal contact disc in the right way round? convex towards the driver.
If you have access to the NASCO Accelerator magazines check out Vol 14 No.2 (Mar 1957) pages 12 and 14 for details on horn adjustment and horn ring adjustment procedures. Also look at the article in Vol 16 No.9 (Oct 1959) regarding Kontak Fix lubricant.
Doug
|
|
|
|
|
Logged
|
|
|
|
Maco
nsw-club
Senior Member
Offline
Model: FC
Posts: 964
|
|
« Reply #19 on: August 26, 2021, 10:38:55 AM » |
0
|
I believe Holden switch the Earth (negative), so check where the wire a the bottom of steering is going to, should be Earthed. Power (positive) to the horn at all times, hope this helps.
Cheers
John
|
|
|
|
|
Logged
|
Better in Green
|
|
|
|


