FE-FC Holden Discussion Forum
April 25, 2024, 12:30:33 PM *
Welcome, Guest. Please login or register.

Login with username, password and session length
News: The FE-FC Holden Car Club of NSW are proud to host the 19th FE-FC Holden Nationals. Check out the announcement video for more.
 
   Home   Help Search Calendar Login Register  
Pages: [1] 2 3 ... 6   Go Down
  Add bookmark  |  Print  
Author Topic: "Why don't you take the FC on?"  (Read 84441 times)
ardiesse
nsw-club
Guru
*****
Offline Offline

Model: FC
Posts: 1288


View Profile
« on: February 13, 2012, 04:45:48 PM »
+2

It starts innocently.  A chance remark, an unexpected response, and a new project starts.

In May 2008, there was a fortieth anniversary celebration at work, and the retirees were invited in to share in the fun.  An ex-colleague found me, and said, “I’m cleaning out the garage, and there’s an FC Holden which I started to restore.  Would you be interested in it?”  I said thanks, but as I already had two old Holdens, I didn’t really want a third.  But I knew some people in the FE-FC club, and I could pass his details on, and see whether anyone’s interested.  I mentioned this to my parents in passing, and then my father said, “Why don’t you take the FC on?”  Never in thirty years of me bringing cars home had he said this.  So we went around to my ex-colleague’s, and took a look at the FC.  Usual story.  1959 FC Standard sedan, stripped down in 1990 for a restoration which got not much further.  Panels good, floors good, sills shot, rear doglegs shot, LH rear quarter very rusty.  Special interior, Simca Aronde front seat, Speco floorshift, Toyota heater.  Reconditioned engine, new brakes, and about three trailer-loads of spares.  Good parts vehicle, in other words.  I looked at it differently: viable, but probably lengthy, restoration.  Lots of people restore Specials.  Original Standards are a lot thinner on the ground.

$700 later, and the FC is mine.


Now to strip the car down properly.


Characteristic pose for quite some time to come.


Engine and transmission out.

Now that’s an engine bay!


A division of labour came about naturally:  I did the bodywork, and my father took care of the mechanicals.

Once the shell was stripped down, I got an idea of what I was in for.  The body was a mess where the subframe bolts on.

Journey of thousand miles starts with single step – the right hand front inner sill.


I made a pattern

Marked out some 2 mm sheet, cut, bent, welded to make the inner sill section.


I rebuilt the lower cowl panel from the inside

Made a crude jig


And welded


Fabricated the No. 1 body crossmember


The left hand side wasn’t nearly as bad.


But it still needed a lower cowl panel replacement.


Blanking the hole in the firewall for the heater.


The inner sills were the most difficult repairs.

I realise now that the subframe on this FC was in very good condition considering.  The “dumb irons” were intact, and the front subframe tie member was rust-free.  A small section of the right-most lower subframe leg required repair.  The dumb-iron-to-tie-member welds had cracked on both sides, and I re-welded them.  Apart from welding up numerous extra screw holes in the inner guards, that was the full extent of repairs to the subframe.

How hard could the rest of the car be?  Try the doglegs.
Logged

Remember: if your Holden's not leaking oil, it doesn't have any.
fe350chev
Guru
*****
Offline Offline

Model: FE and FC
Posts: 2601


View Profile
« Reply #1 on: February 13, 2012, 05:02:35 PM »
0

Well sounds like you are sort of enjoying it  Tongue   Cheesy

At least the story telling part anyway!
Logged

Deano

Current Rides: 1958 "Black and White Taxi" FC special Sedan, 1957 FE special Sedan, BA Futura,  2015 VF Commodore, 1956 Austin Tipper Truck
customFC
Moderator
Guru
*****
Online Online

Model: FC
Posts: 5895


Ask me about microwaving cats for fun or profit.


View Profile
« Reply #2 on: February 13, 2012, 09:49:44 PM »
0

Well, it looks like you took on the FC and struck the first blow.
Nice work, looking more solid by the day.
Regards
Alex
Logged

ardiesse
nsw-club
Guru
*****
Offline Offline

Model: FC
Posts: 1288


View Profile
« Reply #3 on: February 14, 2012, 09:43:05 AM »
0

Alex,

There's lots more to come yet.  It was only when I went through all my images and put them in sequence that I realized how much work goes into a restoration . . .

Rob
Logged

Remember: if your Holden's not leaking oil, it doesn't have any.
graham_fuller
nsw-club
Guru
*****
Offline Offline

Model: FE
Posts: 1975


I love YaBB 1 Gold!


View Profile
« Reply #4 on: February 14, 2012, 10:22:03 AM »
0

Hi Rob,
Bring on more pics. Even better bring the car tonight to the meeting.
Cheers,
Graham
Logged
ardiesse
nsw-club
Guru
*****
Offline Offline

Model: FC
Posts: 1288


View Profile
« Reply #5 on: February 14, 2012, 01:24:36 PM »
0

Graham,

Your word is my command.

Rob
Logged

Remember: if your Holden's not leaking oil, it doesn't have any.
ardiesse
nsw-club
Guru
*****
Offline Offline

Model: FC
Posts: 1288


View Profile
« Reply #6 on: February 16, 2012, 04:13:12 PM »
+1

The doglegs are a story in themselves.

This, from inside the car


And from the inside of the wheel arch


Cut away three sections


. . . and the inner wheel arch is rotten too


I peeled away the weatherstrip retainer for safekeeping


First repair


Repair to the inner wheel arch


Inner sill and gusset


Rear channel section


And finally, slam it all up shut.


But don’t forget the rear floor repair


The right hand side went exactly the same (except for the inner wheel arch repair).  Even though the right hand side was less diseased than the left, I made the same-size repairs.  I already had the patterns, it was just a case of bending the metal the other way.


The inner gusset panel, on its own


and successive stages in the repair


Logged

Remember: if your Holden's not leaking oil, it doesn't have any.
fcwrangler
nsw-club
Guru
*****
Offline Offline

Model: FC
Posts: 1257


JIM-- Gilead NSW


Jim Tuckwell
View Profile
« Reply #7 on: February 16, 2012, 06:03:25 PM »
0

Great work Rob, when you finish there you can come and give me a hand on mine.HE HE HE
Regards Jim
Logged

on the seventh day: God Made Holden
Not Happy Jan
nsw-club
Senior Member
****
Offline Offline

Model: FC
Posts: 947


Aussie adventure


View Profile
« Reply #8 on: February 16, 2012, 06:54:16 PM »
0

Great work Rob... Nice fabrication!!!! It takes me a week to do all that!
Keep posting!
Nick
Logged

You can never have too many!
Port Macquarie NSW
customFC
Moderator
Guru
*****
Online Online

Model: FC
Posts: 5895


Ask me about microwaving cats for fun or profit.


View Profile
« Reply #9 on: February 16, 2012, 09:23:25 PM »
0

Some neat repair work there.
Regards
Alex
Logged

zulu
nsw-club
Guru
*****
Offline Offline

Model: FE and FC
Posts: 1860


Old Boonah Ambo


View Profile
« Reply #10 on: February 16, 2012, 10:28:12 PM »
0


Very neat indeed Rob, looking forward to seeing and hearing about the rest of the build

Gary
Logged
ardiesse
nsw-club
Guru
*****
Offline Offline

Model: FC
Posts: 1288


View Profile
« Reply #11 on: February 17, 2012, 09:36:18 AM »
+1

Thanks to all for the encouragement.

Nick - if it only takes you a week, then you can work way faster than me.  Each dogleg repair took me maybe a month of weekends . . .

Jim - I've still got a manilla folder with labelled patterns.  I can lend you them if you'd like   Grin

Rob
Logged

Remember: if your Holden's not leaking oil, it doesn't have any.
TTV6FC
Guru
*****
Offline Offline

Model: FC
Posts: 1132


View Profile
« Reply #12 on: February 17, 2012, 10:21:49 PM »
0

Nice work Rob,keep up the great work and the pics of course... Cool
Logged

Run your fingers over my Holden and I'll run my Holden over your fingers!!!!
fcwrangler
nsw-club
Guru
*****
Offline Offline

Model: FC
Posts: 1257


JIM-- Gilead NSW


Jim Tuckwell
View Profile
« Reply #13 on: February 18, 2012, 08:29:22 PM »
0

Rob, pm sent. Thanks, Jim
Logged

on the seventh day: God Made Holden
Stewy
sa-club
Senior Member
****
Offline Offline

Model: FE
Posts: 881


FErgus 1957 FE Special Station Sedan


Jeff Stewart
View Profile
« Reply #14 on: February 18, 2012, 09:36:44 PM »
0

Great job Rob, another one on the way to being saved from that big scrap heap.

Keeping the patterns that you have made is a great idea and one that deserves merit for future people to be able to access.

Rare Spares and others do a great job in being able to produce rust repair sections, but until they do the whole subframe or a complete chassis

there will always be a need for these little bits and pieces. Metal fabrication is not my forte (Carpenter and Joiner) but with patterns to guide

and some great pictures provided I would be willing to have a go. Keep up the great work and I look forward to seeing more progress shots.

Cheers Stewy     Cool
Logged

No matter how much you push the envelope, It'll still be stationery
FE 4 ME
qld-club
Senior Member
****
Offline Offline

Model: FE
Posts: 451


"A Sweet Sensation"


View Profile
« Reply #15 on: February 18, 2012, 10:43:54 PM »
0

Great work Rob,
  Very neat welds and thankx for taking the time to post your re-build... even better you keep a copy of each repair you make +1 from me for wanting to share them with us on here...thumbs up from me Rob  Grin

thankx for sharing it with us

FE 4 ME


Logged

$$$ Parts Catalogue 1948-1969 for sale ONLY $15 $$ all Money goes to the FE/FC Club QLD PM Me to get this great Catalogue
ardiesse
nsw-club
Guru
*****
Offline Offline

Model: FC
Posts: 1288


View Profile
« Reply #16 on: February 21, 2012, 09:17:27 AM »
0

It's time to give my father a little credit.  While I was cutting, welding and grinding, my father devoted himself to the mechanicals.

Transmission first.  Just to be on the safe side, he took the sump off the transmission to check the internals.  Sure enough, the cluster gear had most of a tooth missing from first.  Alan Wall had a good second-hand gear, so Dad stripped and rebuilt the gearbox.
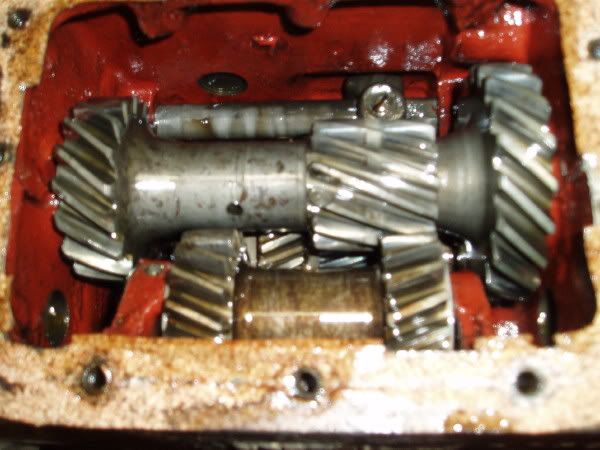


Oops.  Focus.

I asked the previous owner whether the gearbox made any noises in first gear, and he said it was perfectly quiet . . .

Dad stripped the generator down, trued up the commutator, lubed the bearings, bedded the brushes in, and reassembled it.  And did the same to the starter motor as to the generator.

And rebuilt the fuel pump, including a neat trick with valve grinding paste and the fuel bowl to grind down a distorted gasket sealing face because the bail arm had been over-tightened.  The vacuum section was a total mess.  Rust, sludge, ooze, corrosion, you name it.

And pulled the carburettor to pieces, and lapped the faces of the air horn and main body until they were both flat.  He found that the throttle butterfly was loose, and Loctited and staked the screws just to be sure.

I got to work on the distributor, but it was in very good condition anyway.

If you’ve owned a grey-engined Holden long enough, you’ll know what happens when the Welch plug in the back of the block rusts through.  With the motor out, now was the time to take some preventative action.  I punched the plug through, turned it around and levered it out.  And there was the normal amount of mud behind number six cylinder.   What fun a Gerni is.  Then enough reassembly to set the motor and gearbox up on axle stands and start it up.

There’s a Woody Allen movie where the hero discovers a 200- or 300-year-old VW in a cave underground, and he turns the key and it starts.  I wish.  I’ve been told that there are some Holden engines which start immediately after a long storage period.  This was not one of them.  It woke up slowly, one cylinder at a time, and took maybe a quarter hour before it would idle.  Despite its crappy state of tune, it didn’t rattle, didn’t leak oil, and didn’t blow smoke.  So perhaps some potential . . .

The front suspension was next.  The previous owner had told me he could never get the front wheel alignment right.  When Dad disassembled the front suspension, the reason became clear.  The right hand lower control arm shaft had come loose in the crossmember and had enlarged the hole maybe 1/8”.  Repair.  Do not replace.  It sounds nuts, but I set to work on the crossmember with Mister MIG and a file, to restore the holes to the specified diameter (finally achieved by starting the shaft into the crossmember with a large hammer).  The shaft tightened into place with >40 and <250 ft.lbs torque, as specified.  But I noticed that the FC lower control arm shaft inner threads are straight, whereas in an HR they’re tapered, which is much more tolerant of a loose initial fit.

The front springs had broken coils.

The car came with a large box of steering knuckle supports, steering knuckles and king pins, and my father amused himself by selecting parts until he achieved a good, close fit.

The steering box was essentially shot.  The case-hardening had gone off the worm shaft and ball-nut.  In years gone by, if I needed a good steering column, I’d have gone down to Holton Spares in Dee Why, and Steve Williams would have let me go through his stock of steering boxes until I found a good one.  But that was about 20 years ago.

Forum to the rescue.  Unbelievable!  There was an ad for FC steering column and front suspension, lower Hunter Valley.  The donor car was a low-mileage FC.  On disassembly, the steering box internals were in perfect order.  You beauty.  And the front suspension yielded a good pair of springs.

FC gearshift tubes have only two weak points, it seems: the top, where the gearstick engages the roller; and the bottom, where the lower lever bolts on.  The original gearshift tube had broken at the bottom, which led to the Speco floorshift conversion; while the Hunter Valley gearshift tube had broken at the top.  I chose to repair the original, as it was just the brazing for the lower lever which had broken.

More to come later.
Logged

Remember: if your Holden's not leaking oil, it doesn't have any.
ardiesse
nsw-club
Guru
*****
Offline Offline

Model: FC
Posts: 1288


View Profile
« Reply #17 on: February 23, 2012, 01:38:07 PM »
0

Next major step:  the sills.
I took a fairly careful look at the sills, and found that it would be easier to replace them, rather than attempt repairs, and bought a pair of sills from Rare Spares.  Rare Spares sills . . . how to say this . . . they are a good starting point.  That’s all.  They need a lot of extra work before they even go close to fitting.

I made a Masonite profile of the old sills, and my father shaped a two-foot length of four-by-four into a form of the right profile, and I spent much time making the metal conform to the form.  The rear of the sills took a nip and tuck to get right, but the front, where the subframe bolt goes through, was a cut off and make-from-scratch effort.

And, of course, there were many spot welds to drill.


A sharpened piece of power hacksaw blade makes an excellent spot-weld separator.  It’s inserted between the panels and hammered along.  Some welds separate cleanly, others go “ping” if you’re not a good shot with the drill, and there are some which require extra work with the drill to separate.


And some long cuts, and the point of no return is passed.


The inner sill took some cleaning, and some repairs of its own.


Prime and paint both inner and outer sill.  Drill the outer sill for the plug-welds.


Tip the shell the right way up.  Put the subframe back on.  Swing the doors.  Put the front guard on.  Trial-fit the sill.  Get the gaps right.


Tack the sill in place.


Satisfied that all is good?  Weld in earnest.


Now that one side is done, how hard can the other be?  At least I had a better idea of what not to do on the right hand side.  This is what the right-hand inner sill looked like after removal of the outer.


I had to weld a three-quarter-inch strip of metal along the whole length of the bottom edge of the replacement right-hand sill to get enough metal to overlap the inner sill.


Note use of self-tapping screws to hold the sill in correct alignment before welding.


Plug-welds dressed off.


Rear end of sill showing final dogleg repair


Welded and dressed.

Logged

Remember: if your Holden's not leaking oil, it doesn't have any.
graham_fuller
nsw-club
Guru
*****
Offline Offline

Model: FE
Posts: 1975


I love YaBB 1 Gold!


View Profile
« Reply #18 on: February 23, 2012, 02:46:04 PM »
0

Great job Rob,
You certainly know your way around a welder.
Cheers,
Graham
Logged
FCRB26
Guru
*****
Offline Offline

Model: FE and FC
Posts: 3802


peter.mallaby
View Profile
« Reply #19 on: February 23, 2012, 03:04:27 PM »
0

Do them logs have a load rating stamped into them..

Poor bloody tressles..

work cover would be proud... Grin
Logged

Pages: [1] 2 3 ... 6   Go Up
  Add bookmark  |  Print  

Share this topic...
In a forum (BBCode) 
In a site/blog (HTML)

 
Jump to:  

Powered by MySQL Powered by PHP Powered by SMF 1.1.21 | SMF © 2015, Simple Machines Valid XHTML 1.0! Valid CSS!
Page created in 0.049 seconds with 20 queries.