customFC
nsw-club
Guru

 Offline Offline
Model: FC
Posts: 5900
Ask me about microwaving cats for fun or profit.

|
 |
« on: May 26, 2002, 01:03:31 PM » |
0
|
Here is a conversion I did to retain the bench seat in my FC. I love my bench seat and it wasn't going anywhere. I modified the shifter mounts to move it forward, and is in a very comfortable position. I originally saw this conversion in a 'how to' in an early issue of Custom Rodder. Colin Allsopp had done this conversion to his FE and allowed me to make a copy of what he did. I have pics to easily explain what was needed. These are the brackets that we made. On top are the shortened linkages. The bracket on the left bolts to the original shifter bolt holes and features a riser for the rear shifter mount. The bracket on the right is shaped to the contour of the top of the box and bolts directly to the box. It features a right angle that allows the front two bolts of the shifter to bolt up. 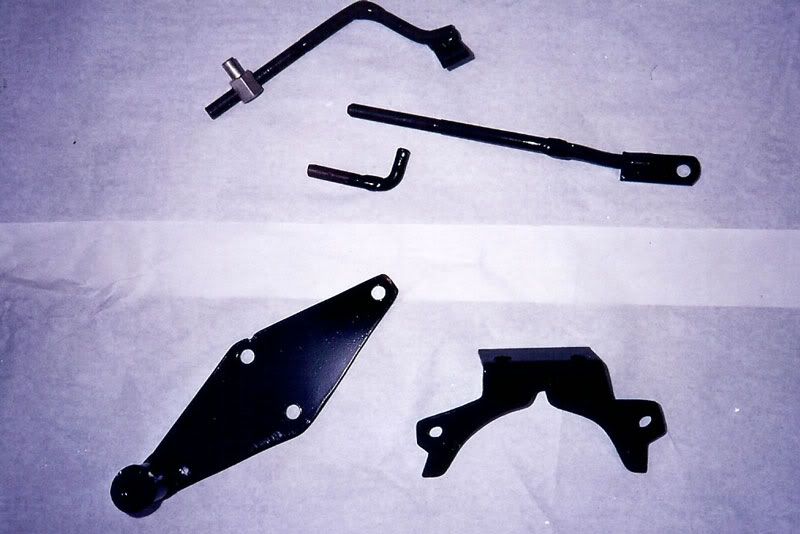 Here are the brackets bolted in place. Make sure the height of the rear riser and front mount are level and there is enough room below to put the nuts on the front bolts. The rear riser has a nut welded inside. It is made of hollow tube with a nut welded to a washer which is welded to the tube. (about 1" high). You can see how these bolt up using existing bolts. 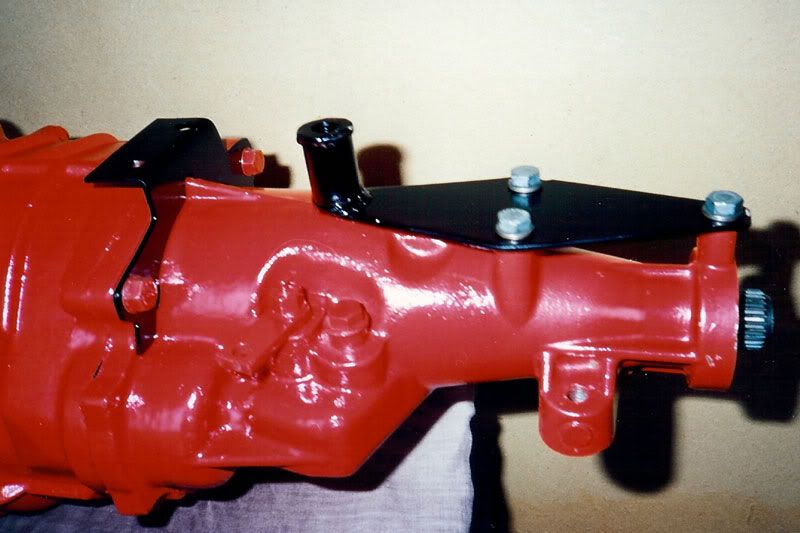 This pic shows the standard shifter bolted into place. The linkages need to be shortened. 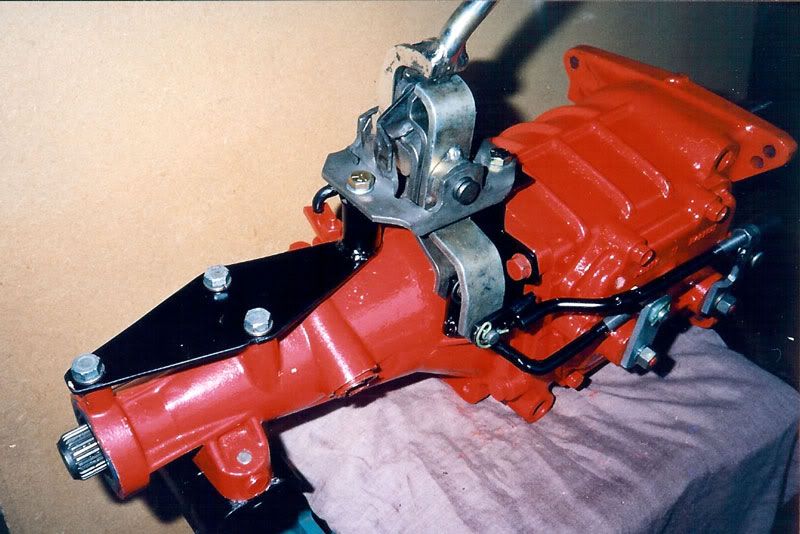 Right side of box showing stock shifter mount and linkages. 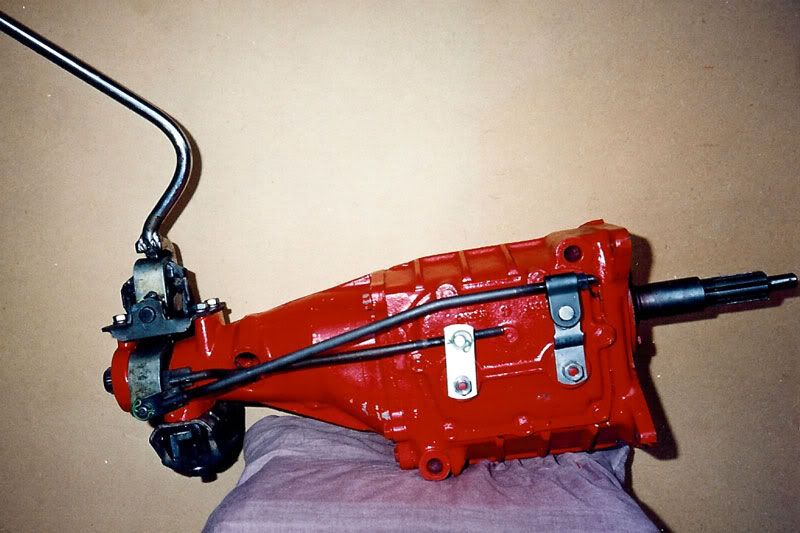 Right side of box showing modified shifter position and shortened linkages. 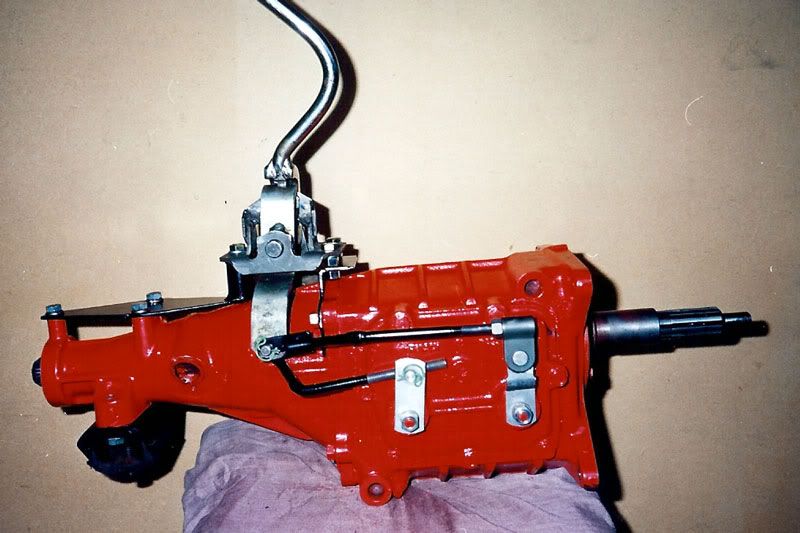 Left side of box showing stock shifter mount and reverse linkage. 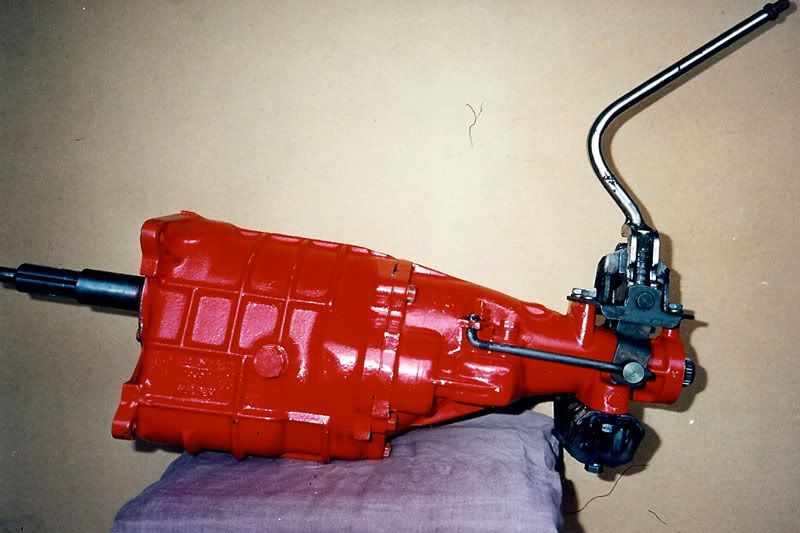 Left side of box showing modified shifter mount and shortened reverse linkage. Note that the shifter now mounts ahead of the reverse bracket, resulting in a Push-Pull action as opposed to the stock Pull-Push action.  I hope the pictures tell the story, and the description is not too confusing. I don't have exact measurements, as the box is in my car, so don't ask. Lol. I only needed to cut a hole in the floor for the shifter and I made a bubble section to cover the linkages. I used the curved shifter from a one tonner box. Regards Alex  |
|
|
|
« Last Edit: October 31, 2010, 03:36:59 PM by stinky »
|
 Logged
|
|
|
|
|
keithu
Guest
|
|
« Reply #1 on: May 26, 2002, 01:34:59 PM » |
0
|
Cool  stuff alex il keep this in mind when i decide to put a floor shift in my old girl when i get it thats a briliant idea alex jolly good show mate the pics explained it well and all cheers mate .keith |
|
|
|
|
Logged
|
|
|
|
|
Gary Claypole
Guest
|
|
« Reply #2 on: May 26, 2002, 02:36:22 PM » |
0
|
Alex, I know you are keen mate but is that gearbox sitting on your pillow?
regards Gary
|
|
|
|
|
Logged
|
|
|
|
|
Digger
|
|
« Reply #3 on: May 26, 2002, 10:10:31 PM » |
0
|
Hi Alex,  Thats a top set up Alex (very professional),  you wouldn't happen to have a template of the mounting brackets that you might pass on. I'm in the same opinion as you, i fitted a trimatic gear box to my FC so that I could keep the bench seat, but i would prefer the 4 speed. I also have a lay back seat that i will recover in the near future and I was going to modify the front of the seat (cut a "U" shape out at the front) so that i could fit the manual box  But not now thanks to your achievement.  Regards, Steve |
|
|
|
|
Logged
|
|
|
|
|
FEHOLDEN
|
|
« Reply #4 on: May 29, 2002, 04:09:48 AM » |
0
|
gidday alex
did you have to use the one tonner stick with the conversion or was the standard shifter good enough?
did you have to weld in a new hump or is there a way of getting around this?
do you have any inside shots to help?
job looks very proffesional and is exactly what i am wanting to do myself. thanks for the photos they will help.
denis
|
|
|
|
|
Logged
|
|
|
|
|
mcl1959
|
|
« Reply #5 on: May 29, 2002, 07:07:40 AM » |
0
|
It just goes to show when Liam raised this subject about a month ago - that nothing is impossible. However as I have said a dozen times before, this is not the stuff for the faint hearted.  A considerable amount of skill, trialling, making & remaking, head scratching and frustration went into making what in the end looks so easy. Believe me its not!!!!!!!!!!!!!!  A lot of people modifying FE's and FC's just think you bolt something up and a few little adjustments here and there and presto - its done. Yes you can fit an Aussie 4 speed in an FC with a bench seat and you can fit a Trimatic behind a grey motor and you can put a V6 in the engine bay. BUT DONT EXPECT THAT IT WILL BE EASY  The benefit of car clubs is that you dont have to do everything yourself once you find someone who has done the same swap that you want to do - they are often only too willing to help. Ken |
|
|
|
|
Logged
|
|
|
|
|
Digger
|
|
« Reply #6 on: May 29, 2002, 10:41:13 AM » |
0
|
KEN, Well said!!!!!!!!!!!!!! I for one was getting a bold spot from scatching my head at times, or is the bold spot showing my age any- rate, because of this forum and the good people who pass on information and ideas is the main reason my car is on the road today and driven everyday. Steve |
|
|
|
|
Logged
|
|
|
|
customFC
nsw-club
Guru
Offline
Model: FC
Posts: 5900
Ask me about microwaving cats for fun or profit.
|
|
« Reply #7 on: May 30, 2002, 12:17:26 PM » |
0
|
Hi Denis. You don't have to use the one tonner stick, I did because I like the way it curves back, in my opinion placing the shift knob in a more comfortable position. I toyed with the idea of making a straight shifter about 3 feet long with a skull on the end. (Hey, I drive a Custom) Practicality won out. Here is the only pic I have of the inside. I cut out more than was needed and welded some back in.  The box fits under the floor with minor mods to the floor inspection plate. Using a hammer, I knocked 2 dings inward where the bolts of the gearbox are for clearance. The linkages do not fit under, I made a "bubble" in the right side of the floor to give them enough clearance. The section of floor in the middle of the box now continues flat over the linkages and then down to the floor beside them. The hole for the shifter is fairly large as the shifter now sits higher. (above the floor line) I naturally reinforced around it with extra plates. You can see the new riser for the rear shifter bolt protruding from under the floor. I made a new much smaller inspection plate at the top of the original opening to allow access to the top bellhousing bolts. I then welded in the remaining inspection plate. Any gearbox mod of this type will need some additional work. This includes cutting the under floor box section and plating it off. Making a new handbrake set up. Dellow adapter for slave cylinder. New hose from master cylinder. Speedo cable, just to name the major ones. Hope this helps. Email me for more info. customfc@rodrun.com Ken is right about the work, it always looks easier. Give it a go, just don't expect things to bolt up, they never do. Tackle each problem as they come up and seek help when required. Regards Alex |
|
|
|
« Last Edit: May 06, 2005, 10:11:20 AM by custom_fc »
|
Logged
|
|
|
|
|
FEHOLDEN
|
|
« Reply #8 on: May 31, 2002, 11:21:29 AM » |
0
|
good on ya alex, you sir are a champion
sounds like a lot of work with the floor. i remember ken advising some time ago re an ek auto hump [which can be bought new from rod hadfield] do you think this might be a better option for a novice welder or would the custom job be worth the work?
good news about the shifter as i have a standard one.
denis
ps:loved the photos in the racing string
|
|
|
|
|
Logged
|
|
|
|
customFC
nsw-club
Guru
Offline
Model: FC
Posts: 5900
Ask me about microwaving cats for fun or profit.
|
|
« Reply #9 on: May 31, 2002, 11:41:24 AM » |
0
|
The EK floor will work I think. This will give you more tunnel than you need. If you are a novice welder,.........you are just like ME! Try it, if it don't work, go buy the EK floor and cut and weld it in.  What have you got to lose. Regards |
|
|
|
|
Logged
|
|
|
|
|
Flamed_FE
|
 |
« Reply #10 on: August 16, 2002, 12:46:41 AM » |
0
|
Alex - fantastic
Not only did you do it, you remembered to take photos to show other's how. Something we all need to remember to do for projects of this nature.
|
|
|
|
« Last Edit: August 16, 2002, 12:47:55 AM by Flamed_FE »
|
Logged
|
Amy's & Mac's Jumping Castle
|
|
|
customFC
nsw-club
Guru
Offline
Model: FC
Posts: 5900
Ask me about microwaving cats for fun or profit.
|
|
« Reply #11 on: May 06, 2005, 10:13:55 AM » |
0
|
Bump for Phantom
Regards
Alex
|
|
|
|
|
Logged
|
|
|
|
|
Sarge
|
|
« Reply #12 on: May 06, 2005, 10:19:09 AM » |
0
|
Alex
Was it you I redrew this for.
Cheers
Sarge
|
|
|
|
|
Logged
|
Mark Lees Tallerbudgera Queensland
0421 165 351
Holden Classics; a BREED above the rest
|
|
|
|
Flamed_FE
|
|
« Reply #13 on: May 26, 2005, 08:22:10 AM » |
0
|
Sarge
If you are talking the CAD stuff. It was based of my drawings based off alex's post. I always planned to draw up the rods needed, but I then my wife started to swell and along came my little boy (child number two). I've had a shell and half finished aussie 4 speed adapter sitting on my garage floor for over two years now. 50th Ann nationals will hopefully make me pull the finger out and finish it all off. (provide the friartucking boss doesn't send me to India too many times between now and then!!)
Cheers
Alan
|
|
|
|
|
Logged
|
Amy's & Mac's Jumping Castle
|
|
|
|
NO NAME
|
|
« Reply #14 on: June 01, 2005, 08:34:14 AM » |
0
|
I think the 3 foot stick would be the go, you get use to them and if you want to get real snappy with your shifts you just grab the stick at the bottom.
Only problems are the safety of the passenger(sometimes they accidently get punched out) and you bump you rear view mirror out of place.
|
|
|
|
|
Logged
|
|
|
|
|
Sarge
|
|
« Reply #15 on: June 01, 2005, 06:45:42 PM » |
0
|
OK now who has made the linkages for this adaptor and is there any chance of some sort of drawings so that I can redraw them on AUTOCAD and then the whole things complete.
Cheers
Sarge
|
|
|
|
|
Logged
|
Mark Lees Tallerbudgera Queensland
0421 165 351
Holden Classics; a BREED above the rest
|
|
|
|
Phantom
|
|
« Reply #16 on: August 18, 2005, 07:13:03 AM » |
0
|
OK now who has made the linkages for this adaptor and is there any chance of some sort of drawings so that I can redraw them on AUTOCAD and then the whole things complete.
Cheers
Sarge Sarge , have you had any success with this post, i have the adaptors made up, and am just about ready to drop the four speed in . Cheers Rusty |
|
|
|
|
Logged
|
Bogans rule
|
|
|
|
Phantom
|
|
« Reply #17 on: September 12, 2005, 04:47:57 AM » |
0
|
G'day all , just want to post a cupple of pics to show what a Bogan can do with the right plans and some excellent advise from this forum which is what it does best, Sarge thanks heaps mate for sending down those plans for this conversion, and Alex for originally posting your great pics of this conversion and your help alomg the way, the work on my box dont look as good as yours mate , but it works and that is all that counts. So thanks again guys.
Cheers Rusty (Bogan, Phantom)
|
|
|
|
|
Logged
|
Bogans rule
|
|
|
|
Phantom
|
|
« Reply #18 on: September 12, 2005, 04:51:54 AM » |
0
|
dont know how to post all pics in one go sorry
Rusty
|
|
|
|
|
Logged
|
Bogans rule
|
|
|
|
Phantom
|
|
« Reply #19 on: September 12, 2005, 04:53:40 AM » |
0
|
another
|
|
|
|
|
Logged
|
Bogans rule
|
|
|
|


