FE-FC Holden Discussion Forum
January 18, 2025, 03:56:27 PM *
Welcome, Guest. Please login or register.

Login with username, password and session length
News: The FE-FC Holden Car Club of NSW are proud to host the 19th FE-FC Holden Nationals. Check out the announcement video for more.
 
   Home   Help Search Calendar Login Register  
Pages: [1]   Go Down
  Add bookmark  |  Print  
Author Topic: Repairing Stainless Moulding/Trim  (Read 221 times)
Jolls
nsw-club
Senior Member
****
Offline Offline

Model: FC
Posts: 274


View Profile
« on: January 07, 2025, 12:45:08 PM »
0

I picked up an FC Special door card for nothing that had some badly damaged stainless trim. I thought I would show how this was "restored" to a usable condition for anyone who finds themselves in a similar situation down the track.

This is what I received:
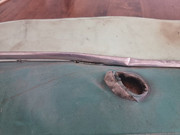


I was a little concerned about working the trim cold given the depth of the crease. It doesn't look as bad in the photo as it did in the flesh, the crease was quite sharp and deep.

I have broken this "guide" into parts because the system refuses to load it if it is too big.

PART 1. The tools needed for the job:

Anvil or similar
Flat tippe screwdrive that is quite "sharp"
Pein/panel beating hammer(s)
Grinder
Long Bolts/Metal Stock
Blow torch (I used MAP)


Logged

Cheers n Beers

Jolls
Jolls
nsw-club
Senior Member
****
Offline Offline

Model: FC
Posts: 274


View Profile
« Reply #1 on: January 07, 2025, 12:48:42 PM »
0

PART 2. Preparation for repair

For this piece of trim the retainer runs the full length as opposed to using individual clips. As a result the retainer has to be removed prior to any repair work on the trim commencing. This is the first challenge, as straightening it cold to remove the retainer strip runs the risk of snapping the trim and the retainer at the point of damage. To overcome this the trip was gently heated using a blow torch (MAP) at a distance of around 250mm (10") until it was easily able to be straightened. The key is not to overheat it, otherwise you could discolour the stainless trim. After heating and straightening it looked more like a piece of spaghetti but it was straight enough to enable access to the back of the trim without risk of breaking it or work hardening it at the point of damage.

The metal retainer strip slides into the moulding and the moulding is then peined over to hold it in place. The first step in removing it was to apply some WD40 to loosen up the rusty retainer, then open the end closest to the damage and ease the back of the trim up with a screwdriver until the retaining strip can move. Once this has been achieved the retainer can be removed with a bit of effort, taking care not to break the trim or the retainer in the process. 


Open end of the trim with the retaining strip removed.

Logged

Cheers n Beers

Jolls
Jolls
nsw-club
Senior Member
****
Offline Offline

Model: FC
Posts: 274


View Profile
« Reply #2 on: January 07, 2025, 12:51:04 PM »
0

PART 3.a. Easing out the damage

Once the retainer was removed it was easliy striaghtened using a hammer on the anvil.

The next step was the ease out the crease and the major dents. To achieve this a dolly was made that could slide into the trim and be worked down the length of it to ease out the major damage. An old bolt and a few minutes work with the grinder produced this nifty tool.


A bit of work on the anvil using the dolly (tap until it rings) and most of the damage had been addressed and the trim naturally straightened.


Logged

Cheers n Beers

Jolls
Jolls
nsw-club
Senior Member
****
Offline Offline

Model: FC
Posts: 274


View Profile
« Reply #3 on: January 07, 2025, 12:52:16 PM »
0

PART 3.b. Rinse and Repeat

From there it is pretty much rinse and repeat to address the damage under the lip on either side and then straighten the edges of the trim.

To achieve this two additional dollys were created from bolts using the grinder.


Finally the trim was worked several time over the anvil anvil/dolly to ease out the damaged sections, resulting in an acceptable finish.


Logged

Cheers n Beers

Jolls
Jolls
nsw-club
Senior Member
****
Offline Offline

Model: FC
Posts: 274


View Profile
« Reply #4 on: January 07, 2025, 12:53:18 PM »
0

PART 4. Finish

With a bit of additional sanding and polishing I expect I could have achieved a better finish; however, I was concerned with how thin the material was. Given I have no backup this will suffice until I source an unmolested piece of trim to replace it with. Once I find a set of "unmolested" stainless trims for the driver's door I will revisit this one to see if I can get it back to its original glory.

Suffice to say there is plenty more life in this part now.

So then it is just a matter of sliding the retainer back in and peining over the end to get it back into service for another sixty odd years!

Logged

Cheers n Beers

Jolls
Errol62
Guru
*****
Offline Offline

Posts: 1206


View Profile
« Reply #5 on: January 08, 2025, 08:46:28 AM »
0

Thanks for posting Craig. Very ingenious mate.


Sent from my iPad using Tapatalk
Logged
geebeefc
Junior Member
**
Offline Offline

Posts: 60


View Profile
« Reply #6 on: January 09, 2025, 09:47:17 PM »
0

Very practical information and shows what can be achieved without special tools. Just need some ingenuity!
Logged
Pages: [1]   Go Up
  Add bookmark  |  Print  

Share this topic...
In a forum (BBCode) 
In a site/blog (HTML)

 
Jump to:  

Powered by MySQL Powered by PHP Powered by SMF 1.1.21 | SMF © 2015, Simple Machines Valid XHTML 1.0! Valid CSS!
Page created in 0.031 seconds with 20 queries.