|
mcl1959
|
 |
« Reply #40 on: January 07, 2018, 01:46:49 PM » |
0
|
No seal on the tailgate of a ute. There is one on a wagon and van though.
Ken
|
|
|
|
|
 Logged
|
|
|
|
|
JB
|
 |
« Reply #41 on: January 07, 2018, 01:55:42 PM » |
0
|
I made one for the Ute which works quite well.
See if I can find some photos for you.
|
|
|
|
|
 Logged
|
Phone +64 223509263
|
|
|
|
JB
|
 |
« Reply #42 on: January 07, 2018, 03:15:42 PM » |
0
|
From memory I used 15 x 15mm square down the sides and 15 x 25 or 30 for the bottom. Carefully cutting out the bits for the hinges and the stays with a fresh blade. Then used the rubber superglue to install.
|
|
|
|
|
 Logged
|
Phone +64 223509263
|
|
|
|
JB
|
 |
« Reply #43 on: January 07, 2018, 03:19:41 PM » |
0
|
From memory I used 15 x 15mm square down the sides and 15 x 25 or 30 for the bottom. Carefully cutting out the bits for the hinges and the stays with a fresh blade. Then used the rubber superglue to install.
 |
|
|
|
|
 Logged
|
Phone +64 223509263
|
|
|
|
Roybeth
|
 |
« Reply #44 on: January 07, 2018, 07:02:18 PM » |
0
|
No seal on the tailgate of a ute. There is one on a wagon and van though.
Ken
Hi Ken, mine's not sitting quite right, think it may be missing the bumper stops. |
|
|
|
|
 Logged
|
|
|
|
|
Roybeth
|
 |
« Reply #45 on: January 07, 2018, 07:04:33 PM » |
0
|
Thanks, will look at this also, when I get to the tub - seems to be lots of space there so may look at a seal also. :-) |
|
|
|
|
 Logged
|
|
|
|
|
mcl1959
|
 |
« Reply #46 on: January 07, 2018, 07:41:35 PM » |
0
|
There should be adjustable metal catches for the tailgate
Ken
|
|
|
|
|
 Logged
|
|
|
|
|
Roybeth
|
 |
« Reply #47 on: February 18, 2018, 09:01:51 AM » |
0
|
Use a heat gun to soften the old sealer and a gasket scrapper to clean it off. Worked well on my sedan especially around the pillars and floor if you have to go that far.
Jim
After finding another inspection plate (sans rust holes) I also found a great way to get sealer and any other paint n stuff off - caustic soda (aka draino) works a treat |
|
|
|
|
 Logged
|
|
|
|
|
Roybeth
|
 |
« Reply #48 on: February 18, 2018, 09:05:47 AM » |
0
|
Has anyone got a picture of an original fc ute seat - seems lots of them were replaced with sedan seats or others. I think that the seats had seams evenly across (apart from a wider strip on the edges) and that they went vertically all the way up the squab - the utes didn't have the panel across the top of the squab??
Would love to see a pic of a correct ute seat if anyone has one.
thanks
|
|
|
|
|
 Logged
|
|
|
|
customFC
Moderator
Guru
    
 Offline Offline
Model: FC
Posts: 5904
Ask me about microwaving cats for fun or profit.

|
 |
« Reply #49 on: February 18, 2018, 02:43:51 PM » |
0
|
 Regards Alex |
|
|
|
|
 Logged
|
|
|
|
|
Roybeth
|
 |
« Reply #50 on: February 18, 2018, 05:15:36 PM » |
0
|
Thanks Alex, thats super, wasn't really sure if there was a wide strip in the middle, I see there is and I see the lines go all the way up the squab Cheers, just what I was after. Helen |
|
|
|
|
 Logged
|
|
|
|
zulu
nsw-club
Guru
    
 Offline Offline
Model: FE and FC
Posts: 1867
Old Boonah Ambo

|
 |
« Reply #51 on: February 19, 2018, 01:11:43 PM » |
0
|
Helen These images may help This image is of the seat that was in my FC Panelvan ambulance, ignore that it has been cut in half but the pattern is correct for FC, panelvan, ute, and standard sedan and wagon Only difference being at the back of the seat, FE ute had a flap of matching vinyl that was attached from the seat to under the back window and acted as a sort of loose parcel shelf behind the seat panelvan had a piece of ply wood, both ute and panelvan were ashtray delete  FE ute seat is different to FC seat as per this pick  Gary |
|
|
|
|
 Logged
|
|
|
|
FE_UTE
wa-club
Senior Member
   
 Offline Offline
Model: FE and FC
Posts: 547
I love YaBB 1 Gold!

|
 |
« Reply #52 on: February 19, 2018, 08:59:57 PM » |
0
|
Helen the FC Ute & Panel Van brochure also shows the Ute with red seats with the top half solid and Black surrounds as per Gary’s top pic  |
|
|
|
|
 Logged
|
|
|
|
|
Roybeth
|
 |
« Reply #53 on: February 19, 2018, 09:56:20 PM » |
0
|
Thanks, I've got a copy of the brochure but the quality isn't good enough to blow up and see that, very clear in yours, thanks |
|
|
|
|
 Logged
|
|
|
|
|
Roybeth
|
 |
« Reply #54 on: May 20, 2018, 09:20:07 AM » |
0
|
Cant seem to upload pics atm
|
|
|
|
|
 Logged
|
|
|
|
|
Roybeth
|
 |
« Reply #55 on: May 26, 2018, 09:18:41 PM » |
0
|
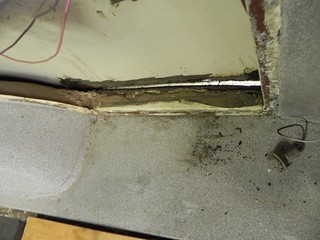
 inside tub rear quarter seal inside tub rear quarter seal by Helen Sheedy, on Flickr been going very slowly lately - other work keeping me away, but I make sure I get back to Ruby and do a little bit. This is where I'm up to atm, just cleaning up the very back of her underneath. This pic is from the top and you can see the mastic is no longer sealing I've already chipped away at it here. Looking at putting another rubber seal in the gap as its so big before using some new mastic. |
|
|
|
|
 Logged
|
|
|
|
|
Roybeth
|
 |
« Reply #56 on: May 26, 2018, 09:22:27 PM » |
0
|
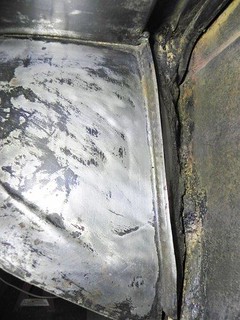
 underneath rear quarter underneath rear quarter by Helen Sheedy, on Flickr here it is from underneath looking at the back of the wheel well. will have to replace the grommets and hose for the wiring to the taillights that go under the car - hard as and all cracked and not sealing anything. |
|
|
|
|
 Logged
|
|
|
|
|
DJ
|
 |
« Reply #57 on: May 26, 2018, 09:33:01 PM » |
0
|
Looks like some good progress when the days are so short.
I find that the colder it gets, the longer it takes me to achieve anything.
|
|
|
|
|
 Logged
|
Dave
0417 270 315
|
|
|
|
Roybeth
|
 |
« Reply #58 on: June 09, 2018, 06:01:06 PM » |
0
|
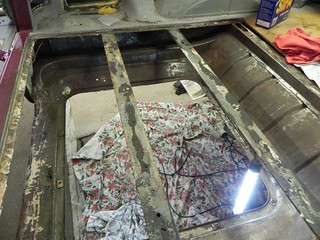
after finding a hole and built up rust under a plate around the fuel tank opening when working underneath, decided to strip the paint from on top as well. It has had a black coating put over the original beige on the inside. a couple more holes, and some previous brass filling found. Will do some rust converting, some hole repairing and a repaint.  DSCN7021 DSCN7021 by Helen Sheedy, on Flickr |
|
|
|
|
 Logged
|
|
|
|
|
Roybeth
|
 |
« Reply #59 on: June 09, 2018, 06:01:46 PM » |
0
|
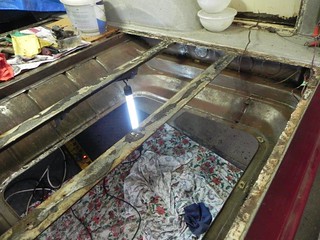
 DSCN7023 DSCN7023 by Helen Sheedy, on Flickr bit of surface rust all round, but nothing too bad |
|
|
|
|
 Logged
|
|
|
|
|


