FE-FC Holden Discussion Forum
April 26, 2024, 06:20:33 AM *
Welcome, Guest. Please login or register.

Login with username, password and session length
News: The FE-FC Holden Car Club of NSW are proud to host the 19th FE-FC Holden Nationals. Check out the announcement video for more.
 
   Home   Help Search Calendar Login Register  
Pages: [1]   Go Down
  Add bookmark  |  Print  
Author Topic: window regulators  (Read 12367 times)
surferboy
wa-club
Guru
*****
Offline Offline

Model: FE and FC
Posts: 1338


10,000 POINTS !


View Profile
« on: November 23, 2012, 12:02:22 AM »
0

G'day guys

What options do I have for replacing/fixing the drivers door window winding regulator toothy goggy thing ?

I've worn out my third one.

I'm hoping to not just replace it with another partly worn out second hand one that will need replacing again in a couple of years.
But fit a new one or modify a good one from another door to fit.
Rare Spares don't seem to have one. Can the ones they have for other vehicles be made to fit ?

Ta
surferboy
 Cool Cool Cool
Logged

cruisin's great with a 58
ardiesse
nsw-club
Guru
*****
Offline Offline

Model: FC
Posts: 1288


View Profile
« Reply #1 on: November 23, 2012, 05:11:53 PM »
0

Surferboy,

This is a topic I've been meaning to post on for a while.

All FE-EK window regulators share a large number of common parts: the basic "frame" which takes the mounting screws, the splined shaft/pinion gear and spring clutch assembly, and the assist spring (looks like the famous boot spring, only smaller).  The sector gear is also common to all window regulators, but is installed one way around or the other depending on front/rear or left/right.

The only major difference is in the lift arm, which is unique to each door.

Your best bet is to salvage the lift arm from the driver's window regulator (and you'll need to put in a new lift pin and roller kit), get a good rear door window regulator (doesn't really matter which side), pull it apart enough to remove the lift arm and install the driver's door lift arm in its place, and reassemble - taking care to install the sector gear in the same way as on the driver's regulator, and also to install the assist spring the right way.

If I'm really keen this weekend, I'll get a couple of window regulators and take photos of the procedure.  The major hassle is in removing rivets so they can be re-used.

Stay tuned.

Rob
Logged

Remember: if your Holden's not leaking oil, it doesn't have any.
NES304
Guru
*****
Offline Offline

Model: FC
Posts: 2874


Yes Dear


nes304
View Profile
« Reply #2 on: November 23, 2012, 08:49:36 PM »
0

looks like the famous boot spring, only smaller

Does it look like a broom Huh Huh Huh
BAHAHAHAHAHAHAHHAHAHAHA
Logged

ardiesse
nsw-club
Guru
*****
Offline Offline

Model: FC
Posts: 1288


View Profile
« Reply #3 on: November 24, 2012, 08:25:29 AM »
0

Correction 1:  window regulator lift arms are the same for both sides, but differ front to rear.
Correction 2:  FE-FC and FB-EK window regulators are not exactly the same.  I think the rears can be interchanged between model series, but the fronts can't.  The main difference is in the sector gear.  The FE-FC sector gears have two holes, and the lift arm is riveted to either hole depending on front or rear.  The FB-EK sector gear has one hole, used for both front and rear FB-EK, and which corresponds to rear FE-FC.

The parts I have for comparison are EK LHF, LHR and RHR window regulators; and FC RHF (sector gear worn out).

@NES232: No, the spring doesn't look like a broom, instead it's more like a screwdriver jammed between the window and the belt weatherstrip.  Does much the same thing though.  Wink

Rob
Logged

Remember: if your Holden's not leaking oil, it doesn't have any.
NES304
Guru
*****
Offline Offline

Model: FC
Posts: 2874


Yes Dear


nes304
View Profile
« Reply #4 on: November 24, 2012, 09:28:52 AM »
0

Correction 1:  window regulator lift arms are the same for both sides, but differ front to rear.
Correction 2:  FE-FC and FB-EK window regulators are not exactly the same.  I think the rears can be interchanged between model series, but the fronts can't.  The main difference is in the sector gear.  The FE-FC sector gears have two holes, and the lift arm is riveted to either hole depending on front or rear.  The FB-EK sector gear has one hole, used for both front and rear FB-EK, and which corresponds to rear FE-FC.

The parts I have for comparison are EK LHF, LHR and RHR window regulators; and FC RHF (sector gear worn out).

@NES232: No, the spring doesn't look like a broom, instead it's more like a screwdriver jammed between the window and the belt weatherstrip.  Does much the same thing though.  Wink

Rob
Correction: Boot spring clapped out = specific NASSCO super dooper special accessory BOOT holderer upperer thingy (Broom stick)
Logged

surferboy
wa-club
Guru
*****
Offline Offline

Model: FE and FC
Posts: 1338


10,000 POINTS !


View Profile
« Reply #5 on: November 25, 2012, 01:05:40 AM »
0

G'day Rob

I had 13 spare window regulators that came with the wagon when I bought it 13 years ago. But not one of them was a drivers door unit. Roll Eyes
Gave a couple to a mate a few years back who reckoned it looked like an easy job to pull the left front one apart and rejig it to fit the right side door. He still hasn't got back to me yet. Looks like I might need to chase him up.
I figure it must be do-able or we are all going to be driving cars with dodgy windows in a few years time   Sad

I was hoping someone had done it already and was going to reply saying it was an easy job (even for someone with a bent screwdriver and a wobbly headed hammer) AND post step by step instructions ...WITH PICTURES  Grin

With the wagon being my daily driver, it's a real pain if I can't open the window. Where do I put my elbow  Huh Roll Eyes Cool

 Cool Cool Cool
Logged

cruisin's great with a 58
87 velo
nsw-club
Junior Member
**
Offline Offline

Model: FE
Posts: 74


Sydney


View Profile
« Reply #6 on: November 25, 2012, 10:13:32 AM »
0

I had the same problem, I had a few LH spares but none for the RH side, I did this a while a go, but from memory, it only involved drilling out a few rivets and moving the segment piece to another position. The other holes for the different position were already there, so it was just a matter of reassembling and it turned a left one into a right one.

If no else puts up any more details I'll dig mine out of the shed and post some pictures (still not finished the rest of it yet, so not installed)
Goodluck Mick
Logged
fcwrangler
nsw-club
Guru
*****
Offline Offline

Model: FC
Posts: 1257


JIM-- Gilead NSW


Jim Tuckwell
View Profile
« Reply #7 on: November 25, 2012, 10:28:15 AM »
0

If you have spare rear regs. then you could cut the arm fo and weld the front arm in its place, as the rear would'nt have the amount of wear as the front lot less hassel for the same result.
Regards Jim
Logged

on the seventh day: God Made Holden
FCRB26
Guru
*****
Offline Offline

Model: FE and FC
Posts: 3802


peter.mallaby
View Profile
« Reply #8 on: November 25, 2012, 10:44:23 AM »
0

Might pay to show some attention to the channels as well and the adjustments.
I used a piece of 3mm plastic and wacked it up and down the channel to make sure they are seated in right and not putting pressure on your window.

Also i used LYNXX deoderant im telling you i use this stuff on hinges key barrelss bailey channels it awesome goes on dry and as slippery as hell..


Pete
Logged

ardiesse
nsw-club
Guru
*****
Offline Offline

Model: FC
Posts: 1288


View Profile
« Reply #9 on: November 30, 2012, 09:57:30 PM »
0

Sorry, I got distracted a bit in the last week.  If I can buy an FE-FC rear window regulator from one of the NSW people on the weekend (Christmas bash at Gledswood Estate on Sunday), I'll have a shot at doing the conversion, and taking some photos too . . .

Rob
Logged

Remember: if your Holden's not leaking oil, it doesn't have any.
ardiesse
nsw-club
Guru
*****
Offline Offline

Model: FC
Posts: 1288


View Profile
« Reply #10 on: December 17, 2012, 01:29:12 PM »
0

At long last – the documented window regulator “how-to” guide.  Thanks to zulu for providing a rear door window regulator.

Here is how to convert a rear window regulator into a driver’s.  Required components are a RHF window regulator and a rear door window regulator.  The rear door regulator will provide all the components except the lift arm from the RHF regulator.  All the other parts of the RHF window regulator will most likely be good for the bin only.

The first couple of images show representative FE-FC and FB-EK window regulators.  Somewhat naively I thought they’d be exactly the same, but they’re not.  To tell them apart, FE-FC regulators are yellow zinc-plated, while FB-EK regulators are bright zinc plated.  FB-EK sector gears are different from FE-FC; FB-EK regulator bodies have two holes for the limit rivets compared with one for FE-FC.  Finally, the FB-EK front window lift arms are just different enough from FE-FC that they can’t be interchanged – the locating boss is in a different place.
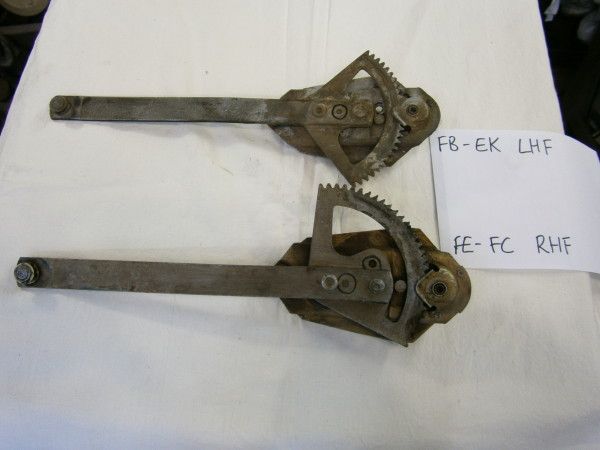
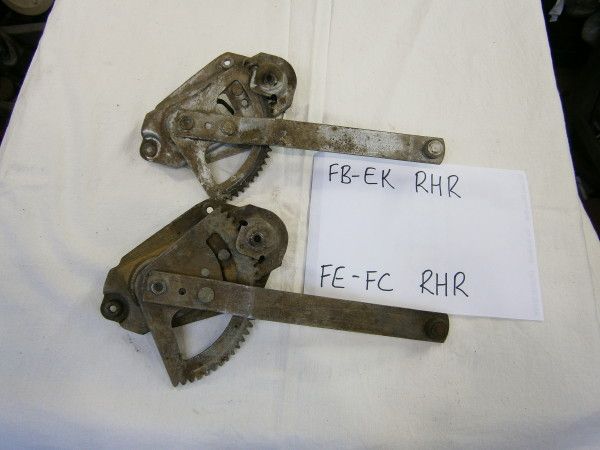


I’m using FE-FC hardware here, but the procedure is valid for FB-EK too.

1.   Remove limit rivet.


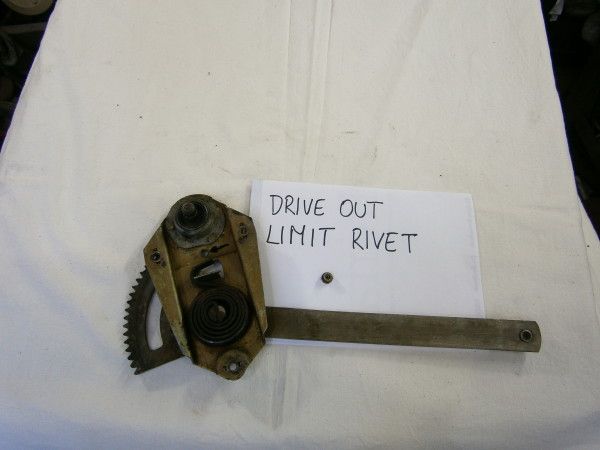
Just drive it out with a hammer and pin punch.  The metal will distort around the hole.  Tap the metal flat again with a pin punch and suitable dolly.

2.   Remove the assist spring.


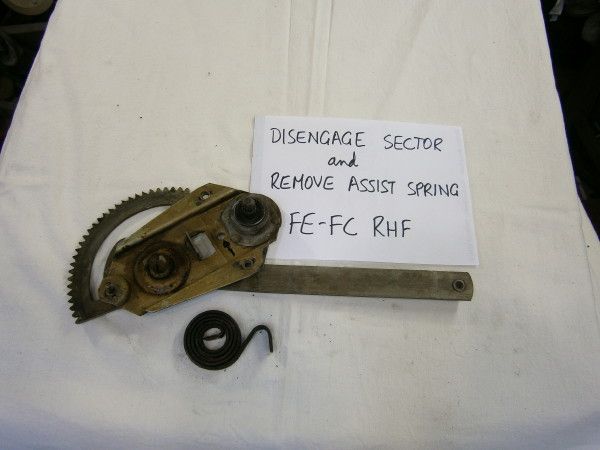
Using a window winder handle, wind the window “up” – that’s in the “easy direction” until the sector gear disengages from the pinion.  Rotate the arm until the assist spring is free, then remove the assist spring.

3.   Remove the pivot stud.


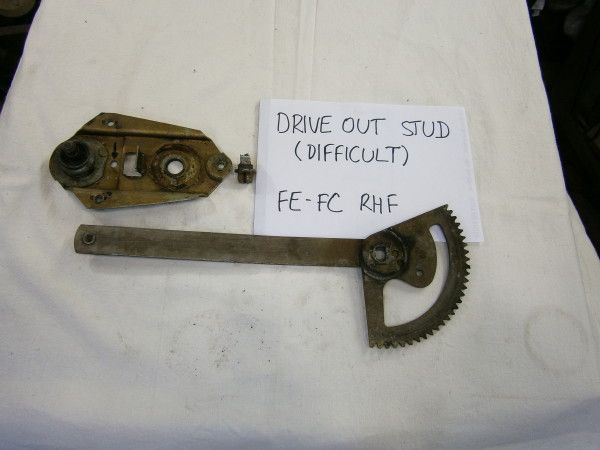
This is a difficult operation.  The pivot stud is high-tensile steel.  I couldn’t make it budge with a hammer and pin punch, so instead I used a vice as a press, with a 7/8 socket over the large end of the stud and a 5 mm hex socket head driver bit as the drift.  Most of the pivot stud’s shoulder will break off.

Option: grind the peened-over part of the pivot stud off and use a pin punch.  You’ll have to weld the pivot stud back on if you go this way.

Remove the sector gear and lift arm from the window regulator body.

4.   Separate the lift arm from the sector gear.


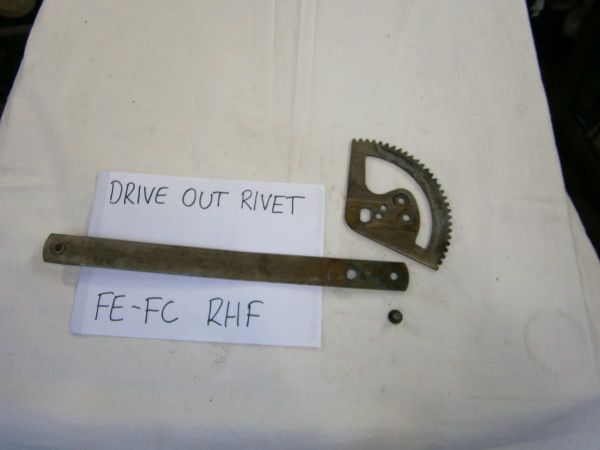
The rivet holding the lift arm to the sector gear is not easy to remove.  I used a vice, a 12 mm socket, and a 5 mm hex socket head driver bit.  Option: use a grinder and pin punch, but you’ll need to weld the rivet back in.

5.   Drive out the lift pin and roller.
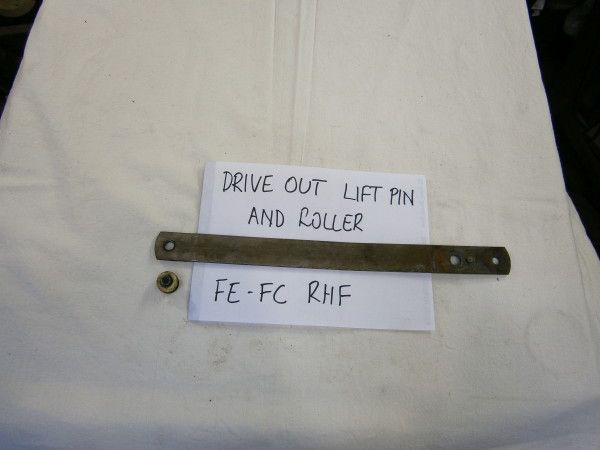


If it’s a driver’s window regulator, the plastic roller will long since have worn out, so use the one from the rear door regulator.

That’s the RHF window regulator disassembled.  The only part to salvage is the lift arm.  And it looks to me as if the lift arm is subtly asymmetric – the rivet holes are not exactly dead centre, and the arm has a slight bend in it.  Which means you can’t just use a LHF lift arm on the driver’s side (rats).

Bugger. 5000-character limit exceeded (again).

Stay tuned.

Rob
Logged

Remember: if your Holden's not leaking oil, it doesn't have any.
ardiesse
nsw-club
Guru
*****
Offline Offline

Model: FC
Posts: 1288


View Profile
« Reply #11 on: December 17, 2012, 01:30:43 PM »
0

Where were we?  Most of the way through a teardown.

Step 6.   Disassemble the “donor” window regulator in exactly the same manner as the RHF.


All these parts except the lift arm will be re-used.

7.   Reassemble lift pin and sector gear to the RHF lift arm.


Reassemble the “donor” lift pin and roller to the lift arm, being careful to put it on the right way.  When re-using the old rivets, it’s a good idea to make a chamfer in the lift arm with a ½” drill.  The marks on the old RHF sector gear will tell you which way to assemble the “donor” sector gear to the RHF lift arm.  Grease the recess around the pivot hole, install the sector gear and lift arm to the regulator body, tap the pivot stud into place, and peen it over well.

8.   Lubrication, assist spring, limit rivet.


Grease the sector gear well.  Grease the assist spring well.  Force the grease down between the coils so the spring won’t do the familiar “groan”.  Install the assist spring on the pivot stud, the correct way around, and then engage the pinion teeth with the sector.  When you hold the window regulator the same way as it’s in the driver’s door and operate it, the “down” direction should be hard and the “up” direction should be easy.  Once you are satisfied that the assist spring is in the right way around, re-install the limit rivet.  You’ll have to make the flared end of the rivet straight in a vice, and chamfer the hole in the regulator body to make the rivet start in the hole.

Job Done.

But before installing the rebuilt regulator into the driver’s door, check that the window slides freely in the bailey channel.  If the driver’s window is stiff, you’ll only chew out your newly rebuilt regulator.  Adjust the division channel, and replace bailey channels if needed.


Rob
Logged

Remember: if your Holden's not leaking oil, it doesn't have any.
mcl1959
vic-club
Guru
*****
Offline Offline

Posts: 6155


FE's rule


View Profile
« Reply #12 on: December 17, 2012, 02:07:09 PM »
0

Good stuff Rob, love your work - a very detailed explanation

Ken
Logged
NES304
Guru
*****
Offline Offline

Model: FC
Posts: 2874


Yes Dear


nes304
View Profile
« Reply #13 on: December 17, 2012, 03:01:27 PM »
0

Wow, Good effort mate.

Got one for instlalling power window motors?
Logged

ardiesse
nsw-club
Guru
*****
Offline Offline

Model: FC
Posts: 1288


View Profile
« Reply #14 on: December 17, 2012, 03:13:20 PM »
0

How hard could it be?  Just remove the splined shaft and pinion and put the motor and gearbox in its place . . .

Who's got a spare HK-T-G-Q-J-X-Z power window setup they want to donate to a worthy cause?

 Wink

Rob
Logged

Remember: if your Holden's not leaking oil, it doesn't have any.
NES304
Guru
*****
Offline Offline

Model: FC
Posts: 2874


Yes Dear


nes304
View Profile
« Reply #15 on: December 17, 2012, 03:33:44 PM »
0

How hard could it be? 

Dunno, But I am hoping to tell you one day soon with a set of power motors from a VT SS
Logged

surferboy
wa-club
Guru
*****
Offline Offline

Model: FE and FC
Posts: 1338


10,000 POINTS !


View Profile
« Reply #16 on: December 27, 2012, 09:25:42 PM »
0

Thanks Rob

I knew somebody on our Forum would have an answer (with pictures  Grin)

I haven't fixed the problem yet..
BUT THE CAR DOES SMELL VERY NICE  Grin

Now I will go and get my bent screwdriver and wobbly headed hammer and start pulling more parts of Cathy's "Ugly Duckling"
I will ask Cathy if she has a pin punch in her sewing kit and the grand kids have some dollies i can "borrow". Does it matter if I use the Barbie or would a Ken Dolly be better  Huh Roll Eyes)

 Cool Cool Cool
Logged

cruisin's great with a 58
Not Happy Jan
nsw-club
Senior Member
****
Offline Offline

Model: FC
Posts: 947


Aussie adventure


View Profile
« Reply #17 on: December 27, 2012, 09:59:56 PM »
0

I think that the  Barbie dolly feels better in the hand Surfer boy.
Ken gets way too hard and it's a prick to work with!
Also don't use the Barbie dolly when the misses is around Grin
That's just my opinion
Nick
Logged

You can never have too many!
Port Macquarie NSW
Pages: [1]   Go Up
  Add bookmark  |  Print  

Share this topic...
In a forum (BBCode) 
In a site/blog (HTML)

 
Jump to:  

Powered by MySQL Powered by PHP Powered by SMF 1.1.21 | SMF © 2015, Simple Machines Valid XHTML 1.0! Valid CSS!
Page created in 0.042 seconds with 20 queries.