FE-FC Holden Discussion Forum
November 26, 2024, 03:31:00 PM *
Welcome, Guest. Please login or register.

Login with username, password and session length
News: The FE-FC Holden Car Club of NSW are proud to host the 19th FE-FC Holden Nationals. Check out the announcement video for more.
 
   Home   Help Search Calendar Login Register  
Pages: [1]   Go Down
  Add bookmark  |  Print  
Author Topic: Wagon rear seat fittings  (Read 6894 times)
surferboy
wa-club
Guru
*****
Offline Offline

Model: FE and FC
Posts: 1338


10,000 POINTS !


View Profile
« on: June 06, 2012, 04:15:57 PM »
0

I can't see it in the workshop manual
Does anyone have pictures or photos of how the fittings are attached to the rear seat in a wagon ?
I'm looking at the bits that hook together when the seat is folded down flat.
I have just found that in the rush to finish the rebuild before the Nats      one bit ( the hook piece that screws into the bottom part of the bench seat) was left off.    and another bit (the catch that screws into the top corner of the upright seat) fell off.
What do the internals of the two benches look like where these bits attach ?
Is there a fixed plate that the screws go into ? or is there something that could have moved out of place and the screws aren't attaching ?

Am I going to have problems fixing them now the seats have finished being upholstered Huh

Ta
 Cool Cool Cool
Logged

cruisin's great with a 58
GMHwagoon
Senior Member
****
Offline Offline

Model: FC
Posts: 388


View Profile
« Reply #1 on: June 06, 2012, 04:39:05 PM »
0

send me your email l will send pics
   thanks greg
Logged
Glenn 'Stinky' Stankevicius
Moderator
Guru
*****
Offline Offline

Model: FE and FC
Posts: 5135


Willaston, South Australia


Glenn.Stankevicius
View Profile
« Reply #2 on: June 06, 2012, 04:41:31 PM »
0

There should be some captive nuts that these pieces bolt up to with the large philips head bolts.
On the last wagon seats I did they were attached well so I can't see them falling off unless severly rusted or you've got white-ants  Shocked
If the threads are not there, then yes, the covers will need to come off to investage/fix/replace which is trimmers work as the covers are stapled or tacked onto the backing boards.
Logged

GMHwagoon
Senior Member
****
Offline Offline

Model: FC
Posts: 388


View Profile
« Reply #3 on: June 06, 2012, 04:44:17 PM »
0

sorry dont mind l found your email  have sent pics
is this what your after
                     thanks greg
Logged
Glenn 'Stinky' Stankevicius
Moderator
Guru
*****
Offline Offline

Model: FE and FC
Posts: 5135


Willaston, South Australia


Glenn.Stankevicius
View Profile
« Reply #4 on: June 06, 2012, 08:43:44 PM »
0


Logged

surferboy
wa-club
Guru
*****
Offline Offline

Model: FE and FC
Posts: 1338


10,000 POINTS !


View Profile
« Reply #5 on: November 02, 2013, 11:32:21 PM »
0

Thought I would get around (eventually  Roll Eyes)  to doing some small bits that weren't finished previously
got the brackets out of the shed for a quick 5minute fix
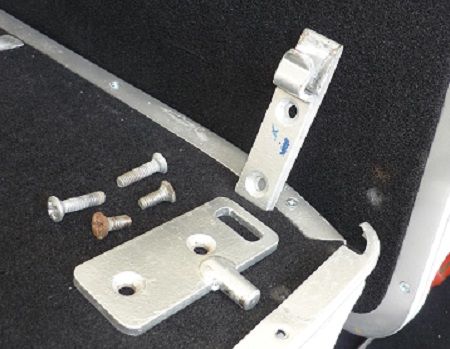
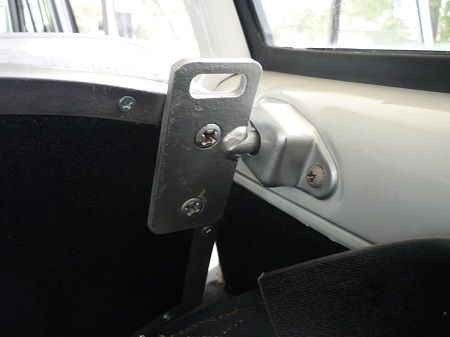


somethings not right

short screws don't reach far enough to screw into anything.     are they off some other part of the car ? (they were all bagged together but I didn't note which screw came off which bracket part)
got the long srews to fit into back of seat
but they don't want to fit into the base/upright clip section Huh

have I got the wrong leftover screws ? or am I just not being patient enough to find the thread inside the seat Huh
the long srews seem to hit a dead end just before they go in the full length

does anyone have a pic of the inside of the seat without the vinyl fitted, so I have some idea what i'm aiming for

 Cool Cool Cool
Logged

cruisin's great with a 58
GMHwagoon
Senior Member
****
Offline Offline

Model: FC
Posts: 388


View Profile
« Reply #6 on: November 03, 2013, 08:40:51 PM »
0

surferboy

 will send some pics
Logged
mcl1959
vic-club
Guru
*****
Offline Offline

Posts: 6155


FE's rule


View Profile
« Reply #7 on: November 04, 2013, 10:17:31 AM »
0

The parts book says both plates use 1 and 1/4 inch long bolts. They should not bottom out as there should be clear space behind them.

Ken
Logged
surferboy
wa-club
Guru
*****
Offline Offline

Model: FE and FC
Posts: 1338


10,000 POINTS !


View Profile
« Reply #8 on: November 05, 2013, 10:23:09 PM »
0

I'll try again and be more patient Roll Eyes

but where do the short ones come from  Huh

would the long ones still be available ? I'm going to need 4 more.

 Cool Cool Cool
Logged

cruisin's great with a 58
GMHwagoon
Senior Member
****
Offline Offline

Model: FC
Posts: 388


View Profile
« Reply #9 on: November 06, 2013, 01:42:54 PM »
0

surferboy
  send me your address l will post a couple

              greg
Logged
old-blu
nsw-club
Senior Member
****
Offline Offline

Model: FE and FC
Posts: 566


I love YaBB 1G - SP1!


View Profile
« Reply #10 on: November 06, 2013, 04:19:26 PM »
0

  If you are going to use the bolts pictured, then clean the threads with a wire wheel & after oiling them, they should screw home. old-blu.
Logged

6th, may 1958 "I was there".
surferboy
wa-club
Guru
*****
Offline Offline

Model: FE and FC
Posts: 1338


10,000 POINTS !


View Profile
« Reply #11 on: November 08, 2013, 12:14:37 AM »
0


Pic sent from Greg

I think this is, but I'm not sure,  if this is where the springclip piece bolts in (the seat base that goes upright) 
But it doesn't have a hole all the way through

or the piece with the sticking out bit (the upright seat part that folds flat) ?

Do you have any more pics Greg ?

I will play with it on the weekend

Greg, I have sent you a PM

Ta
 Cool Cool Cool
Logged

cruisin's great with a 58
surferboy
wa-club
Guru
*****
Offline Offline

Model: FE and FC
Posts: 1338


10,000 POINTS !


View Profile
« Reply #12 on: February 01, 2014, 09:57:25 PM »
0

All done
It takes a while but I get there eventually

I found the missing long screws in my box of leftover bits,  (still not sure what the short ones are for though    Roll Eyes )
The magic trick to get them to fit...
I could poke a screwdriver all the way through the holes that seemed to be blocked off so I knew the screw should go all the way through
I found if I poked the screw driver through the bottom hole I could lift what seems like a plate inside the seat to align the top hole properly to allow the screw thread to catch.
Then the bottom hole would align properly also and both screws could be tightened up

 Grin Grin Grin

I must learn to be more patient  Roll Eyes

 Cool Cool Cool
Logged

cruisin's great with a 58
Pages: [1]   Go Up
  Add bookmark  |  Print  

Share this topic...
In a forum (BBCode) 
In a site/blog (HTML)

 
Jump to:  

Powered by MySQL Powered by PHP Powered by SMF 1.1.21 | SMF © 2015, Simple Machines Valid XHTML 1.0! Valid CSS!
Page created in 0.037 seconds with 21 queries.