|
NES304
|
 |
« Reply #20 on: February 23, 2012, 04:29:03 PM » |
0
|
Hope you have your steel toe thongs!!
|
|
|
|
|
 Logged
|
|
|
|
Not Happy Jan
nsw-club
Senior Member

 Offline Offline
Model: FC
Posts: 947
Aussie adventure

|
|
« Reply #21 on: February 23, 2012, 09:20:12 PM » |
0
|
That's GREAT! ( envy) Gives me a great insight into trying to do mine!!!! Unless you want to....  |
|
|
|
|
Logged
|
You can never have too many!
Port Macquarie NSW
|
|
|
|
TTV6FC
|
|
« Reply #22 on: February 23, 2012, 09:59:25 PM » |
0
|
Sill repairs look very familiar,even the dog leg repair is the same...Seems like forever since I did mine.Hang on....it was forever ago and it's still not finished!!!!Keep up the good work and the pictures,they are great for inspiration.Unfortunately I don't require the inspiration,I have that.Just don't currently have the time or the cash....  |
|
|
|
|
Logged
|
Run your fingers over my Holden and I'll run my Holden over your fingers!!!!
|
|
|
|
ardiesse
|
|
« Reply #23 on: February 24, 2012, 03:34:55 PM » |
0
|
Thanks to all for the encouragement . . .
It's amazing how much more . . . sanitised it all looks when I post photos and a story on the Forum. Swear-words and hours of labour just don't translate.
One thing I should mention was the fantastic case of welder's sunburn I got at the base of my throat after I finished the left hand sill. I made certain to tie a damp tea-towel around my neck for the right-hand sill.
Rob
|
|
|
|
|
Logged
|
Remember: if your Holden's not leaking oil, it doesn't have any.
|
|
|
|
ardiesse
|
|
« Reply #24 on: February 24, 2012, 05:07:24 PM » |
0
|
Now for the rear quarter panels. This car had had a long and hard life. The left-hand rear quarter panel had been replaced early on (accident?), and, as is always the case, the metal mice set to work. There wasnt much left of either the inner or outer. 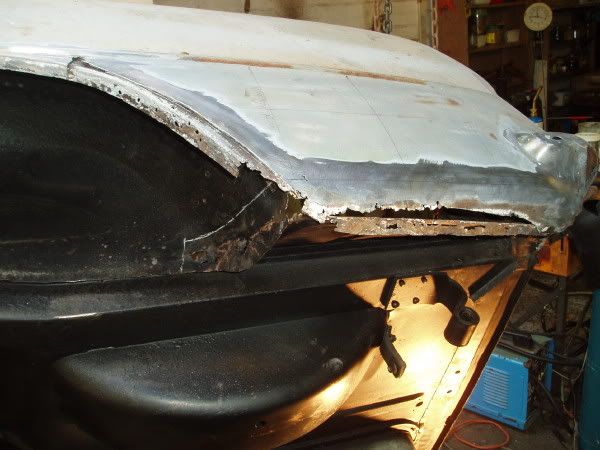 Rare Spares didnt have much in the way of replacement sections, so I fabricated them out of sheet metal. This shows the inner sections repaired. 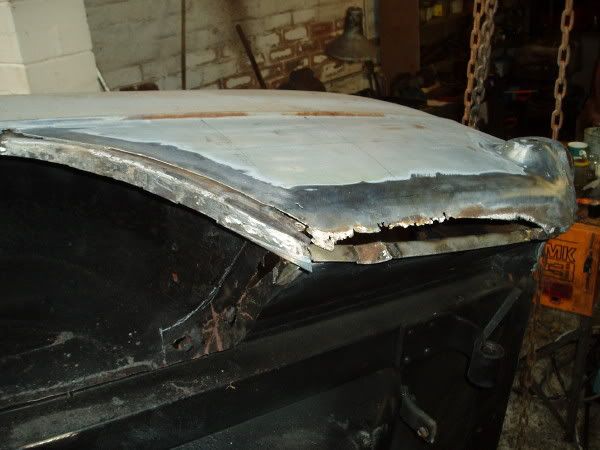 I now had to reproduce the shape of the rear wheel arch, using the right hand rear wheel arch as the prototype. I used a big piece of stiff cardboard to make the wheel arch pattern. This is the first repair section (and inner wheel arch repair). I tried making the repair section complete with wheel arch return, but I'm not good enough at "puckering", and ended up warping the repair section. In the end I cut off the return, and just started the rolled edge. 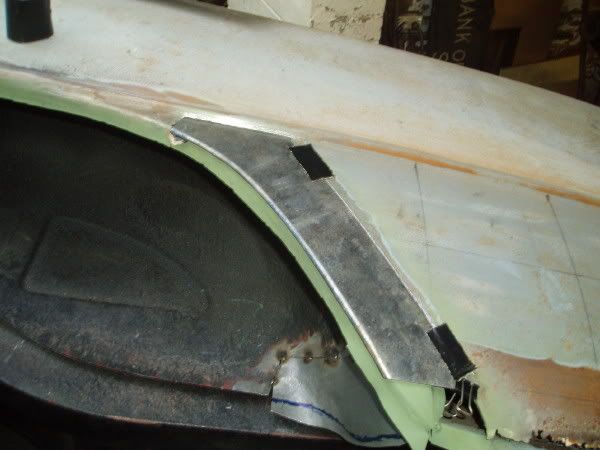 Tacked 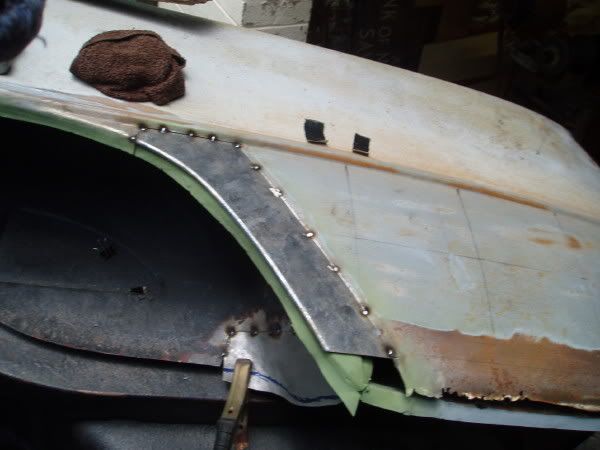 And welded into place  Rare Spares were out of rear quarter panel repair sections, so I fabricated one out of sheet. I made profile templates at four locations along the rear quarter panel, which explains the ruled lines. This is the bottom section, formed and tack-welded.  So far, this is almost exactly like how TTV6FC did his rear quarter panel repairs in "It has begun, but will it continue?", p.5. The last part of the repair was to fabricate the wheel arch return, drill, weld to the outer and then plug-weld through to the inner panel. Now that I'm around to the rear of the car, I can attend to things like the fit of the taillights.  And the boot. A hot-shrink or two to fix unresolved accident damage.  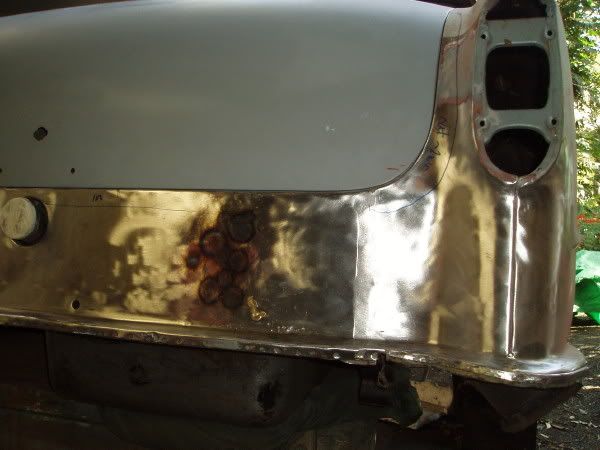 The right hand rear quarter (blessed relief) only took a small rust repair, and some panelbeating. 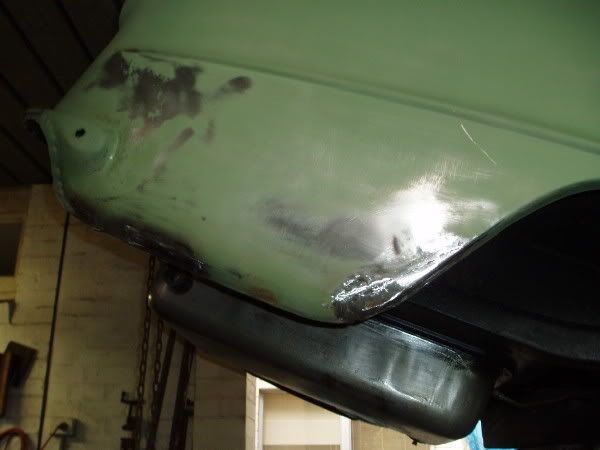 Time to turn motor body trimmer. The FCs previous owner never threw anything out, and among the spares were the original Fall Red door trims, and a Special front seat. Over time, Holden front seat frames crack and they need welding. The front seat frames for a Special and a Standard are different (mainly at the top of the frame); but to convert a Special seat frame into a Standard seat frame just takes an angle grinder, a welder, and some bog. 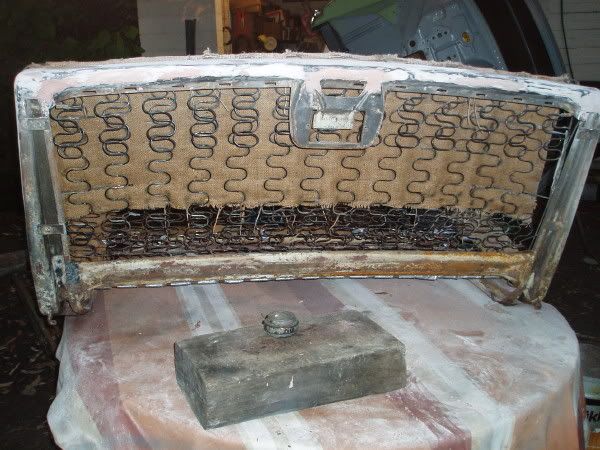 Supertrim in Melbourne had the patterns for an FC Standard interior, and they made an entire interior for me. I also sent them the door trims, and they repaired them, replaced the backing boards, and re-coloured the trims. Between my father and I, we turned motor body trimmers for a while. This is the front seat frame, repaired, modified, and etch-primed to be on the safe side. 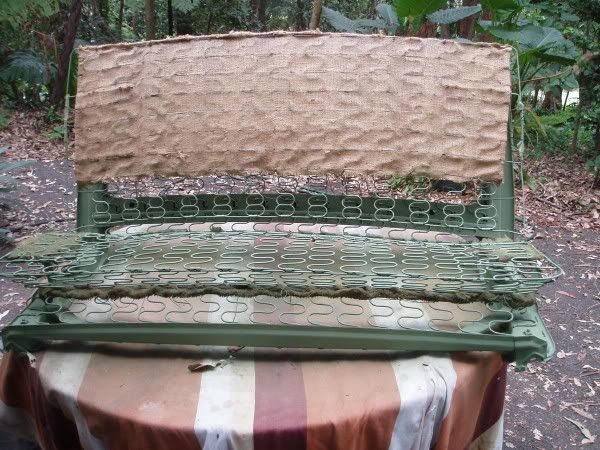 |
|
|
|
|
Logged
|
Remember: if your Holden's not leaking oil, it doesn't have any.
|
|
|
|
TTV6FC
|
|
« Reply #25 on: February 24, 2012, 10:33:35 PM » |
0
|
Nice work Rob although your repairs are far neater than mine....  |
|
|
|
|
Logged
|
Run your fingers over my Holden and I'll run my Holden over your fingers!!!!
|
|
|
Not Happy Jan
nsw-club
Senior Member
Offline
Model: FC
Posts: 947
Aussie adventure
|
|
« Reply #26 on: March 02, 2012, 05:14:51 AM » |
0
|
That's fantastic work. Keep it up Rob |
|
|
|
|
Logged
|
You can never have too many!
Port Macquarie NSW
|
|
|
|
ardiesse
|
|
« Reply #27 on: March 02, 2012, 01:24:47 PM » |
0
|
"Body-In-White" Eighteen months into the project (December 2009) - a huge sigh of relief. All the rust repairs to the body shell are finished. Now the task is to fit all the panels up and perform a series of "gentle adjustments" with hammer and dolly, or more usually large rubber mallet and sandbag. Its a lot easier to discover the panels dont fit properly before theyre painted, rather than afterward (been there, done that). I asked the previous owner how far the FC had gone. He reckoned it was up to about 400 000 miles. As well as the replacement LHR quarter panel, the front guards both showed the evidence of accident damage, back in the days when repairs were done with oxy, panel file and wiping lead. 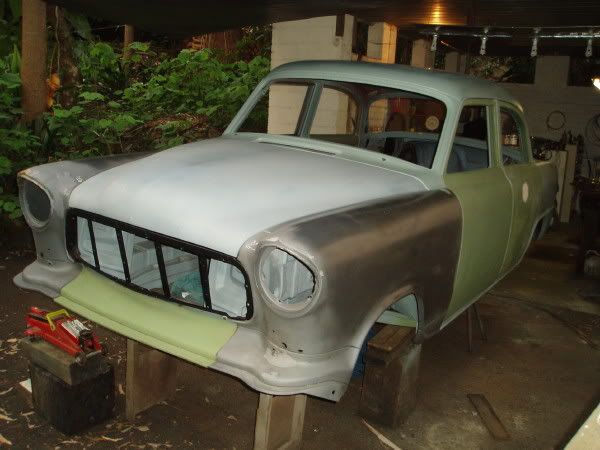 Making the front valance, the subframe and the lower front guards line up was a fair challenge. And the front-guard-to-bonnet gaps needed adjusting as well. 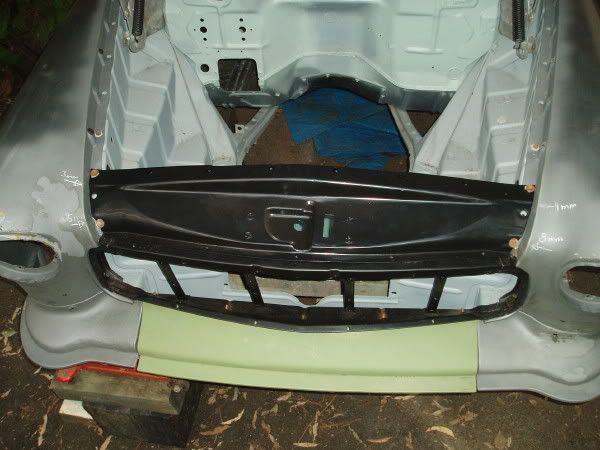 Not only was this the time to get the panel gaps right, it was the right time to test-fit the bumpers. I got the bumpers and overriders (selected from many examples) electrolytic-stripped, and then set to work on the dents and rust holes, because the first place I went to said, We dont repair, we just electroplate. I chose to repair the sections I had, rather than find replacements. And its much easier to repair rust holes in an otherwise straight bumper section than try to straighten a bent one with no rust holes. Thus large hole, inside 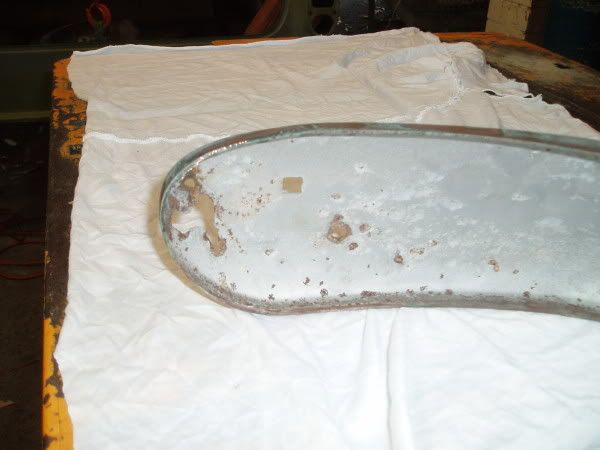 and outside 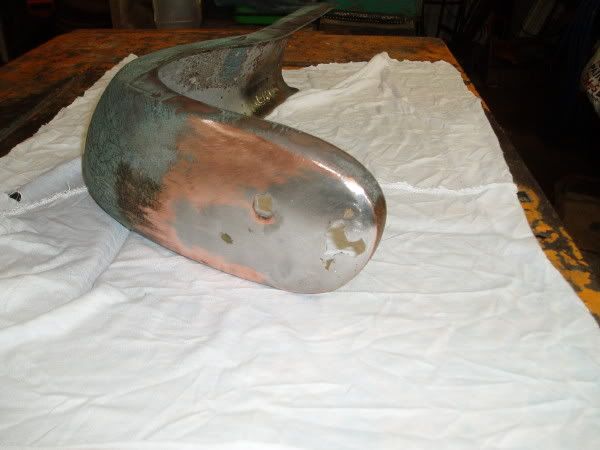 welded 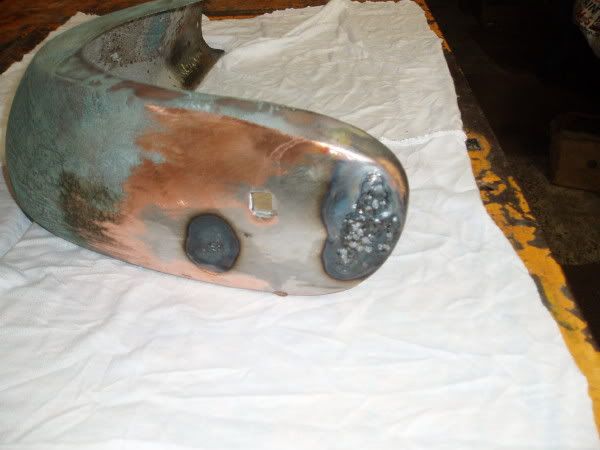 and dressed 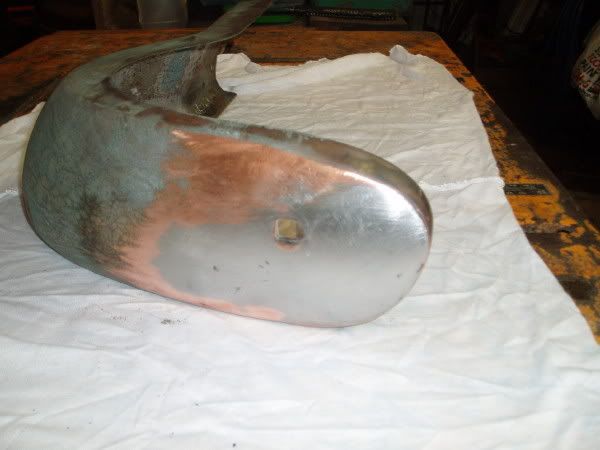 And so I could trial-fit the bumpers and make them line up correctly before they are chromed. One thing that doesnt photograph so well is the swearing, grunting and brute hammer work to get the bumper brackets into shape. 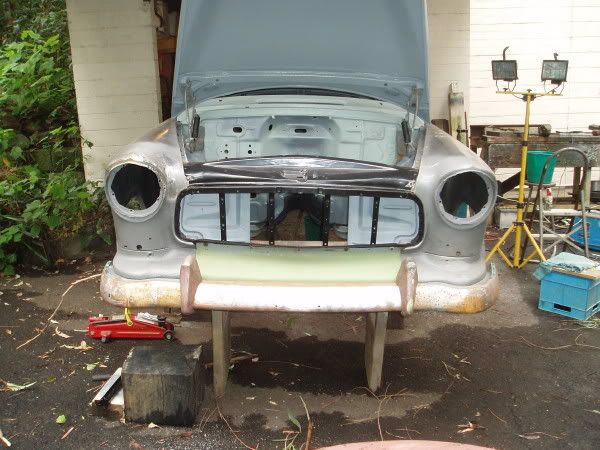 The bottom grille bar was a similar story, except that its made from much thinner sheet. After electrolytic strip, I silver-soldered the rust holes, filed them smooth, knocked the dings out, and ended up with something that (I hoped) the chrome-platers could work with. Major Breakthrough: Electroplating Technology in Queanbeyan. Turns out I need not have done the electrolytic strip and repairs myself, because they are quite happy to do that work. Here are the bumper sections, overriders and lower grille bar in their carpark, after some exposure to a stinkingly humid Sydney summer. 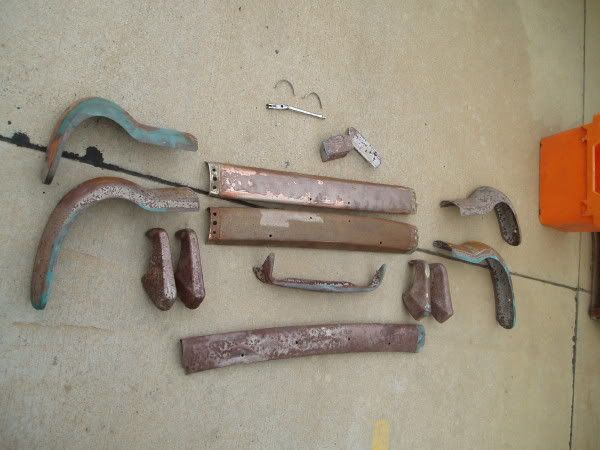 Meanwhile, another thing dear to FE/FC restorers: front guard eyebrows. As usual, they were shockers, the right side worse than the left. This one had several generations of dodgy repairs. 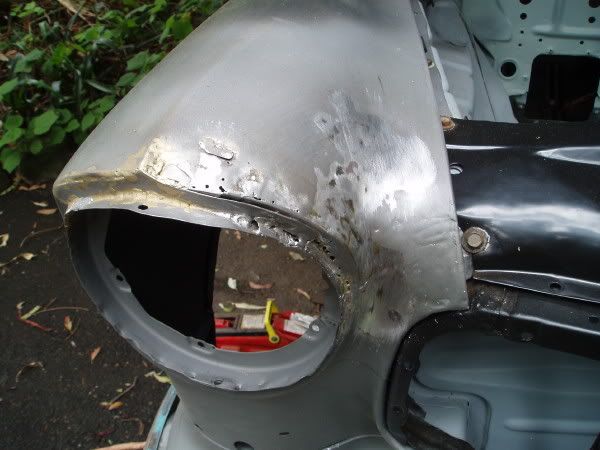 See what I mean? This is the inner eyebrow section/headlight flange, after removal. 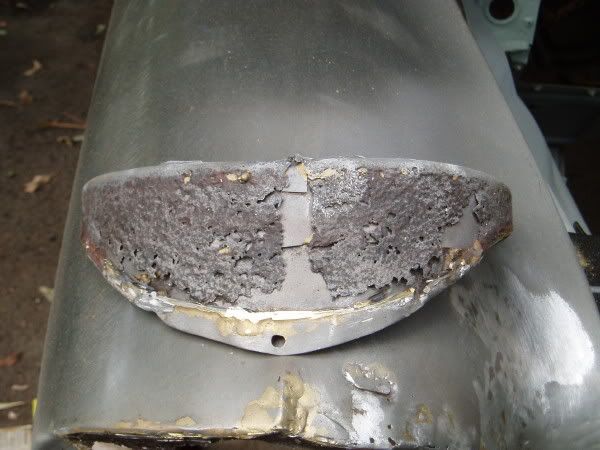 It seemed best to fabricate new sections, rather than repair. This is the replacement top eyebrow section. 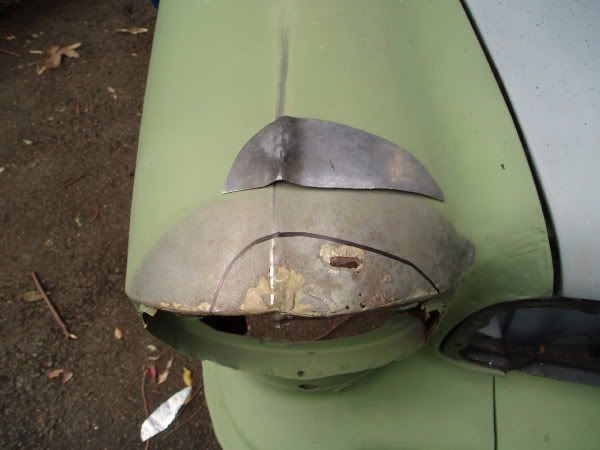 Grafted into place 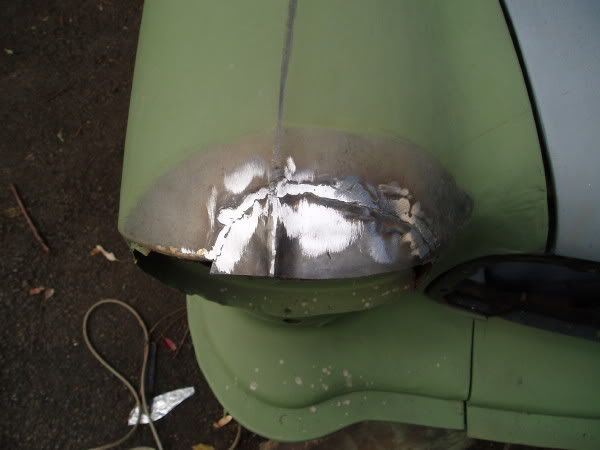 And finally finished. 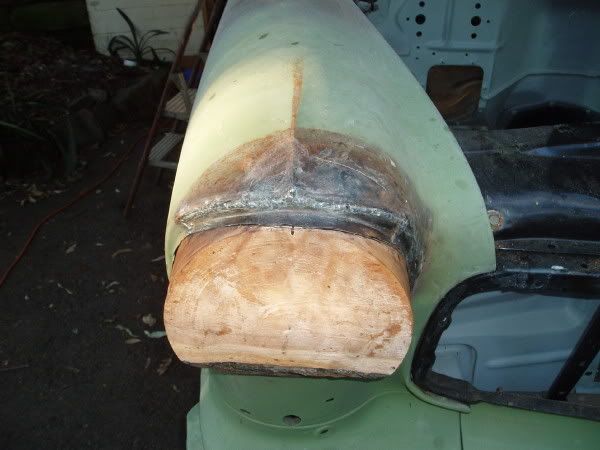 Whats the lump of wood for?, I hear you ask. It just happens that the inner section, where the headlamp bucket goes, is a cylinder, of exactly nine-inch diameter. My father turned a piece of firewood to size. It made an instant form to shape the inner section over, and I held it in place with screws through the headlamp bucket mounting holes, so that the screw holes would line up after I finished welding. |
|
|
|
|
Logged
|
Remember: if your Holden's not leaking oil, it doesn't have any.
|
|
|
|
Ed
|
|
« Reply #28 on: March 02, 2012, 01:32:35 PM » |
0
|
Looking good, I like the liberal use of wood throughout your build.. fantastic!
Cheers
Ed
|
|
|
|
|
Logged
|
in the shed
|
|
|
|
FCRB26
|
|
« Reply #29 on: March 02, 2012, 06:25:33 PM » |
0
|
Dont think you can actually weld "iron bark" .  |
|
|
|
|
Logged
|
|
|
|
|
ardiesse
|
|
« Reply #30 on: March 02, 2012, 06:33:42 PM » |
0
|
Iron bark? Sydney Blue Gum more like  The fun bit was putting the flames out. Didn't take much work with the MIG to start a fire . . . Rob |
|
|
|
|
Logged
|
Remember: if your Holden's not leaking oil, it doesn't have any.
|
|
|
|
ardiesse
|
|
« Reply #31 on: March 09, 2012, 03:22:26 PM » |
0
|
The photographic record goes a bit sketchy by late 2010. Restorations usually go through the following stages: first love (alias wild optimism), tempered expectations ("Hmm. This will take longer than I thought"), initial successes, stubborn perseverance ("I dont care how long the bloody thing takes"), the black hole of effort ("S**t. All that work, and this is whats to show for it?"), and then despair. The last phase is triggered by having to do things twice, and La Nina conditions, in Sydney at least, are perfect for that. "Come to Sydney, the Mould Capital of the World. Watch metal parts rust before your very eyes!" Things were not helped by the fact that this car had sat, in primer, for eighteen years in a damp garage. The roof was fairly deeply pitted in places, and it took a lot of work with a Clean and Strip disc and Deoxidine to get rid of the rust. Things were also not helped by the fact that I couldnt do the body repairs fast enough to keep up with my father, the wielder of the spray gun. Again the body sat in primer far longer than it should have. And when it came time to paint, I had to take the roof, the rear quarters and the doors back to bare metal, for the second time, and start again. Nonetheless, by April 2011, the paint was complete. 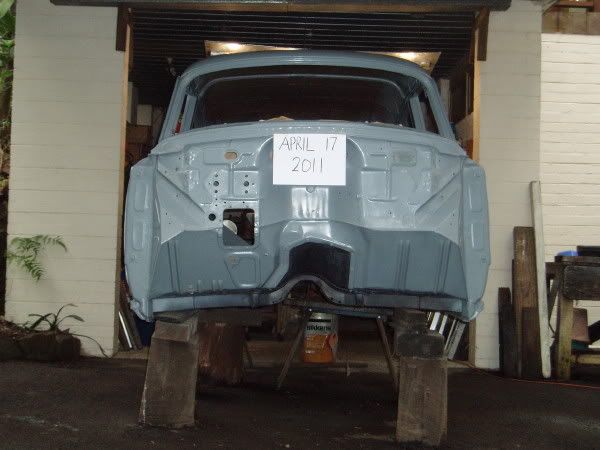 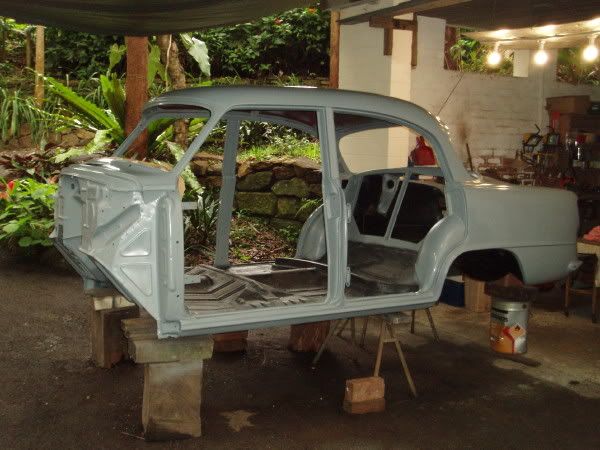 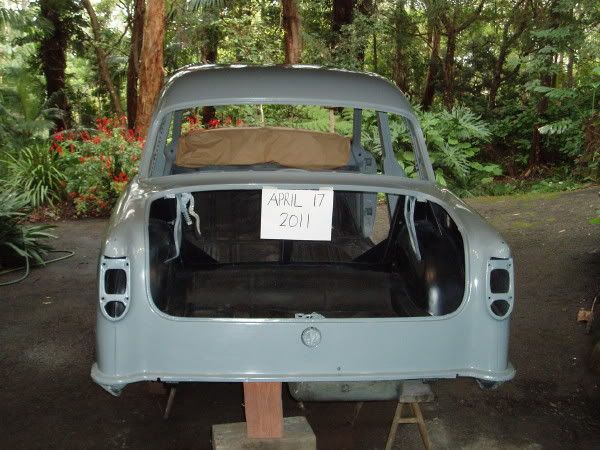 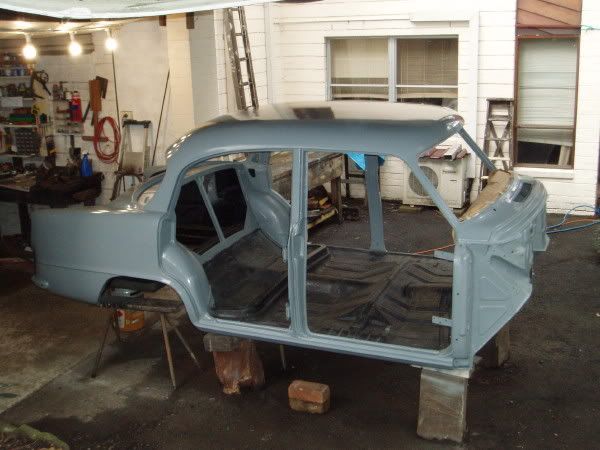 |
|
|
|
|
Logged
|
Remember: if your Holden's not leaking oil, it doesn't have any.
|
|
|
|
Glenn 'Stinky' Stankevicius
|
|
« Reply #32 on: March 09, 2012, 09:01:41 PM » |
0
|
Are you working in the middle of the Botanic Gardens Nice work though |
|
|
|
|
Logged
|
|
|
|
|
TTV6FC
|
|
« Reply #33 on: March 09, 2012, 11:22:49 PM » |
0
|
Nice work Rob.This is how I wish I had done my thread so that hopefully I could actually get to the end result whilst still having a generous amount of content and pictures and without people getting bored shitless and thinking I was never going to finish the project(maintaining the interest of the forum members).....if that makes sense....yes I've been drinking..... |
|
|
|
|
Logged
|
Run your fingers over my Holden and I'll run my Holden over your fingers!!!!
|
|
|
|
ardiesse
|
|
« Reply #34 on: March 12, 2012, 09:15:00 AM » |
0
|
@stinky:
If you can believe it, what you see in the photos is our back yard. It's one of the few remnant blue gum forests left in Sydney. Most people have a lawnmower. We have chainsaws.
@TTV6FC:
This is one of the few advantages of doing a retrospective - you can choose the way you present the content. But nonetheless I wish I'd taken a few more photos of the swinging panels in preparation.
Rob
|
|
|
|
|
Logged
|
Remember: if your Holden's not leaking oil, it doesn't have any.
|
|
|
|
ardiesse
|
|
« Reply #35 on: March 14, 2012, 05:06:23 PM » |
+1
|
Assembling a car after painting is a straightforward business, you might think. I reckon that an irreversible change happens when you pull a car apart. You disassemble a mass-produced item composed of interchangeable parts, but yet when you put together the same car out of the very same parts, theyve lost all memory, and youre hand-building a prototype. In short: it beats me how they made hundreds of Holdens every day. In this rebuild, everything grew around the accelerator pedal. I assembled the throttle linkages to the firewall before putting the subframe on. Trial-fitting the front panels gave me practise at removing and installing the front subframe. Here is the subframe ready to line up. 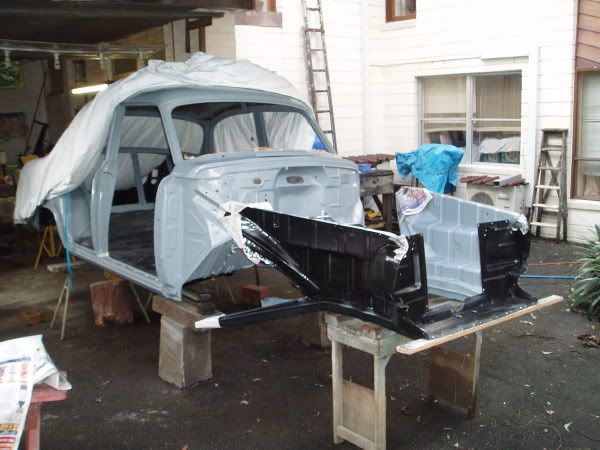 And bolted up. 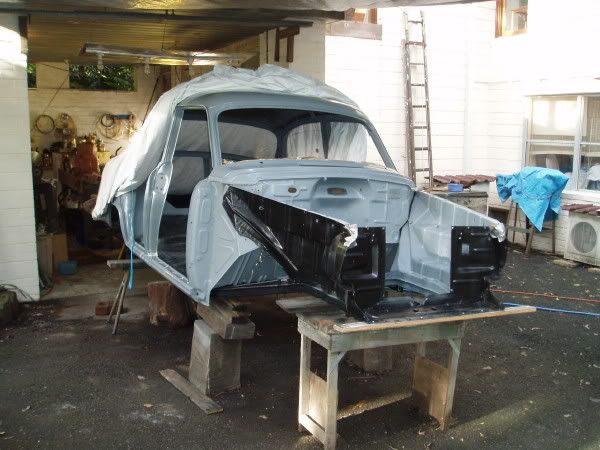 Pedal set, firewall panel, cowl vent, wiper linkages, steering column, dashboard and wiring harness in order. And it is much easier to connect the wiring harness to the dash first and install it all as a unit, rather than installing the wiring and dash as separate items.  Amongst the many little tasks, the clutch pedal required re-bushing, and even the hole for the master cylinder pushrod had worn oval and needed welding and reaming to size. The wiring was in a fairly sorry state, but once I removed all the extra tacked-on bits, I figured I could re-use the original harness, with some repairs. The dome lamp had suffered a short and smoked the wire up at some stage, so I replaced the dome lamp wire. I rewired the body harness to late 1959 spec: orange indicators, and used the EK ute/van wiring diagram as the reference. In the main harness, the ignition wire had been shorted out and cooked. I unwrapped the harness and replaced the ignition wire, and also the oil pressure and starter solenoid wires, as theyd gone brittle with engine heat. Vintage Wiring Harnesses sold me harness tape and the different-coloured wire I needed, and other bits like bullet connectors, adaptors, and the old-style in-line metal fuseholders. When Id made the repairs to the wiring, I set up a ping-pong table and laid out the wiring harnesses. I plugged in the switches, gauges, fuses and lamps (lots of alligator leads to provide the negative connections), connected up a power supply, and began to power up each circuit in turn. Again, its much easier to discover wiring problems when the wiring is out of the car. Because the FCs a Standard, I made all the indicator wiring as a separate harness, and taped it onto the main wiring harness. One other detail was to have the indicator/parker/stop/tail lamp sockets zinc-plated. That way I could be certain that theyd make reliable contact with the indicator and tail-light housings. Interior trim came next, starting with the headlining and windlace. There is definitely an art to installing a headlining. Actually, give me a felt FX/FJ headlining and a jar of tacks any day. And then the fixed glass. I find installing windscreens and rear windows a stressful business. The curved FE/FC rear glass is difficult. The lip of the seal pulled over the body flange (just) along the top and bottom, but along the C-pillar it didnt take at all until the glass was bumped more into position, and then I had to use a wooden ruler to pull the lip of the seal over the C-pillar flange. And finally the glass wanted to stay in position rather than pop out. 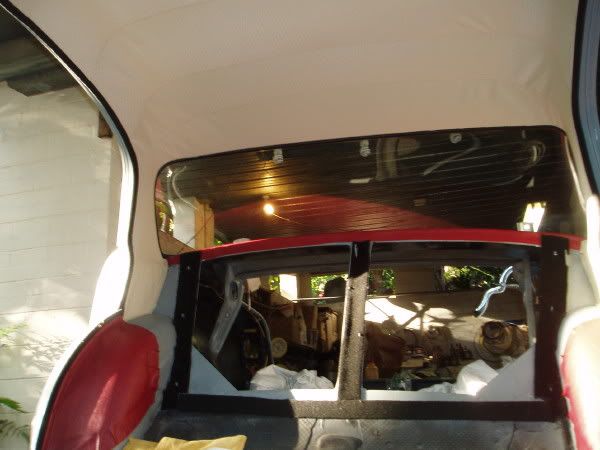 Whats the trick? I started pulling the cord through at the bottom. Do you start at the top and bottom at the same time? The boot hinges are worthy of mention. The hinge spring pivots had broken and been replaced (badly), so during body repair time I installed a pair of RETs patent adjustable boot hinge spring pins and resized the holes in the boot hinges with Mister MIG and a file. I bought a new laminated windscreen, and I was really afraid of cracking it during installation. Fortunately the windscreen was much easier to fit than the rear window. |
|
|
|
|
Logged
|
Remember: if your Holden's not leaking oil, it doesn't have any.
|
|
|
|
Glenn 'Stinky' Stankevicius
|
|
« Reply #36 on: March 14, 2012, 06:54:51 PM » |
0
|
Interior trim came next, starting with the headlining and windlace. There is definitely an art to installing a headlining. Actually, give me a felt FX/FJ headlining and a jar of tacks any day. Definately! I don't like doing these in the least, never done the FX/FJ but the FB/EK ones are a doddle compared to the FE/FC. |
|
|
|
|
Logged
|
|
|
|
Not Happy Jan
nsw-club
Senior Member
Offline
Model: FC
Posts: 947
Aussie adventure
|
|
« Reply #37 on: March 14, 2012, 07:48:33 PM » |
0
|
Wow! Great work and the tips are fantastic.  :)Please keep them coming. Are you in the Turramarra area with the blue gum forest? Nick |
|
|
|
|
Logged
|
You can never have too many!
Port Macquarie NSW
|
|
|
|
fcwrangler
|
|
« Reply #38 on: March 14, 2012, 08:02:24 PM » |
0
|
Great work Rob, it's all starting to come together looks fantastic, all that hard work and welding has paid off. With regard to the screens I always start at the bottom and work my way around (thats what I do for a crust) I have found that the aftermarket rubbers are not quite the same size as the origninals thats why they are a bit of a pain to install. Nice to meet you last night and thanks again for the template.
Regards Jim
|
|
|
|
|
Logged
|
on the seventh day: God Made Holden
|
|
|
|
ardiesse
|
|
« Reply #39 on: March 19, 2012, 04:54:27 PM » |
0
|
Doors and seals. 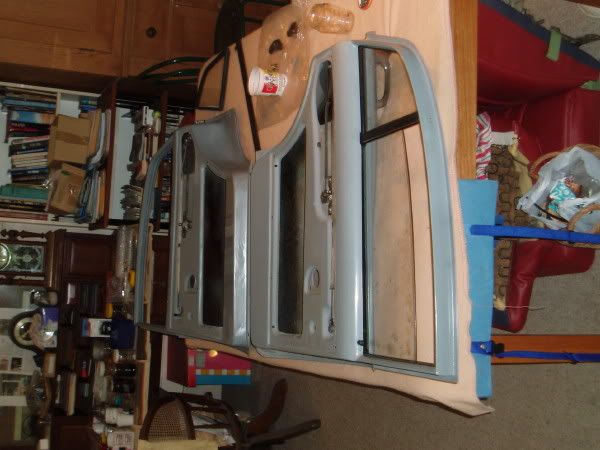 The window winders and door locks (front particularly) were essentially worn out. My father sacrificed an old polyethylene chopping board to make up a set of rollers for the window regulator lift pins. The major thing that helped was finding a set of four, badly rusted, EK doors at a swap meet that I could then rat for their internal hardware. Still I had to do some major rebuilding of the drivers door window regulator. As it turns out, you can convert a rear window regulator into a drivers by swapping over the lift arm and (if needed) tipping the sector gear upside down. Now theres an idea for another forum thread . . . Ralph Moore Autoglass had supplied me with all new side glass, and Rare Spares sells bailey channel kits. Except that the rigid channel (for the division channel) is 26 long originally and Rares sells it in 24 lengths. I found that Spectrum Rubber sells the rigid channel in 8 lengths, which means you can get three 26 lengths of channel, and then you have a useless 18 left over, which means buying a lot more than you need to get it right. The flexible channel that Rares sells is long enough for a rear door, but about an inch and a half short for a front door. For reference, here are the lengths of bailey channel needed for sedan doors: Front door top bailey channel - 500 mm Front door rear bailey channel - 740 mm (total length 1240 mm, which is 40 mm longer than the Rare Spares channel) Rear door top bailey channel - 530 mm Rear door front bailey channel - 670 mm (total length 1200 mm, which is exactly the length of the Rare Spares channel) I first swung the doors with no seals to get the striker plates in the right position, and then removed the doors to put the door seals in. There was no fast way to go about the job, just followed the instructions on the forum and got a satisfactory result. As they say, Rubber Magic and shut door for two weeks. 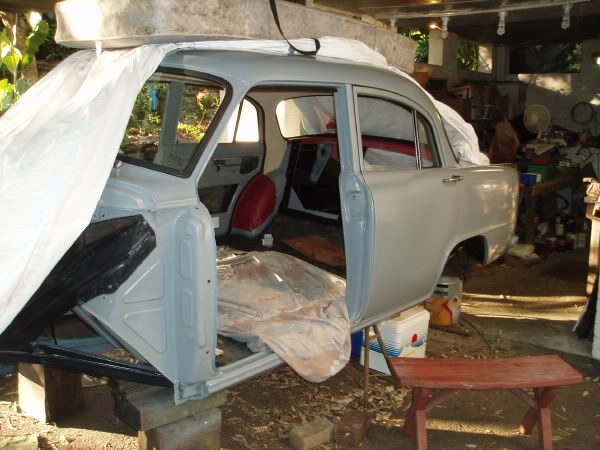 I couldnt swing the front doors before installing the door seals. Before installing the front door seals I wanted to have the front guards on, and I wanted to have the driveline in place before putting the front guards on. Short detour through DriveTrainLand coming . . . I put new lower control arm bushes in the front suspension, and then assembled everything up. I faced a choice with the rear axle though. Since the cars first major outing would be a trip to WA and back for the Nationals, I would like the car to have slightly longer legs than originally. I figured that a 3-1/8 bore motor would have enough extra torque to make a 3.36 diff practical, and I changed diffs over, along with the rear uni-joint. I then put the rear axle in the car, and suddenly, its a rolling shell. The motor, though, took a bit of work to get right. Rob |
|
|
|
|
Logged
|
Remember: if your Holden's not leaking oil, it doesn't have any.
|
|
|
|


