|
Glenn 'Stinky' Stankevicius
|
 |
« Reply #80 on: July 08, 2009, 11:18:25 PM » |
|
I love the engineering going into this, completely over my head but I love it, how do you design then create this stuff?
|
|
|
|
|
 Logged
|
|
|
|
|
JB
|
|
« Reply #81 on: July 09, 2009, 07:55:30 AM » |
|
Hey Stinky, I got the tip from Chuck a little while ago to get a "Build Book" a couple of years ago on Joe Rogans 1970 CUDA called the Sick Fish. I was an awesome read and i have got the ideas on the fabrication from there... http://www.buildbooksusa.comI dont have the machinary that they do in the book ie laser cutters, rollers and formers, tig welder... I have my Lincoln welder and an angle grinder, some G clamps and a vice that I use... I draw templates out of old political posters, as they cut easily... Its great carving up a politicians head too!!!LOL Then just have a go... If it doesn't fit or work, you can only have another go at it to make it fit or work. I have no experience really as this is only the second car that I have modified... ever. But I have never taken kindly people telling me that I cant do something, and I guess thats the drive I use to get this thing done sometimes. This rear end has been REALLY scary for me as I want to get it right... Its the first tim I have tried to shorten a diff, cut and replace rail, tubs etc, so am pretty excited at seeing it come together. I guess I have just tried to show everyone hear in a detailed way how I am doing this and if I can do it then anyone can. Cheers Jason. |
|
|
|
|
Logged
|
Phone +64 223509263
|
|
|
propig2003
Junior Member

 Offline Offline
Model: FC
Posts: 52
I love YaBB 1G - SP1!

|
|
« Reply #82 on: July 09, 2009, 06:32:10 PM » |
|
jason, youre being too modest there mate. have been keeping a daily intrest in the build up of your beast mate, very impressive, goes to show how important forward planning is. my recent rebuild was a 6 week engine replant that eventually took 2 years, ( to do this i had to modify/change this, and so on...) and no where to the standard that you have achieved. well done
cheers brett
|
|
|
|
|
Logged
|
|
|
|
|
JB
|
|
« Reply #83 on: July 15, 2009, 07:12:33 PM » |
|
Well had a bit more fun today... Finished the diff off welding the Top trailing arms mounts on, sway bar mounts, and then the breather into it as well. 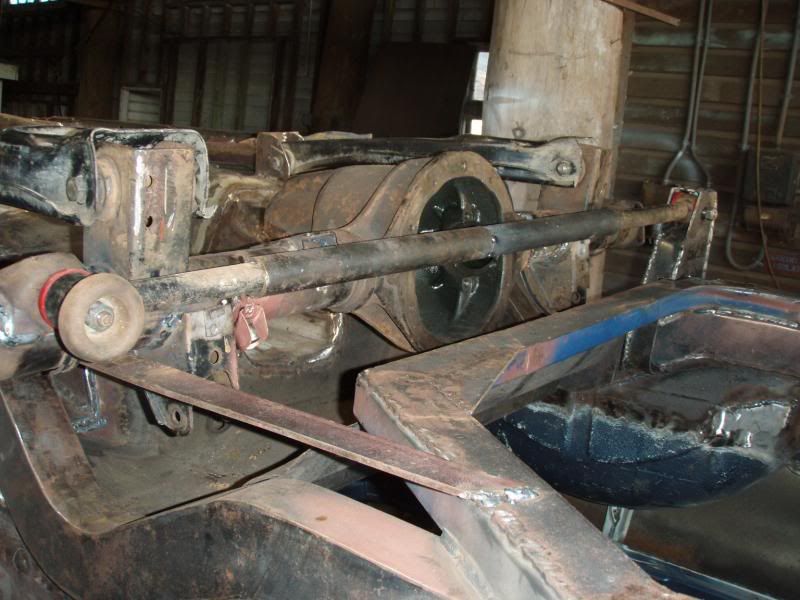 Then it was time to make a bracket for the panhard rod. I got a bent one from the wreckers and cut out the bend. Am going to make an adjustable one instead... tomorrow hopefully. 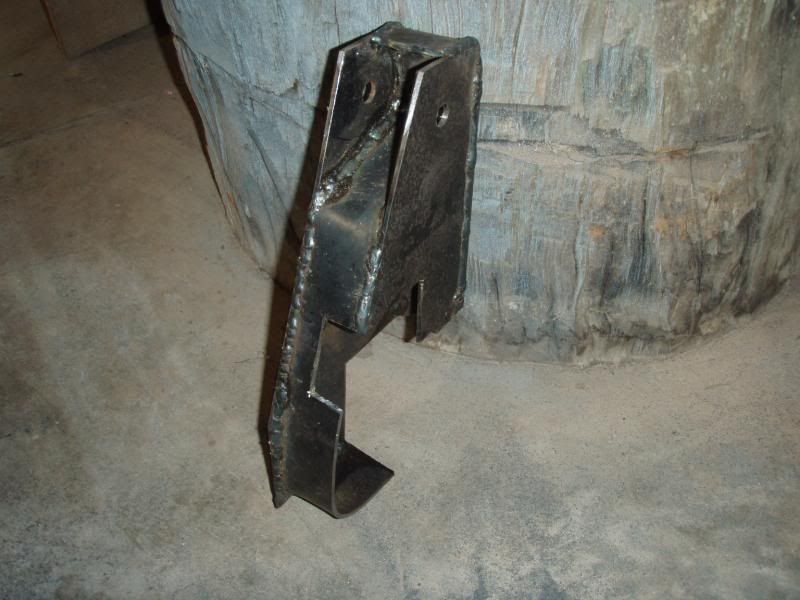 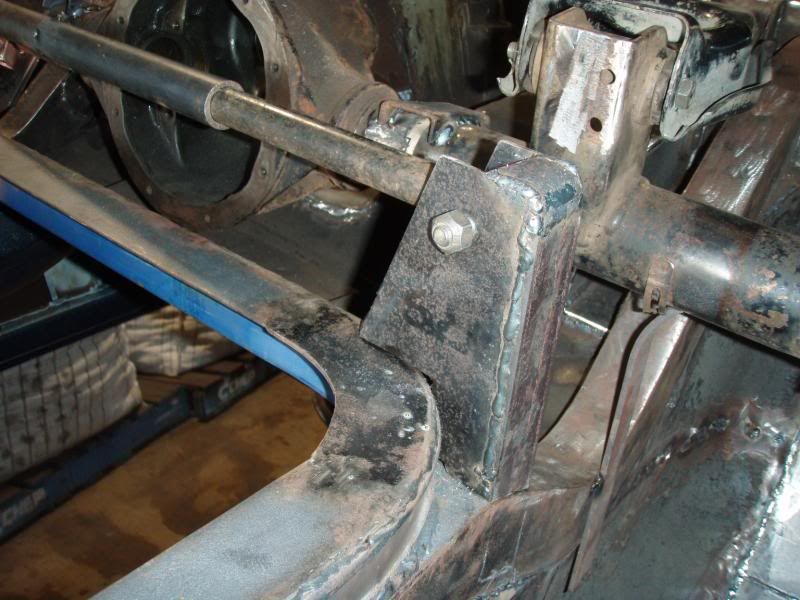 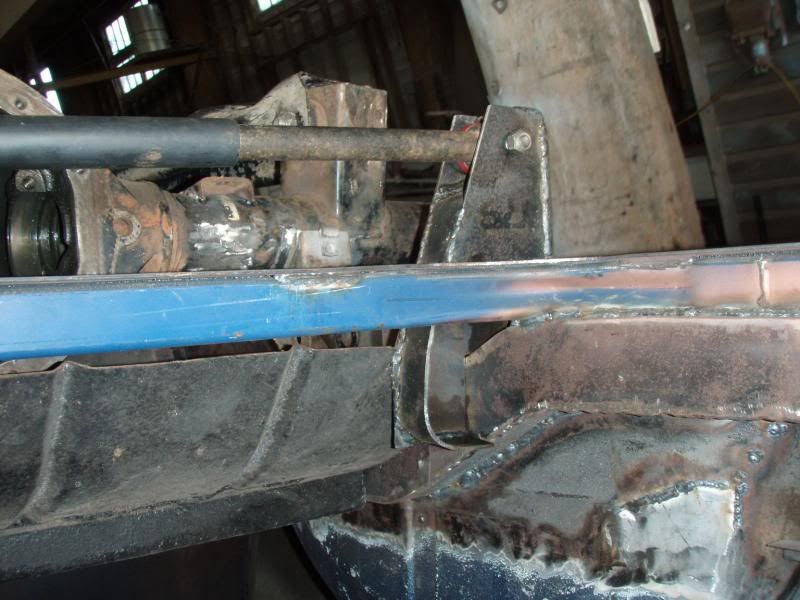 Just need to clean up the edges, make it a little more rounded and then weld it in tomorrow as well.  |
|
|
|
|
Logged
|
Phone +64 223509263
|
|
|
|
JB
|
|
« Reply #84 on: July 17, 2009, 06:57:30 PM » |
|
|
|
|
|
|
Logged
|
Phone +64 223509263
|
|
|
FE350
Junior Member
Offline
Posts: 37
Old holdens never die they just get faster!!
|
|
« Reply #85 on: July 17, 2009, 08:43:59 PM » |
|
Impressive work my friend you have definatly got some skill..
|
|
|
|
|
Logged
|
|
|
|
brett_f
Senior Member
Offline
Model: FC
Posts: 557
I love YaBB 1G - SP1!
|
|
« Reply #86 on: July 18, 2009, 12:56:51 PM » |
|
fevanv6,
Been following the build. Lots of thought into this. Is going to look great. Just letting you know that when i had the commodore rear end fitted to my vehicle, the engineer would not let me fit any trailing arms that were after market or made without having them strength tested. I know all engineers are different but just thought i would let you know just in case you need to do this. I ended up using original arms and therefore no engineering problems.
regards brett
|
|
|
|
|
Logged
|
|
|
|
|
JB
|
|
« Reply #87 on: July 18, 2009, 01:45:03 PM » |
|
Hey Brett,
Thanks for the heads up, but the engineer that I am using was the instigator in all of this... I am only following what he wants so that it is easy to get engineered. I have been enjoying doing this bit of the build as I haven't done any of this before and is coming together surprisingly well.
Like I said previously you can only have a go.
Cheers
JB.
|
|
|
|
|
Logged
|
Phone +64 223509263
|
|
|
|
JB
|
|
« Reply #88 on: July 19, 2009, 09:18:06 AM » |
|
|
|
|
|
|
Logged
|
Phone +64 223509263
|
|
|
|
ratbox
|
|
« Reply #89 on: July 19, 2009, 10:59:28 AM » |
|
i love whatching quik good builds, you keep saying first time but surely looking at yor work you must have some training or work in metal working industry, doubt yor a brickie and it's the first time you've picked up a welder  |
|
|
|
|
Logged
|
|
|
|
pedro
qld-club
Guru
Offline
Model: FC
Posts: 1683
If you haven't grown up by 50, you don't have to.
|
|
« Reply #90 on: July 19, 2009, 12:26:10 PM » |
|
G'day Jason, looking good, great job on the diff setup, i can't quite see in the pics and i know i'm using a different floor but did you have to rebate the floor slightly where the inner subframe rails sit, I'm going to have to either rebate the floor or shorten the rails and put the mounting spot higher by the look of it as they are stopping the floor going low enough.
Pedro
|
|
|
|
|
Logged
|
I love animals - they taste great
F4+
|
|
|
|
JB
|
|
« Reply #91 on: July 19, 2009, 02:33:40 PM » |
|
Hey Pedro,
If you have a look at page 4 you will see that after I had moved the rails in I then made the brackets for the upper and lower trailing arms. They go onto the new rails. The upper trailing arm does go into the floor and is the reason for the shape of the bracket. Grab the build book that I have spoken about, as this has been a bit of a bible for me. But if I can help in any way just let me know.
Cheers
Jason.
|
|
|
|
|
Logged
|
Phone +64 223509263
|
|
|
pedro
qld-club
Guru
Offline
Model: FC
Posts: 1683
If you haven't grown up by 50, you don't have to.
|
|
« Reply #92 on: July 19, 2009, 08:36:33 PM » |
|
Sorry Jason i meant on the front floor, the sub frame rails hit either side of the hump.
Pedro
|
|
|
|
|
Logged
|
I love animals - they taste great
F4+
|
|
|
|
JB
|
|
« Reply #93 on: July 19, 2009, 09:17:46 PM » |
|
Ah, i remember that bit... LOL I had to use a bit of creativity to get it to fit... It was called a mallet and a blow torch. I had help getting the subframe on and then off numerous times and kept adjusting the clearance bit at a time until i could get the subframe on without any of the legs fouling on the body of the car. Where the Y frames would normally join to the car I cut these brackets away from the pieces that I had cut off and bolted them onto the subframe. From here I bolted the subframe to the car using the upper mounts and the outside mounts on the Y frame. I then fabricated, or replicated the underbody crossmember so that the inner mounts could be welded to the car. 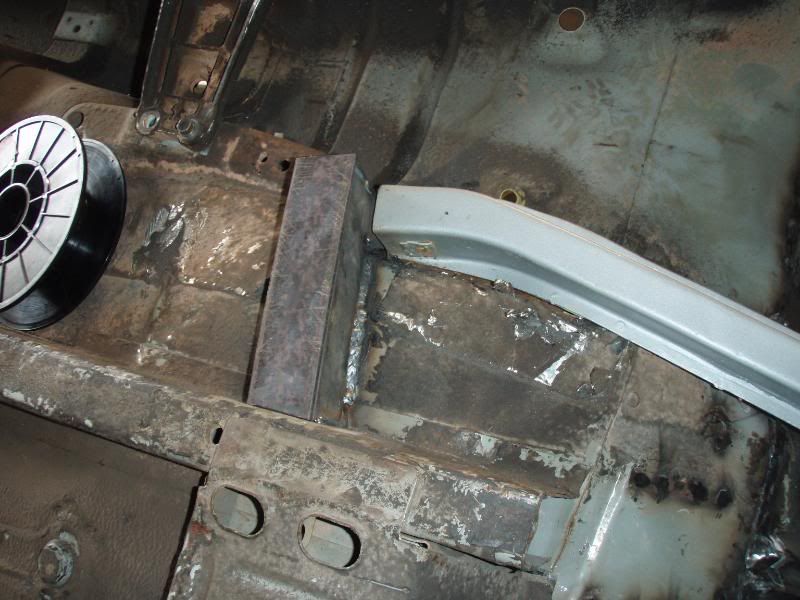 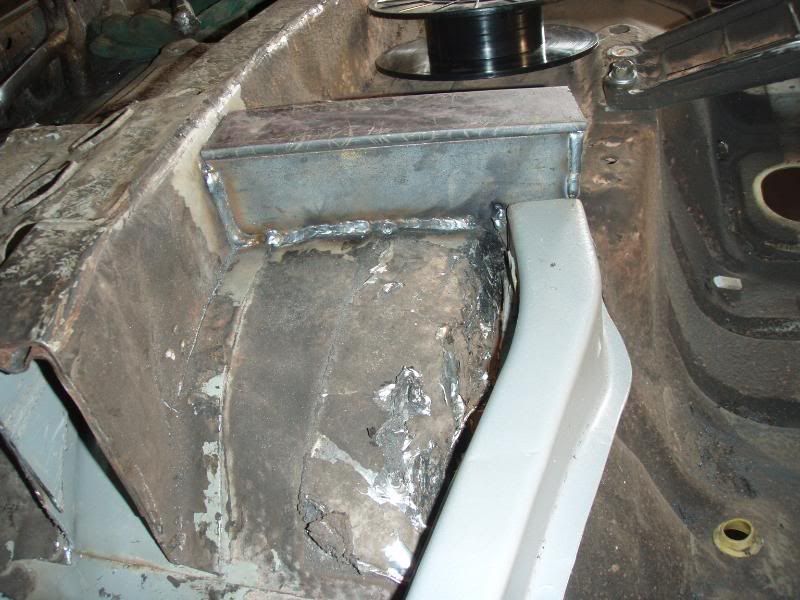   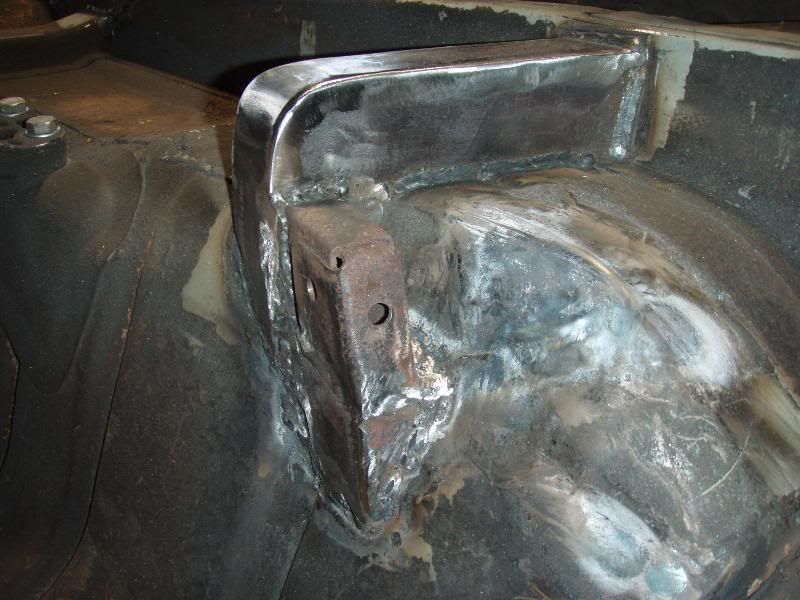 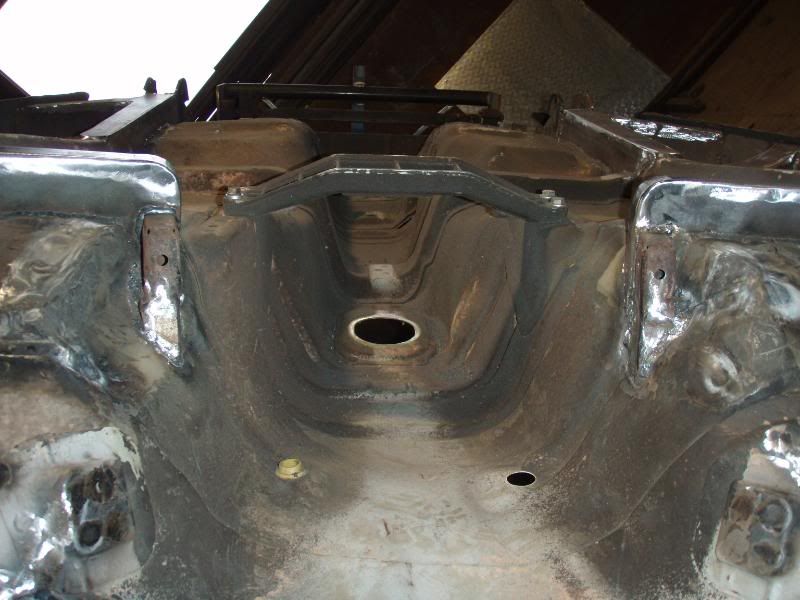 |
|
|
|
|
Logged
|
Phone +64 223509263
|
|
|
GOA350
vic-club
Senior Member
Offline
Posts: 489
FE's are great when they've got a V8
|
|
« Reply #94 on: July 20, 2009, 05:26:49 PM » |
|
Hi Jase, i watch with great interest and congratulate you on your effort so far. I know from past experience that you must be going home covered in grinding dust, feeling itchy from grinding dust and welding burns. And you also must be snorting out some great black boogers . Most people dont realise how much crap you get covered in when attempting such a major project. (not to mention how many grinding discs you must be going through). Well done again and keep up the great work, you are deffinately teaching alot of us a thing or two on how much work goes into these things. Chears Scott |
|
|
|
|
Logged
|
|
|
|
|
JB
|
|
« Reply #95 on: July 20, 2009, 05:41:32 PM » |
|
Thanks Scotty, You are very correct with the black nuggets... And the dust and the burns and the itching, plus the 2 trips to the emergency department to remove a piece of crap from my eyes that got under the safety goggles. I hadn't thought about how many wheels that I had gone through, but I have used 85 thin cut off wheels, about 9 grinding wheels and 3 of the sanding discs so far on a 4" grinder. 3 bottles of gas, 4 x 5kg welding rolls of .9mm wire. I pair of overalls... they are stuffed from burns and dust... 1 tyre on the bike from all of the trips up the hill... Hated doing that... The one hours ride up the Gillies highway is awesome this time of year!. So thats a rough total so far. Costs so far $5500 Donor car $6000 Ute $4975 Front end $260 Radiator $450 Fuel tank $250 Sand blasting and painting of the new sub frame Plus all of the other drill bits, cutting wheels etc. There would be more that I have forgotten about... So wheels approx $3500 Diff Centre about $1000 Stereo $4000 Paint and panel  ? $8000 maybe Chrome $3000 Gets a little expensive when you add it all up. Maybe i will just say it all quick.. LOL Cheers Jason. |
|
|
|
|
Logged
|
Phone +64 223509263
|
|
|
|
RET
|
|
« Reply #96 on: July 20, 2009, 05:48:02 PM » |
|
I think the secret is to keep the receipts, but not to tally them up Awesome job, Jase. Watching this with great interest. cheers RET |
|
|
|
|
Logged
|
|
|
|
|
Chuck
|
|
« Reply #97 on: July 20, 2009, 07:17:35 PM » |
|
Jason You make me want to run out and by a bottle of the finest mig gas  Sensational work, wish you lived a little closer as it would be great to dive in and lend a hand, will be following with keen interest
Chuck |
|
|
|
|
Logged
|
So yes it has changed my life. I can remember when I had a wife, a mortgage and a dog; I dont have any 3 of those things any longer
Dr Gregory W Frazier
|
|
|
|
JB
|
|
« Reply #98 on: July 20, 2009, 07:47:31 PM » |
|
Hey Chuck,
What are you like at bogging and sanding??? LOL
Would fly you up myself!!!
The panels are not too straight, I need to replace the sills and have to learn a bit more on panel work... Or its going to cost me a fortune!!
Would love to get the car nearly as straight as your ute Chuck!
Cheers
JB.
|
|
|
|
|
Logged
|
Phone +64 223509263
|
|
|
pedro
qld-club
Guru
Offline
Model: FC
Posts: 1683
If you haven't grown up by 50, you don't have to.
|
|
« Reply #99 on: July 21, 2009, 10:55:57 AM » |
|
Thanks for the pics Jason, made things a lot clearer, unfortunately too clear, the VL floor isn't just narrower in overall width the tunnel is also narrower which puts the inner subframe rails under the floor not on the side of the tunnel, looks like it's a lump in the floor or shorten the rails and make a new mounting point, hopefully i'll get some more time soon and will be able to juggle things around and see which way to go, if anybody else out there is thinking of this swap you'd be better off with a later floor, from what i've been told the VN/VP floor is also the same as the VL and the body was just ballooned around it.
Pedro
|
|
|
|
|
Logged
|
I love animals - they taste great
F4+
|
|
|
|


