FE-FC Holden Discussion Forum
October 06, 2024, 09:47:27 AM *
Welcome, Guest. Please login or register.

Login with username, password and session length
News: The FE-FC Holden Car Club of NSW are proud to host the 19th FE-FC Holden Nationals. Check out the announcement video for more.
 
   Home   Help Search Calendar Login Register  
Pages: [1]   Go Down
  Add bookmark  |  Print  
Author Topic: External sun viser  (Read 5049 times)
saxon
Newbie
*
Offline Offline

Posts: 13


View Profile
« on: August 31, 2007, 07:46:02 PM »
0

I am planing to fit my external sun viser this weekend is there anything technical that I should think about before I start  regarding height or angle or can it only go in one position.

Saxon
Logged
TTV6FC
Guru
*****
Offline Offline

Model: FC
Posts: 1132


View Profile
« Reply #1 on: August 31, 2007, 09:27:13 PM »
0

One of the more senior guys could probably help you out more on this topic but if it is an original NASCO or similar visor,the centre bracket is determined more by mounting the gutter brackets first.There may be an exact measurement though.Mine is 25mm from the last edge of the windscreen to the first set of holes and 155mm to the third hole at the back from the last edge.Hope this makes sense and is of use.Cheers,Jamie.

Logged

Run your fingers over my Holden and I'll run my Holden over your fingers!!!!
FC0058
qld-club
Guru
*****
Offline Offline

Model: FC
Posts: 2128


Jim Altmann
View Profile
« Reply #2 on: September 01, 2007, 09:22:14 AM »
0

Saxon
See link for fitting instructions.
http://smg.photobucket.com/albums/v608/customfc2/FEFC%20instr/?action=view&current=sunshade.jpg

Jim
Logged

Forgiveness is easier than permission.
Spinner
nsw-club
Senior Member
****
Offline Offline

Posts: 643


Whitewalls - more than 'just' a way of life.


View Profile
« Reply #3 on: September 01, 2007, 01:55:58 PM »
0

Saxon,

I'd suggest measuring & mounting the centre bracket first, as there is some variation in shape, thus distance from the windscreen/roof crease.  Place the bracket onto the roof, then move it backwards/forwards until the mounting pads sit on the roof. 

I have one which fits best about 2" back, another which fits best about 1" back.  Look at other people's cars as the sunvisors are not all fitted in the same fore/aft position.

Cheers

Brett
Logged

(0414) 49-6706.  d5461 on Ebay.
fe hotrod
Senior Member
****
Offline Offline

Posts: 393


View Profile
« Reply #4 on: September 01, 2007, 06:33:10 PM »
0

 ;)Howdy just a word of caution when fitting your sunvisor,the center bracket should be fitted using captive nuts inserted into the roof,as im not to sure if self tappers will do the job, at 100kmh!! i have heard of the self tapper screws pulling out,captive nuts are available at a good bolt shop....good luck...jamie
Logged
saxon
Newbie
*
Offline Offline

Posts: 13


View Profile
« Reply #5 on: September 01, 2007, 09:45:24 PM »
0

I fitted the sunvisor tonight with thread inserts and stainless steel screws with counter sunk heads hopefully this will do the job. Has anyone had trouble with this area leaking because I had an after thought that maybe I should have put some sort of sealer around the screws as the directions suggested.
Thanks for all  the advise it was very helpful.

Saxon   
Logged
Paul In Ireland
Guru
*****
Offline Offline

Model: FE and FC
Posts: 1059


View Profile
« Reply #6 on: October 06, 2007, 07:34:09 AM »
0

I am new to FC's but not to problematic car roof's.

On some in the past I liked to put a small closed circle of silicon around the underside of the brackets before fitting. This did 2 things: First it meant you are less likely to scratch the duco with the metal rubbing and second it stopped water ingress. Dont be afraid to put on a little more than you think you need as the excess is easily removed.

I haven't fitted sun visors but instead heavy duty roof racks on some 4x4's and the like. The principal of water leaking exactly where you don't want it to would still apply.

Good luck - but definitely do some sort of seal for the long term.

Paul (in a wet country where silicon is king)
Logged

The International FE FC Fleet of Ireland
Education is where you read the fine print. Experience is what you get when you don't.
Spinner
nsw-club
Senior Member
****
Offline Offline

Posts: 643


Whitewalls - more than 'just' a way of life.


View Profile
« Reply #7 on: October 22, 2007, 07:47:30 AM »
0

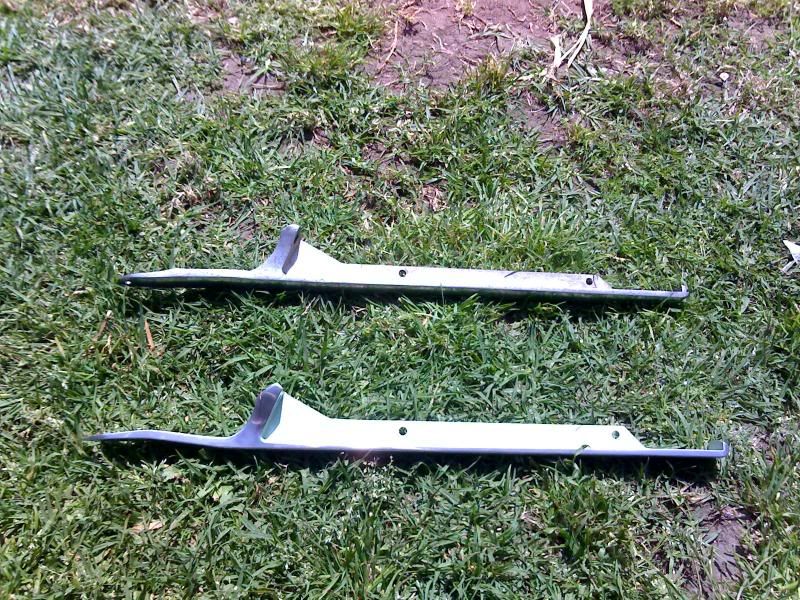
Here are some pictures of two different centre brackets, showing some variation in shape and fitting location.

Bracket No 2 Upper, Barcket No 1 lower


Bracket No2 in the best position for No1.  Note that the pads do not sit in contact with the roof.


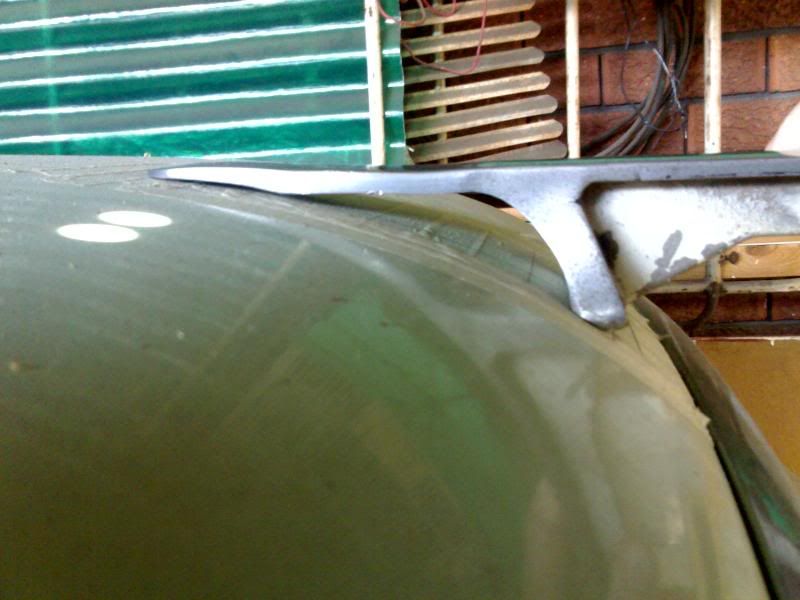
Bracket No2 shown in its best location.  This is about where the fitting instructions say to mount it.


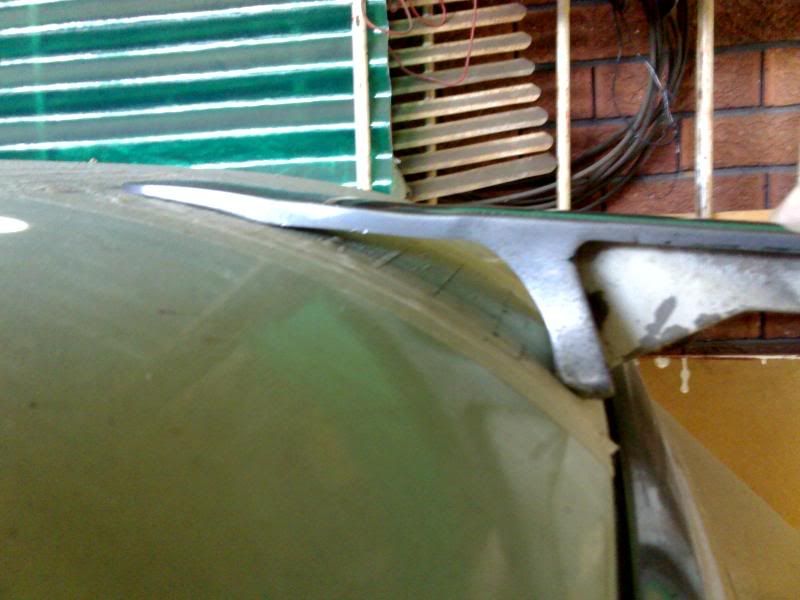
Bracket No1 in its best location.


Bracket No1 in the 'official' location.  Again, note how the mounting pads are not sitting on the roof.


Here the two brackets, individually.
Bracket No 1.


Bracket No 2.


Cheers

Brett


Logged

(0414) 49-6706.  d5461 on Ebay.
fe1957
qld-club
Full Member
***
Offline Offline

Model: FE
Posts: 144


Turbo Charged


View Profile
« Reply #8 on: October 22, 2007, 05:02:58 PM »
0

Fantastic instructions, would also like to ask if anyone has a spare drivers side clamp I am chasing one.
thanks
Grant
Logged

OFE570
Pages: [1]   Go Up
  Add bookmark  |  Print  

Share this topic...
In a forum (BBCode) 
In a site/blog (HTML)

 
Jump to:  

Powered by MySQL Powered by PHP Powered by SMF 1.1.21 | SMF © 2015, Simple Machines Valid XHTML 1.0! Valid CSS!
Page created in 0.031 seconds with 20 queries.