FE-FC Holden Discussion Forum
November 23, 2024, 02:27:08 PM *
Welcome, Guest. Please login or register.

Login with username, password and session length
News: Are you a member of one of the FE-FC Holden Car Clubs of Australia ? If you are, get access to the Club-Member-only area of this discussion board. Send an IM to the board admin, including your real name and club to get access.
 
   Home   Help Search Calendar Login Register  
Pages: [1]   Go Down
  Add bookmark  |  Print  
Author Topic: its not much but its a start.  (Read 4423 times)
smithy
Guru
*****
Offline Offline

Posts: 1014


yeah its purple !


View Profile WWW
« on: March 11, 2008, 10:46:28 AM »
0

well after being forced through injury to do nothing to the beasty for the last 4 months i gritted my teeth over the weekend and made a long awaited start again.
while only a small job /jobs i feel a lot better for doing them

i have almost completed my new centre console, just got get under dash ( still too sore Angry ) and measure up heater controls to attach to console face plate- i wil be using FC choke and knob to control heater and wiper switch knob for power. once thats done i can then wrap and cover it.


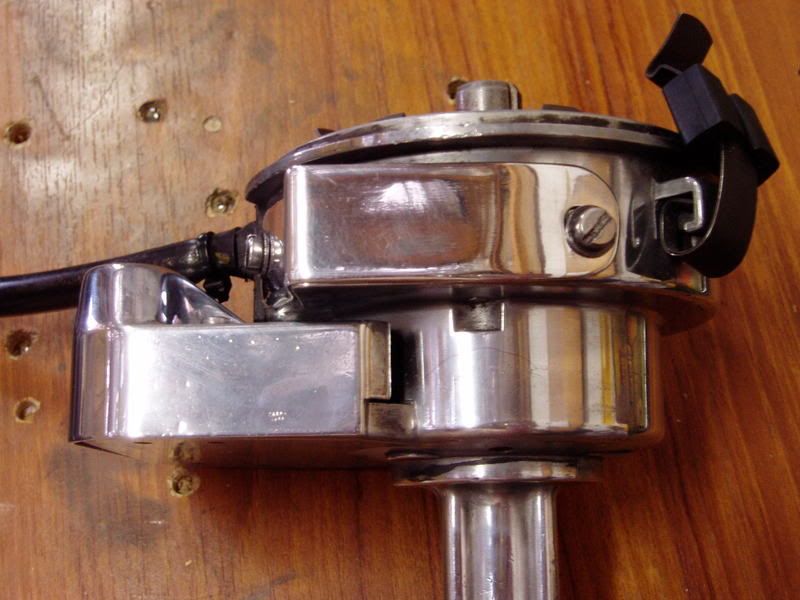
AND got my finger out and moddified the electronic dissy to suit the EFI
worked out that i can just bend the tabs over to lock the weights- no movement what so ever now Wink ( thanks John Effie C ) still may braise them just to be sure


made up a plate to cover the big hole where the vac advance used to be
before


after
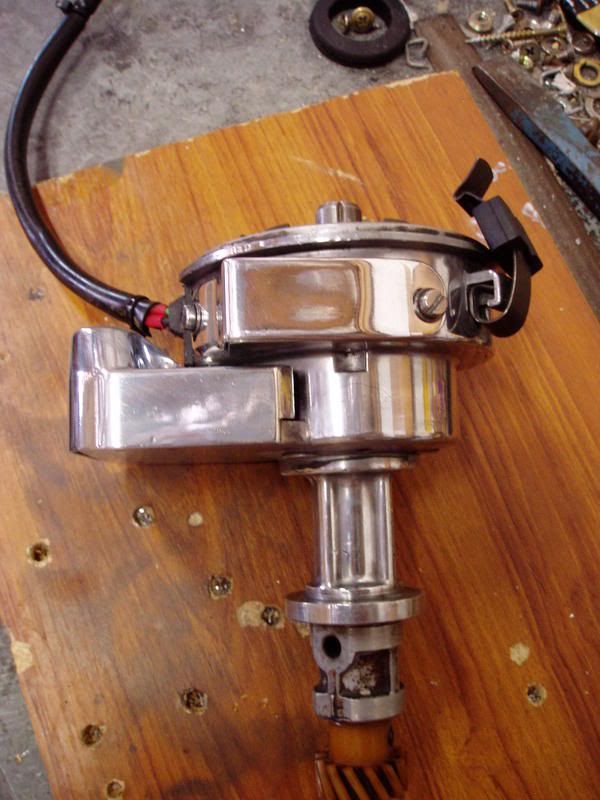

pretty happy with the way this turned out!

i am slowly getting back into it now, problem is this bloody site just makes me want to get into the garage and work  Wink but i have still got to take it easy and heal first Roll Eyes Roll Eyes
but over the next few weeks health and sanity permitting i hope to have the EFI wiring and plumbing complete, and the boot floor for the new fuel tank welded in, if i can con a mate into it Grin
yay i started again Cheesy Cheesy Cheesy
dean
Logged

i may be getting older, but i refuse to grow up!
FC0058
qld-club
Guru
*****
Offline Offline

Model: FC
Posts: 2128


Jim Altmann
View Profile
« Reply #1 on: March 11, 2008, 12:18:07 PM »
0

Well done Dean
The work you have done looks great, I will be watching keenly for updates.

Cheers Jim
Logged

Forgiveness is easier than permission.
Glenn 'Stinky' Stankevicius
Moderator
Guru
*****
Offline Offline

Model: FE and FC
Posts: 5135


Willaston, South Australia


Glenn.Stankevicius
View Profile
« Reply #2 on: March 11, 2008, 02:51:24 PM »
0

That console looks heaps better, the shifter boot is ready too  Wink.
Logged

mikey
Senior Member
****
Offline Offline

Posts: 257

Werribee


View Profile
« Reply #3 on: March 11, 2008, 04:18:37 PM »
0

Dean,
          I do like the console, seems to be glued and/or screwed plywood. You say you are going to "wrap it" does this mean fiberglass wrap it or just wrap it with some sort of covering/carpet to make it look good?

I want a console but it interferes with handle for the vent, have been thinking that one way to get rid of the handle would be to find a small 12 Volt geared motor from Jaycar or Dick Smith and hook it up to a piece of all thread and brass nut, using a toggle switch to turn the motor to open and close the vent. I do have a small geared motor but it is puny for the job

Cheers   M
Logged

Our Lady of Blessed Acceleration, don't fail us now!
smithy
Guru
*****
Offline Offline

Posts: 1014


yeah its purple !


View Profile WWW
« Reply #4 on: March 11, 2008, 05:33:22 PM »
0

cheers all,
stinky, yeah this one is a keeper took a lot of stuffing around with the shape and to make sure there is enough room for the heater outlets, the only down side is that the outlets are at 2 slightly different positions to make room for the vent handle and other components. re the boot thanks heaps mate send it on up and let me know what the postage damage is ( did you manage to find some scrap mermaid vinyl ?) i'm going to try something arty when i cover it so keep fingers crossed.

Mikey. the ply was used to get the basic shape down, i used 2 pieces of aluminium C channel bent to hold the curve together and give some strength all hidden behind looks pretty ugly but no-one will see back there  Grin  the black foam shown in pics is only about 1.5mm thick and was used to snmooth out some of the joints and to allow some minor mods before material is applied
i have then laid some fibreglass both to the back and in places on the front for strength and shape, but the biggest problem was making the vent handle opperational this required both sides to be slightly concave and because my trans tunnel is quite large and boxy the console had to be stepped in places on the left .i laid heaps of glass in this area then sanded away the ply and about 2mm of glass. ( you can see in the pic where it is marked for sanding.
in the next week or so i will be wrapping the exterior in some light padding then covering in vinyl. more pics then maybe Wink

if you want some pics to show what i mean send me your email address
i do really like the idea of using a motor for the vent might be a challenge to get it to seal properly but anything is possible. it would look pretty cool though Cool

cheers
dean
Logged

i may be getting older, but i refuse to grow up!
TTV6FC
Guru
*****
Offline Offline

Model: FC
Posts: 1132


View Profile
« Reply #5 on: March 11, 2008, 06:40:43 PM »
0

Great job Dean,don't you just love the way aluminium polishes up? Cool
Logged

Run your fingers over my Holden and I'll run my Holden over your fingers!!!!
Ed
Guru
*****
Offline Offline

Model: FE
Posts: 3311


Ed74mnd
View Profile
« Reply #6 on: March 12, 2008, 08:43:10 AM »
0

nice work Dean, good to see you're back on the project.

Cheers

Ed

Logged

in the shed
Pages: [1]   Go Up
  Add bookmark  |  Print  

Share this topic...
In a forum (BBCode) 
In a site/blog (HTML)

 
Jump to:  

Powered by MySQL Powered by PHP Powered by SMF 1.1.21 | SMF © 2015, Simple Machines Valid XHTML 1.0! Valid CSS!
Page created in 0.035 seconds with 20 queries.