Spare V6 and commy brakes, 🤔 Sent from my iPad using Tapatalk
The thought crossed my mind but the V6 was sold off and the brakes etc will probably go the same way - if not I will put them on the parts shelf for a rainy day. I have a hot VY SS Commodore as one of my "work utes" - needs repainting but otherwise is in great nick so no need for another go really fast horse in the stable. I am going back to my FC roots and will get the old grey up and running again. In my youth I would have made it a four speed/maybe five but I am keen to keep the 3 on the tree for nostalgia purposes. I leant to drive in one and my last FC started out as one.
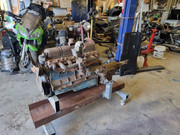
Got a bit of time today to check out the engine in more detail. Unfortunatley the findings weren't great.
Despite the tag attached to the manifold showing 100 psi on all cylinders the readings I achieved were 75 - 80 psi across the board. Given the time it has been in dry storage it is highly likely that the rings are stuck in the grooves. I have always had it in my plans to "freshen" her up but was secretly hoping that there wasn't a reason to.
Off with its head me thinks - and we can do a better assessment from there.
Just got to fight Son 2 for some shed space. He ran (pushed in with a loader) his VZ Crewman project into the shed this morning and is in the process of changing over all of the V6 running and stopping gear for V8 bits.
not hard now to make a plate for rear of block and a post and swivel to mount the block on to rebuild an engine ..
Great idea Vern; thanks. I have two engine rebuild stands at the moment - one is a free standing on castors and the other fits over the stabiliser legs of the engine crane so I am pretty set of rebuild stands at the moment. It is something I will look at as I grow the capability of this little contraption!
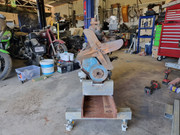
Took some time this afternoon to knock up the radiator support. IT has a bit of flex due to the height above the support. While it would probably be OK to run it as it stands I think I will add a couple of braces to get rid of the flex that "may" cause radiator damage. This is where we are at:
Despite measuring the front engine mount setback twice I managed to get it wrong. I was out by 40mm and the angle I used for the front mount is 40mm, so I expect that I F@#$ed up my maths when I was doing the setout. No real drama - added some 40mm angle to the back of the bottom plate to give it some rigidity.
This will work for me in the short term but I have already identified questions I should have asked. These include:
Have I made the right decision on how I secured the rear of the motor to the stand?
Would there be benefit in rotating the front engine mount 180 degrees to allow better sump access? (Note that the sump is removable in the current conficuration):
How do I incorporate a battery tray and fuel supply into the system. The fuel supply has to be on the opposite side to the zorst for obvious reasons; and finally
Do I add some gauges to make it look good or simply use an old tuning kit that measures the pertinent information?
The key factor in the decision was picking up a second grey today from a local farmer. I know nothing about it except it was supposed to be running when it was laid up in a shed several years ago; but it now doesn't turn over. Son 3 picked it up this morning but didn't think to ask about the history of it so I am currently chasing the detail. Suffice to say I will have one in the ute and a "spare" ready to go. The beauty being is that I can experiment, assess motors etc without having the hassle of putting them in and pulling them out of the ute.
Heard back from the cockie this morning; the motor was in the shed when he purchased the land. He was told by the previous owner that it was a runner and could be used to run a water pump etc. That was some twenty years ago - so it has been sitting idle in the shed for 20-25 years. I just wonder what a diesel soak will achieve!
So, Son 2 and I were discussing this today and were tossing up a design for the grey v a design that could be multi use. After long discussions on site we decided that we can purchase an LS (Chev) stand off the shelf for about the price of the castors for a bespoke job. We had a chat about Harv's approach vs a dedicated setup and landed on building a bespoke solution for the greys and when we do the next LS build (we have a 6 litre up wrapped in plastic for an International KB1 Rat Rod) we will purchase a model like Harv uses that is purpose made for Chev engines.
The key factor in the decision was picking up a second grey today from a local farmer. I know nothing about it except it was supposed to be running when it was laid up in a shed several years ago; but it now doesn't turn over. Son 3 picked it up this morning but didn't think to ask about the history of it so I am currently chasing the detail. Suffice to say I will have one in the ute and a "spare" ready to go. The beauty being is that I can experiment, assess motors etc without having the hassle of putting them in and pulling them out of the ute.
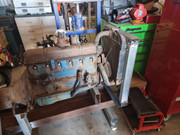
Anyway, we knocked off around 3 today so decided to have a crack at building a bespoke engine stand for grey motors. We dropped into the local hardware store and picked up some castors (125kg) and headed home. I know 1/2 tonne is overkill, but I would prefer longevity of the castors over saving $20 on light duty wheels. We then raided the reclaim yard and returned with a 300mm universal beam (UB), a section of 200 x 45 Duragal RHS, some 90mm Gal SHS, some 90 x 45 Gal RHS and a few angle offcuts. The 300UB is massive overkill but it didn't cost us a cent so we ran with it.
We used the plan I uploaded earlier as a guide and adlibbed a bit; primarily because the 300 UB allowed us to weld the rear supports directly to the sides of it. Stopped to have a bit of a feed then back out to the shed to finish it off and clean up. We ran out of time to build a radiator stand but that is something we will add over time.
The end result:
Overall cost: $120 for the castors, 3 hours in the shed cutting steel and welding. It is a work in progress and will be finessed as we go - will add a lick of paint too to make it look pretty!
My engine test stand needs are pretty basic. It gets used a couple of times a year at most. My space is limited, so I needed something that would double up for storage.
I use the simple SBC engine cradles that a lot of different companies sell (I suspect all made in China, then rebranded by others) like this:
Great insights. I have looked at these on the web and thought about doing something like you have setup. From what I have in reclaim I probably only need to purchase some castors to make it up so cost wise probably close to the mark. So radiator support is a nice to have as opposed to essential - garden hose is a great option. I have the luxury of living on property so apce isn't a huge problem - although with trucks, excavators and car/bike projects I could do with another shed - will have to finish the house for Mrs J first though.
Will keep this idea in mind for if I start to collect more engines - I have a couple of projects between sons and I on the go /in train at present. After the FC we have a plan to shove a 6 litre into an International KB series ute body on a Rodeo Chassis and we're currently transforming a VZ Commodore Crewman from a V6 base into an SS (donor is a written off SS). The point being that something multi use like you use may have more versatility.
The advice about fire is well received - in my youth I had a couple to deal with as well. Burnt through a plastic fuel line hidden inside a rusty channel with OXY as I was cutting out some rust. Managed to get it out with the old yellow extinguisher - but was shitting bricks for a while there.
The good ideas fairy has been jumping around in my head for about a week or so now in relation to constructing an engine test stand. I have access to a bunch of steel in our reclaim yard so with luck it will simply be a matter of welding up what I already have available. I have a few decent sized I beams available so I am thinking of using one for a spine and an offcut as the front engine mount, using some angle on risers for the rear mounts and including a radiator support at the front. I think I can probably just park an outboard motor fuel caddy and battery on the ground as fuel/power supplies.
The concept I have would look something like this:
So before I jump into bulding something:
What is already out there that may provide inspiration/good ideas?
What have I got wrong in the concept?
If it is workable what improvements would you recommend?
If you have already built one what would add if you did it again?
"Tread". It looked easy. Took a surprising amount of time to hammer the convex curve into a flat piece of sheet. This, I think, is where an English wheel would come into its own. I just used hammer, dolly, and sandbag, with much checking of the curves in both directions.
Rob
Fantastic work without an English Wheel. Take a bow and have a cold beer - you deserve it!
Got stuck into the lower portion of the grille today. It had a 25mm depression in the centre rear of the bar and had a small tear in the metal. I beat out the depression yesterday and it was about 2mm out of alignment. I grabbed the MIG today as we were welding up some damage to a couple of our trailers. After the first attempt the shrinkage pulled the bar out of alignment by about 10mm so I muscled it back into shape only to find the material adjacent to the weld tore. So it was rewelded and I used the MAP torch to heat it and then persuades it into position.
I managed to get it within a mm or so out of true so pretty happy with the result. It will be hidden at the rear of the bar and go unseeen so, while it will never be in concourse condition, it should cut the mustard for doing quotes in around Yass and Murrumbateman!
While the boys were slaving away on the trailer repair I also took the opportunity to drill out the rivets in the front quarter windows and separated the glass from the frames. Both clips that hold the pivot rod in place and allow it to rotate were rusted and snapped off so I need to find a way to repair that element before they can go back in. Thoughts?
Drilling out the rivets was time consuming but the worst part of the job was getting the 65 year old rubber out of the channel. Removing the glass with a paint scraper and hammer was probably the easiest part of the whole job.
Ute tail lights were originally p a inted, rather than chromed. If you go that route, they can be lightly filled.
Sent from my SM-G781B using Tapatalk
Thanks, I was aware of that but Mrs J isn't a fan - I was keen on the painted route but was out voted!
I'm fighting to keep the standard chrome strip on the govebox and no radio as original (hiding a bluetooth unit). I folded on the heater though - I feel the cold now too!
There are no numbers on the jack at all. Under the grime I was able to identify some orange paint so it appears to be the correct jack. It is really grubby on the exterior but in good working order. Need to see how it cleans up to see if I can use it as a means to match the paint.
Front quarter windows are a world unto themselves. If you want a top-class job, it's best to separate the top hinge brackets from the frames, and also the lock pivot from the frame (many rivets to drill) and get each component rechromed separately. Be aware also that the replacement Rare Spares rivets are oversize. I had to turn them down before I could use them. Also, chroming reduces hole diameters.
Rob
Thanks for the tip re the Rare Spares components - I assume it is the saem deal from Resto Country. I'm going down the route of separating all of the components and getting them chromed individually. I've messaged you about the taillight housings.
They are the guys I'm taking everything to. I went through everything today and found that there is still a bit of work to do before I take it in for them to do in a job lot:
There was an inch depression in the lower member of the chrome grille caused a while back based on the rust in the depression. I have it back to 2mm over about 200 so I'm happy with that. I do have to weld a tear in the strengthening rib at the the centre of where the depression was though.
On thorough inspection of the left hand front indicator I found a tear in the metal, won't be seen but will need a pot metal repair to stop it spreading.
All of the three tail light surrounds that I thougth were good are damaged. I can probably repair two but maybe not to the standard for chroming - I could probably cut and shut two into one with a pot metal weld but I'm not sure of how the finish will come up. I'll have a chat with them about it as I am taking in the tailgate badge to discuss if the repair is good enough to chrome
I need to pull the quarter windows apart. Started on it today but the rubbers are so stiff they don't want to come out. I will drill out the rivets tomorrow so I have better access to finish the job.
I haven't been able to straighten one of the bumparettes enough to weld yet. I think I will apply some heat to see if I can get a bit more of a response - otherwise I will need to get it into somewhere to press it straight and weld the tear - another search while I am in town tomorrow
The bonnet bird is in average state so definitely needs to be done
The speaker grille and radio cover are in reasonable shape but will look odd among the new chrome so I will get them done as well
I won't be able to pick it up until tomorrow when I head into town to get a wheel alignment for our truck. It is a two stage jack and appears to be correct from the pictures; however, I wasn't able to look it over closely and the owner had no idea. Son 3 ensured that it worked and was not bent/threads not damaged in any way. Will let you know tomorrow.
First bay back on the tools for the New Year - well it was supposed to be but pissing down rain here in Murrumbateman.
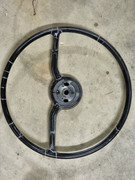
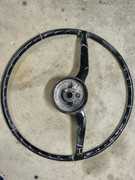
Tidied up some papaerwork and did some maintenance on our machines then started on the steering wheel. Sort of working in reverse until I can get the house resto complete as the shed space I need to work on the ute is full of materials for the house build, and the wife's Capris Convertable. So got to finish the house or the Capri before I get the sehd space I need!
Anyway the steerign wheel had been "restored" by the previous owner. A half hearted job, some bog/spot putty worked into the hairline cracks and then sanded with what looks like 120 grit judging by the sanding marks, well oversanded in places, and then hit with some gloss black. Enamel I expect.
I took to it with the dremmel and gouged out most of the bog and opted for the trusty 5 minute Araldite approach.
There will be a fair bit of sanding to do as I addressed every crack that I found. I will probably need to hit it with some spray putty as well to address the overzealous sanding of the previous owner. As it is going back into a ute I think a couple of coats of black and then some clear in 2 pack should tidy it all up.
Now to try and tidy up the hub caps - I think I have one decent one out of the four that could be rechromed. The other three have been battered over their life - I will see what I can achieve with a hammer and a few dollys but my selection is limited so a slow and steady approach will be required. I expect I will need to find a couple of spoons and make a couple of custom dolly's; but even then a couple of the creases are pretty deep. Slow and steady wins the race here I guess!
Jack has been sorted, young fella picked one up in town this morning. Found the correct decal on ePAy
It works well; however, the paint is completely gone and so I don't have anything to match the paint to.
I know it's being anal and the colour of the paint won't make the jack work any better; however, if I'm going to get some paint I may as well try to match it as best I can.
Is there a particular paint code for the shade of "orange"?