 Show Posts Show Posts
|
|
Pages: 1 2 [3] 4 5 ... 11
|
|
41
|
Technical Board / Modification Help / Re: Hr front end regarding outrigger and engine mounts.
|
on: August 13, 2008, 03:17:02 PM
|
Hi Ben,Ed, Yes will be adding the sump clearance in and internally bracing as well as fully plating the base of the member right up to the coil spring holes. I have quite a few pictures of front ends that clearly show the width of the sump cutout and depth of it (also with an engine in place) but no real clear pictures of the position of the engine mounts so I suppose I am after 100% confirmation of where the correct position of should be. (don't have a trial engine available yet) The welds look a bit sus on the engine mounts from being previously moved so may end up cutting them off and making some other ones out of material a bit heavier. Have already welded on reinforcing bars to both of the lower control arms so that part is out of the way. Am in Melbourne's West, does anyone have any clear pictures of their front end or do you have one either out of car or installed in one that I could have a look see?? Think CRS was about the $650 mark for a change over front end so this bit of mucking around is worth it. Cheers M 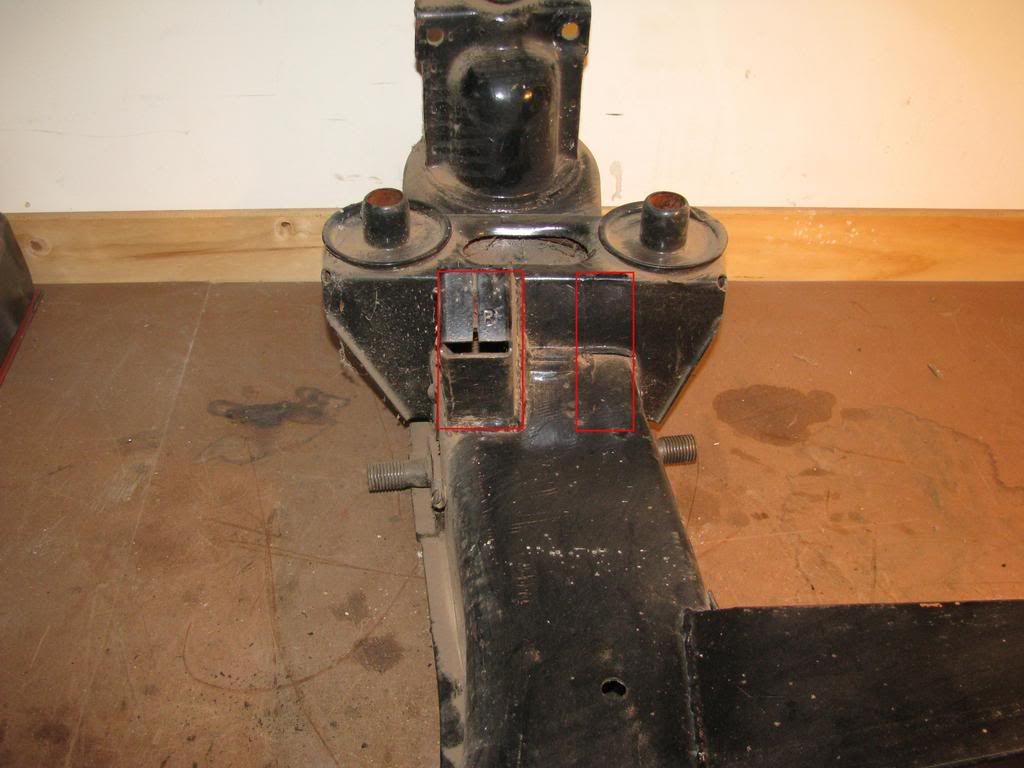 |
|
|
|
|
42
|
Technical Board / Modification Help / Hr front end regarding outrigger and engine mounts.
|
on: August 12, 2008, 09:25:23 PM
|
Hello everyone. I have a HR front end that does not have the original HR outrigger still attached, it has another style and would like to know if this is the correct one. The length of the outrigger has been measured from an existing hole in the middle of the front end. The height of the outrigger at the end is to the bench top. I have heard that outriggers have been fabricated in the past and I suppose it does not really matter to meas long as the dimensions are correct. This will be used with a Holden 5 liter and the next thing is to work where the engine mounts should live, they have been moved to the rear sometime in the past which I think is the right spot if running a red motor. (will stand corrected) Q1 Is the outrigger the right type? Q2 Where should the engine mounts be for a V8. Thanks M 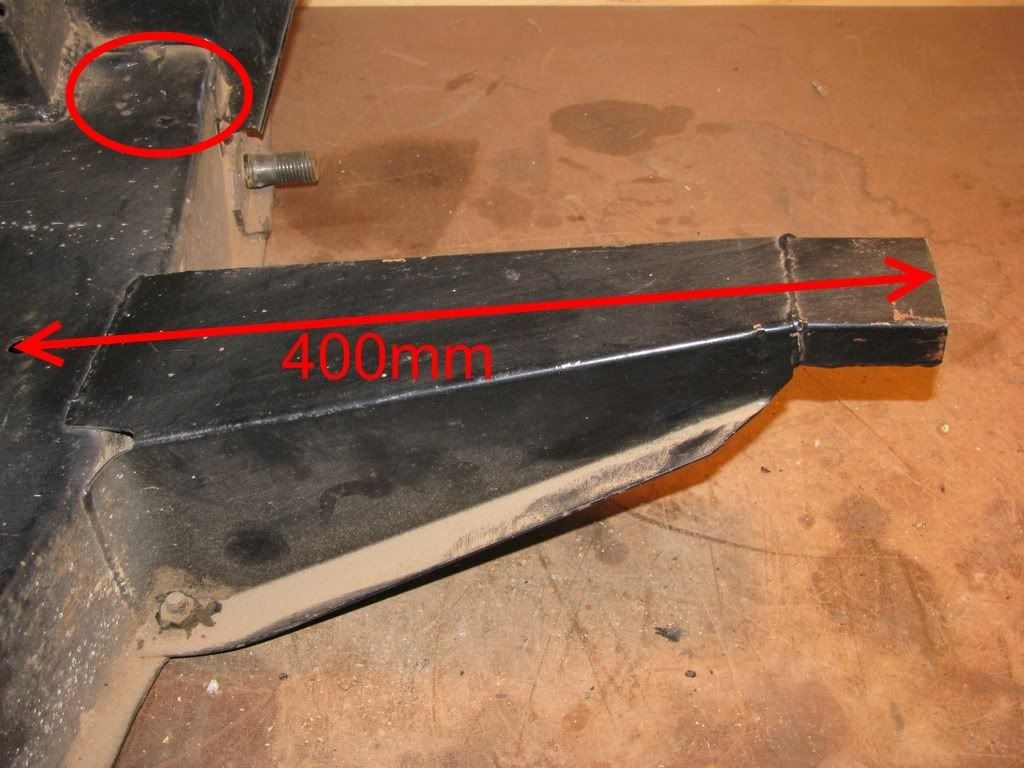 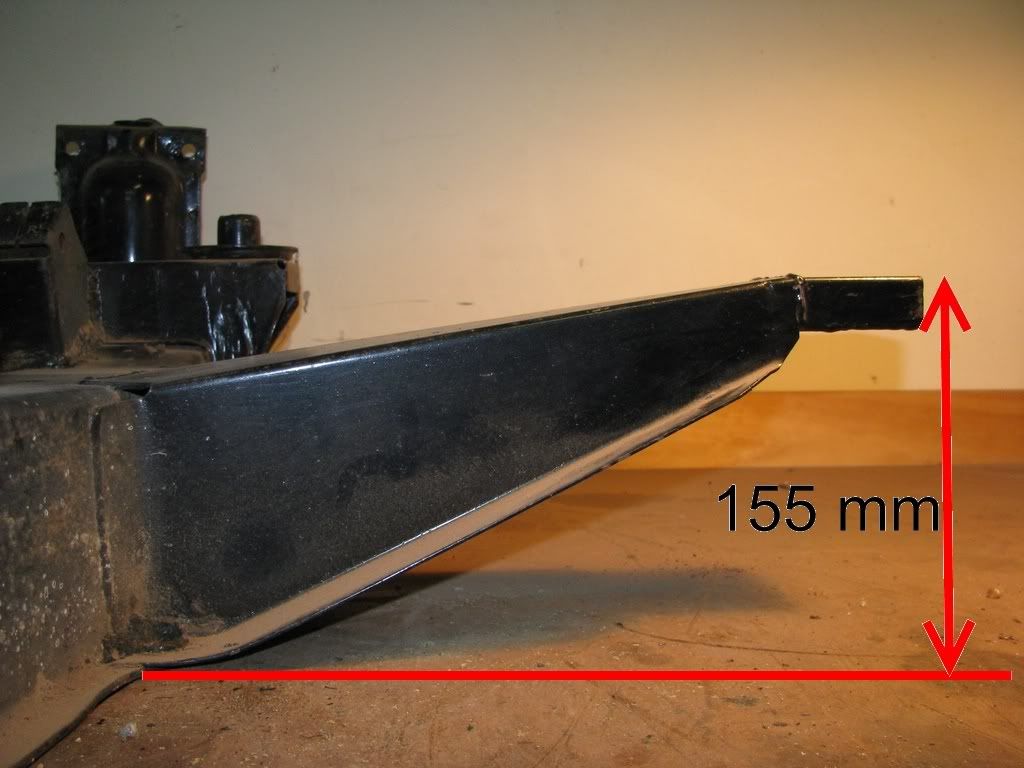 |
|
|
|
|
44
|
Technical Board / General Technical / Re: Brake failure switch on dual circuit master cylinder.
|
on: August 07, 2008, 07:09:40 PM
|
Agree it is is a good idea in principal, but a bit pointless in my opinion almost like having a little light telling your engine has just stalled due to running out of fuel, yeah DUUUUHHHH  Would personally be quite happy to run without one. Might have to speak to the authority to get the OK as I would really hate to buy a master without switch and have to swap it over.. Thanks everyone, M |
|
|
|
|
45
|
Technical Board / General Technical / Brake failure switch on dual circuit master cylinder.
|
on: August 07, 2008, 06:12:04 PM
|
|
Hello everyone, glad the forum is now working again after it took a short holiday.
I would like to know if it is a Victorian engineers requirement to have a brake failure switch on a dual circuit master cylinder.
I have seen after market dual circuit master cylinders that do not have the switch and do not have provisions for one.
I have never experienced a failure in either of the two circuits in any car I have ever driven but would imagine that it would be felt in the pedal right away and would not need an idiot light to tell you something is wrong, is this a fair assumption?
I don't have an old master cylinder floating around to pull apart to see how the switch is activated. Is it a limit type switch that is pushed by something or is it a true pressure differential type?
Thanks, M
|
|
|
|
|
46
|
For Sale and Wanted / Auction and Trade Links / Re: FE Ute on Ebay
|
on: July 31, 2008, 05:12:12 AM
|
Have a look at the ID tag, that looks like some of the worst number stamping I have seen in my life. All over the place seems like the person doing it had a bit too much to drink the night before  The 2 tags I have are all neat and even and look like they have been done through a jig or some sort of stamping machine. Was it normal for some random tags to be done by hand? Did the tags on the ute line line get done manually or possibly the stamping machine broke down? Not really important, just wondering. Cheers M |
|
|
|
|
48
|
General / General Board / Re: fc sedan on tv show
|
on: July 25, 2008, 11:07:26 PM
|
|
Although the TV series is quite old, 1977, the car may well be owned by someone here. Bit of info on the show below.
Cheers M
Young Ramsay
Year of production 1977
1 hr. Drama.
26 episodes.
Cast: John Hargreaves, Barbara Llewellyn, Serge Lazareff, Louise Howitt, Vic Gordon.
Produced by: Crawford Productions.
|
|
|
|
|
51
|
Galleries / Members' FEs and FCs / Re: Mikey's build
|
on: July 01, 2008, 03:35:52 PM
|
you will have a problem as the bottom of the A pillar is like another sill panel inside and is blocked of roughly beneath the start of the scuff plate.
Thanks J that's what I need to know regarding what on earth is inside there. Doesn't matter if it partitioned off as long as I know what is where. Just need more access holes and grommets. Must troll through all the photos here and see if there is one good pic with a whole outer sill off. The rare spares ones are hopeless aren't they? I really don't understand why the repros are not identical to the NOS sills. The people who designed and built the dies for the press tools would have presumably gotten the dimensions off a bare sill but somewhere down the track those dimensions were not transposed to the programmers/machinists. To me, the problems with these sills would be the same as going to buy a set of pistons and finding out that they are just a touch too big. Close enough is just not good enough, or is there something wrong with the way my brain works? Cheers M |
|
|
|
|
52
|
Galleries / Members' FEs and FCs / Re: Mikey's build
|
on: July 01, 2008, 11:33:22 AM
|
There is no doubt that the sill is not as good as a new one and I am now fairly confident that there are no more paper thin areas. I have carefully tapped every square centimeter of the sills with the round end of a ball peen hammer and other than the bits already spoken about they seem ok. Yes it did take a while Of course the sill is not as good as new and would probably find thinner areas if I hit hard enough, but for me I am happy enough with it the way it is. The inner sills look excellent and did not have to rust repair that side of it. The big challenge is to keep up the prevention work in the future, ie re-blowing oil into the sills at regular intervals. 6 monthly?? Ahh the battles and hard choices we must all make as we go along. (or is that part of the fun?) Cheers all, M |
|
|
|
|
53
|
Galleries / Members' FEs and FCs / Re: Mikey's build
|
on: July 01, 2008, 01:43:26 AM
|
Hi Ken, Thanks for the comments, I have been very reluctant to even start fixing the rust in the sills as I have been dreading what I may find. Really, really, really don't want to replace the sill at all unless absolutely required.  For me I am taking a gamble that it will be ok if I do all I can to prevent future ingress of rust. The plan at the moment while the shell is still up on the rotisserie is to block off the drain holes and pour in a liter of Por 15 protective oil that I have into the sill cavity and rotate the shell to cover all internal surfaces and drain. Might repeat a couple of times. This oil is similar to fish oil in properties but without the smell. As I was typing this I had to pop out into the shed just to have a better look at the sill as I was not sure if it is a true blind cavity, It looks like a completely sealed unit, but not sure if it has openings anywhere else. Would hate to fill it up with oil and see it pour out of somewhere I might have missed. Ken no doubt in your time restoring cars you would have pulled off a sill or thirty.  (If this option is not workable then I will just go with the option stated below) As part of the rust preventative program for the long term I have been thinking about drilling a hole at either end of the inner sill and fitting a rubber grommet. This will allow the grommets to be removed and allow me to use a compressed air gun with a venturi set up to blow a big mist of preventative oil down the "tunnel". It's the best way I can think of getting to all internal surfaces when the car is back on it's wheels. Feedback? Cheers M |
|
|
|
|
54
|
Galleries / Members' FEs and FCs / Re: Mikey's build
|
on: June 29, 2008, 11:40:45 PM
|
Ok Jim, Been a bit slow here of late, the only thing of note that I have done is to weld up some rust holes in the passenger sill. One other sill repair I have to do is to fix a previous attempt by the guy who I purchased the car off. Also have been playing with my doors, I only had 4 door shells with hinges and had to get all the internals for them ie glass, runners, window winders, handles and all screws. Big thanks to Ken for coming to the rescue. 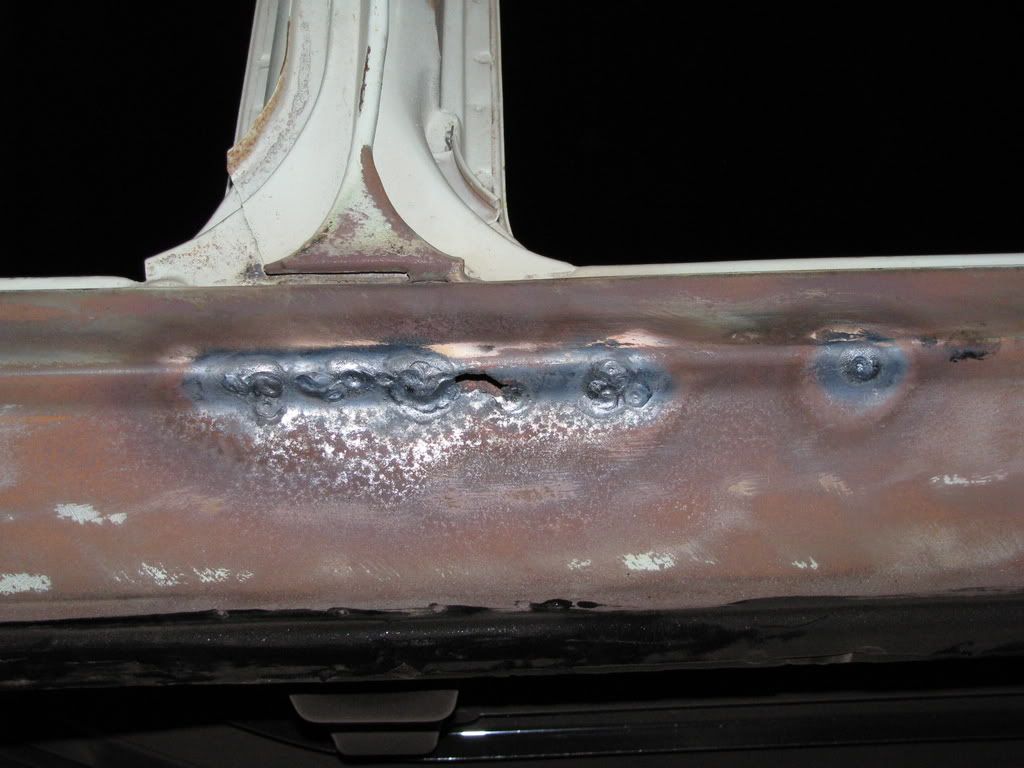 Most of these holes were just coming through so I tapped them in a bit and have used the oxy to just fill them in a bit. One hole is a bit bigger, will slip a small backplate in through the hole and fill. The welding looks terrible in the photo doesn't it? I used the smallest flame possible but some of the sill was so thin it just blew through  Does not look that bad in person Honestly   This is a previous attempt at a repair and sits proud of the sill, it has just been placed on top and tacked welded. It had bog on top trying to hide it. More soon hopefully. Thanks for reading. Cheers M |
|
|
|
|
57
|
Galleries / Members' FEs and FCs / Re: FC 225 40072
|
on: June 12, 2008, 02:51:50 PM
|
Just one more thing and I will stop as I sem to be stealing your thread here. Should start another one I suppose.  I drive a Ford Telstar, one day I hear a squeal when I put the brakes on, real funny sound but thought Oh well time to do the pads. When I took the wheel off the pads were ok, ie still meat on them. I then saw a bent tab of steel riveted to the back of the pad plate, it was this tab that was rubbing on the disc and squealing. I call them squeal indicators (real name???) they are meant to give early warning that the pads are low, in this case about 2.5mm. Here is a quick sketch for those who can't work out what I am rabbiting on about. Red is the disc Blue is the pad material Black is the steel part of the pad Purple is the "squeal indicator" I think they are a fantastic idea and couldn't seeing them cost that much to put on every pad. Cheers M  |
|
|
|
|
58
|
Galleries / Members' FEs and FCs / Re: FC 225 40072
|
on: June 12, 2008, 01:22:15 PM
|
Hey effcee, I was over at my inlaws one day when my brother in law came around in his XC falcon and said that his brake pedal felt funny and brakes were making grinding sounds. After looking around I saw a puddle of brake fluid on the drive way. Pulled off the wheel and the out side face of the disc looked ok but the other side......nasty. These discs are ventilated types not solid and it had been driven metal on metal for so long that the brake pad backing plate had ground right through the inner side of the disc on an angle and had exposed the inner ventilation ribs  This meant the caliper piston had come out so far that the brake fluid was leaking out. I said to him how far had you been driving it while it was making noises? "Oh not long" was the feeble reply. Bulls%#$ was my answer and got really pissed at him but dealing with idiots like him it's water off a ducks back. Freaked me out that day good and proper. Really should have kept that as a trophy to put up on the shed wall. Cheers M |
|
|
|
|
59
|
Galleries / Members' FEs and FCs / Re: Mikey's build
|
on: June 12, 2008, 09:12:09 AM
|
Hi Paul, The only things I had to buy were the wheels, around $12 each from bunnings if I remember correct and 2 ceramic nozzles with fittings on the end of the hose. I bought the nozzles for about $30 off the guy who I got the plans from. The only thing I supplied for the blaster was the bottle (had it for years), the angle iron legs and some of the piping. The rest of the stuff came from work, fittings, regulator, hose, ball valves and PSV (pressure safety valve) rated at 1000 kPa. Didn't really need it as most air compressors have their own PSV. (Did it cause I could) I work in a large chemical manufacturing plant and there is heaps of this stuff around. Never use true sand as this can lead to silicosis which is a respiratory disease. Breathing in pulverised silica dust is no good I used Garnet which I got in 25 kg bags for $25. I called up a few sandblaster supply places and this seemed the normal price. That is not to say it doesn't come with it's own dust hazards. At work we manufacture Chlorine which is a toxic gas and at times have to wear full face canister masks, this was perfect for using to blast. I just put clear tape on the face glass and replaced it from time to time as the abrasive does bounce back into you. Also had on a pair of disposable overalls with a hood done up right around the mask. Search for blasters on ebay and other tool shops. They do have them but are quite small and cheap quality but have the basics which you could fix up a bit. What would I do different? The nozzle I really battled with. The smallest carbide nozzle I could find here was 1/8" 3.2 mm. That is a pretty big hole for a compressor at home to supply enough air. Could get a 3/32" 2.4 mm from the US but it cost about $100 . I ended up getting 2 ceramic nozzles at 3/32" but ceramic is hard but not that hard and did wear out a bit. Did notice the supply pressure falling away towards the end. As I was blasting away towards the end I was thinking I really wish I had a carbide nozzle and had a light bulb moment and at that time I really could have kicked myself so so hard. I am a fitter and machinist by trade (plant operator now) and still play on the workshop machines, what do these machines use to cut metal?? Carbide cutting tips, so what you say....... many of these tips have a hole in the middle to clamp them down, I could have made a holder for these tips and blasted through them for nothing. #@@%$^^&&^%$##@$%^^&&^^%$!!!*&^())^% (lots of swearing)  Any engineering shop would be happy to give worn tips away. All in all not a bad experience as I had the time to make it and the room to use it. Some of the quotes to blast the shell were very scary and this led me down this path. That being said I saw Pedro get his shell blasted and undercoated for $500. ( correct me if I am wrong P) Not a bad price at all. I think that covers everything Paul and have sent you a PM. |
|
|
|
|
60
|
For Sale and Wanted / Parts Wanted / Door internals required for 4 doors.
|
on: June 12, 2008, 12:23:06 AM
|
Hi everyone, One of the big hassles with buying someone else's unfinished project is the hassle of chasing up those missing parts. I am basically after the complete internals for 4 doors and striker plates. I only have the 4 door shells and the hinges. Do you have a bunch of stuff you want to get rid of? I live in Melbourne's western suburbs and will go a reasonable distance for pick up. I can gut out your doors if needed or can take the lot and bring back your empty door shells. Posting doesn't really work here. Of course just like anyone I don't want to pay a million bucks, just need stuff that is in ok condition. Can you help or know someone who can?? Cheers M |
|
|
|
|


