Show Posts Show Posts
|
|
Pages: 1 [2] 3 4 ... 11
|
|
21
|
Technical Board / General Technical / Re: Gearbox oil
|
on: January 26, 2009, 07:10:49 PM
|
Hi again
Now I'm having trouble with the gearbox. I started having trouble shifting from 1st into 2nd, hard to get into second gear and is making a groaning noise. Now I am having a difficult time
shifting down into second. The clutch is adjusted properly. I have just changed the oil and I am not sure if I have used the correct stuff. I know that it should be straight run 90 weight mineral oil.
I ended up getting Castrol EPX 80W-90. It is described as an all purpose gearbox and diff lubricant where API classification GL5 oil is recommended. Do not use in worm drive gearboxes or in gearboxes where non-EP oil is recommended. Huh? What in the hell does all that mean.
What do you all use and what have you found to be the best.
Regards
Mike
Hi Mike, Just did a bit of a search and here is a snippet of info which may shed a bit of light on EP oil (Extreme Pressure) in worm drives. Sorry others will have more info on your gearbox problem. Cheers M Gear Oil Selection We would like to standardize on one brand of oil for all our gearboxes but the manufacturer of our worm gears tells us we shouldnt use the EP (extreme pressure) gear oil we use for our reduction gears for this application. Why cant you use EP oil for worm gears? Many EP gear oils contain sulfurous additives. These additives are designed to chemically bond to the metal surface of the gears and other components under boundary lubrication conditions to prevent welding of asperities on the two opposing surfaces. While vital in preventing metal-to-metal contact in boundary lubrication regimes, they can be corrosive under certain conditions, particularly to yellow metals such as copper, brass and bronze that are commonly used in industrial worm gears and other components. The best approach to selecting the correct product for a given application is to gain a thorough understanding of the gear type, metallurgy and operating conditions of the component and to discuss these points with your lubricant supplier and equipment manufacturer. The correct lubricant can then be selected based on load, speed, operating temperature and additive requirements. -------------------------------------------------------------------------------- |
|
|
|
|
22
|
Technical Board / Modification Help / Re: Floor Hump
|
on: January 25, 2009, 10:20:10 AM
|
|
No probs mate,
When I went and purchased the hump and it was placed on the bench in front of me I remember thinking "holy crap Batman, that thing is huge"
I knew it would be bigger than the original hump (of course) but not by that much.
Anyway the size has grown on me and now I think it looks good.
Cheers M
|
|
|
|
|
25
|
Technical Board / Modification Help / Re: Floor Hump
|
on: January 24, 2009, 10:00:14 PM
|
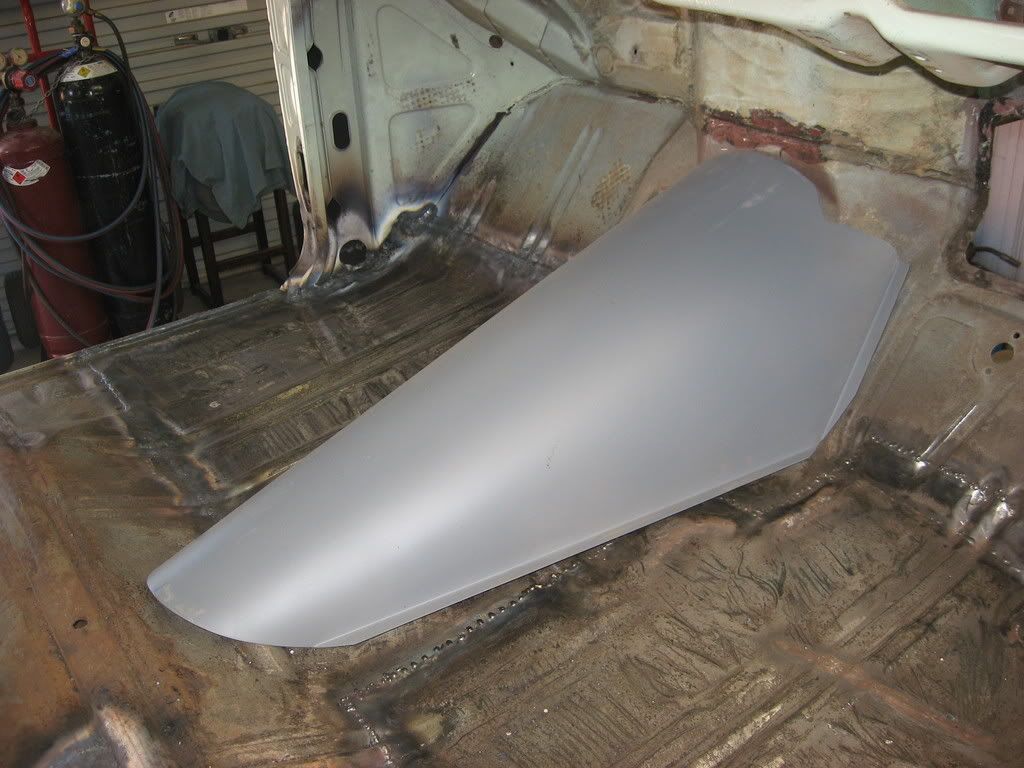
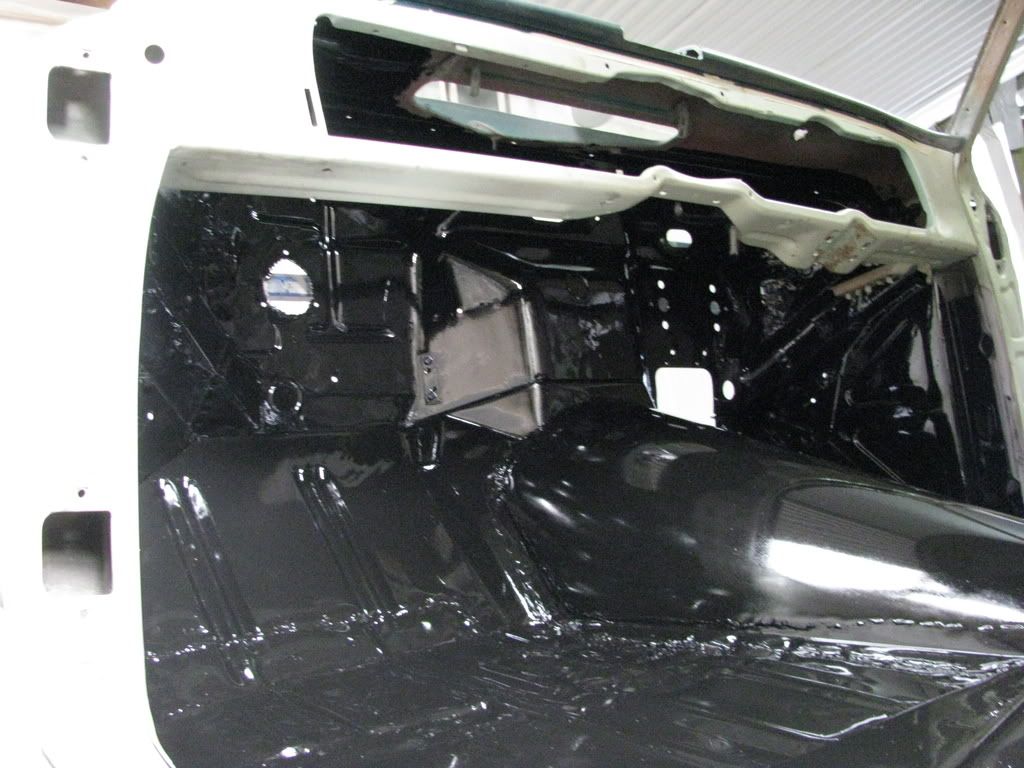
Hi Red, Unfortunately no actual progress shots but have a look at these. Not really of much help as a step by step but it's nice to look at heaps of pics sometimes. I too found that the hump was a fair bit out and had to do a bit of cutting and shaping by hand and with a grinder. I am fortunate to have both a mig welder and an oxy. I found the oxy extremely helpful as I used it to heat up and soften the long lips on either side of the hump and make it conform better to the shape of the floor. I also had about 20 mm of over lap on all the bottom edges as I cut the hole in the floor smaller and this over lap was more easily folded into the hump from the under side. Probably can do it by cold working it but in my case I found it much easier with flame. Doing it cold I found that the floor pan and hump would bounce around a bit. Would have to resort to using 2 hammers or dollies. The pictures that are black are at the stage after I painted it with POR 15 paint and it is nice and glossy and due the gloss level it looks likes a dogs breakfast but in reality it isn't that bad. The sandblasted shots look ok. Have yet to put in the cross member strengthening rib on the under side. All in all I was glad when I had it complete (nearly) I can take some more pics if you need them but obviously it would only be more of the same as below unless you want to see something close up/specific. Cheers M 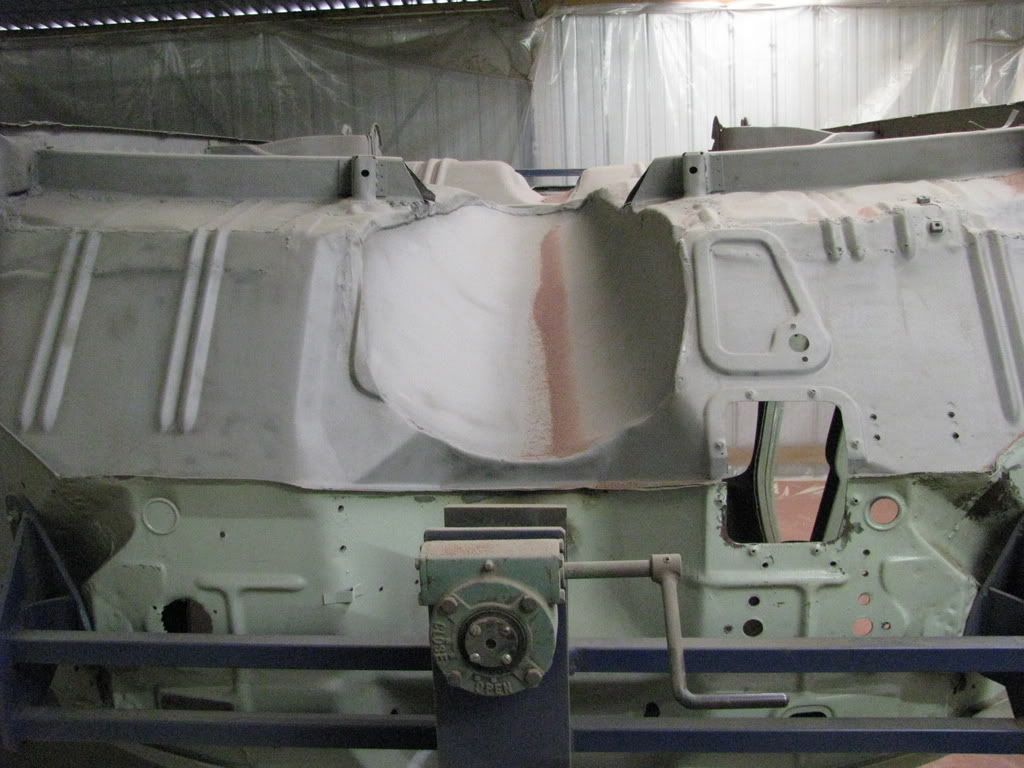 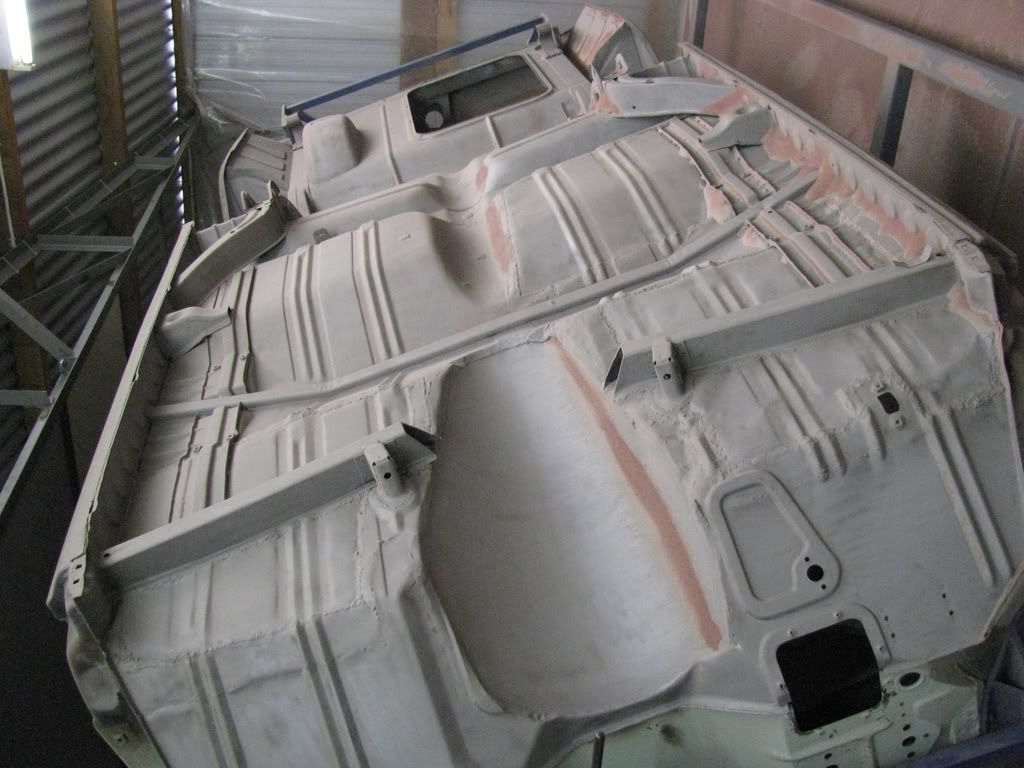 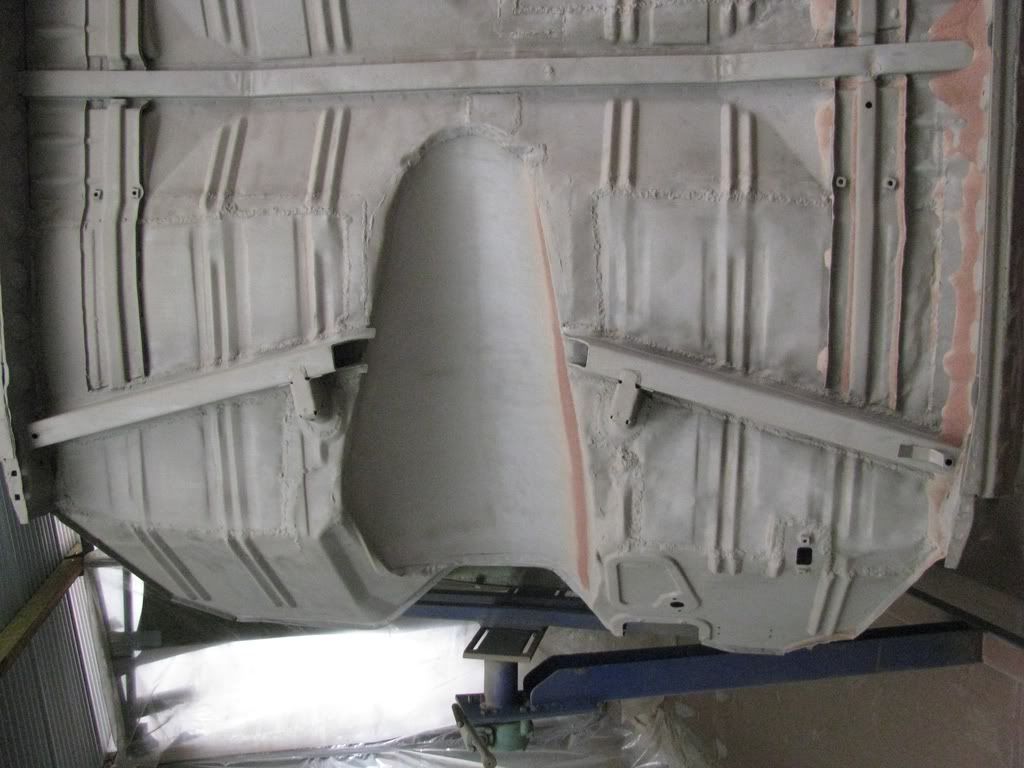 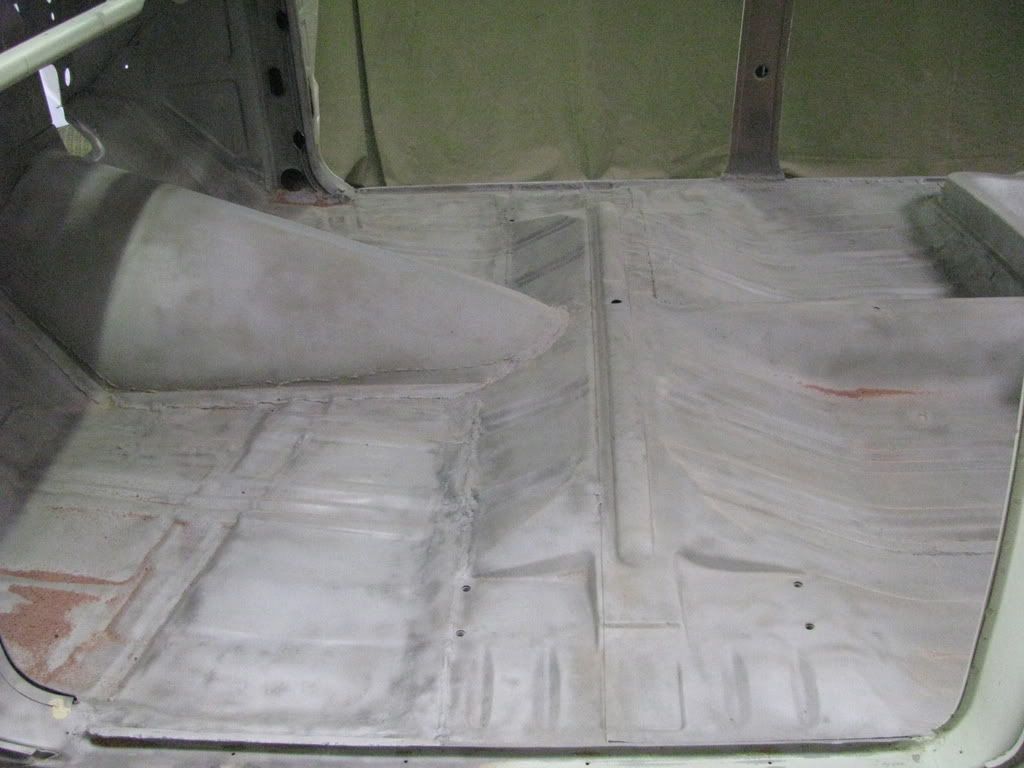 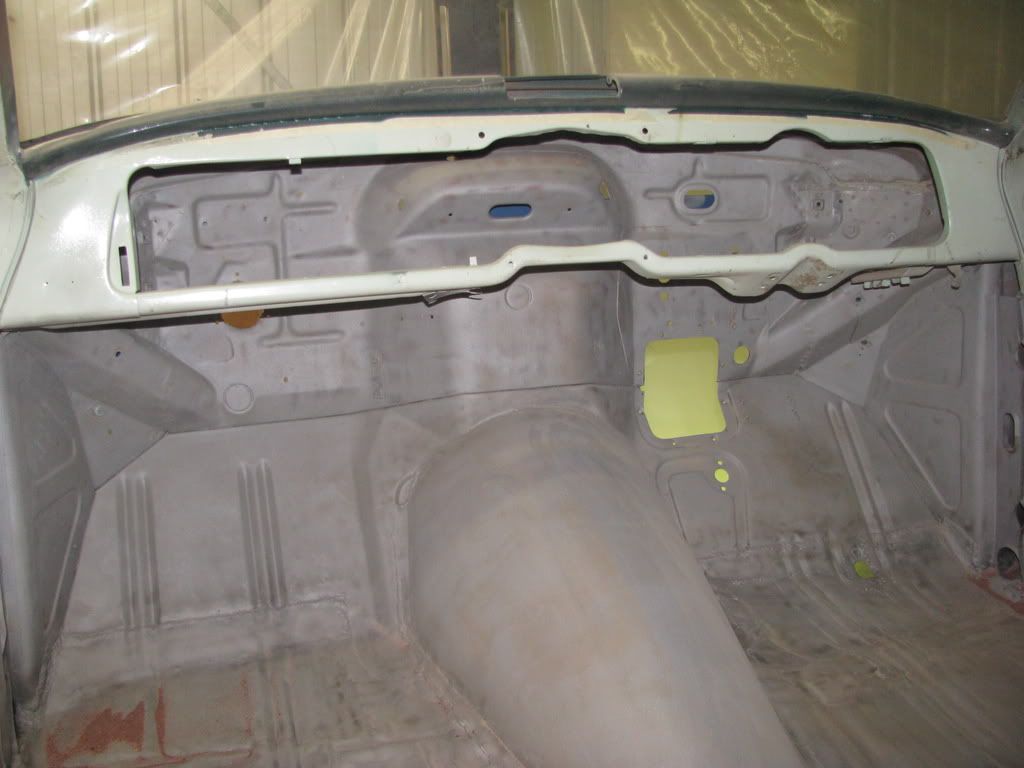 |
|
|
|
|
28
|
Galleries / Members' FEs and FCs / Re: B DOUBLE OR ROAD TRAIN?
|
on: January 08, 2009, 02:02:35 PM
|
get some body to video you trying to reverse it  We get 3 or 4, B double semis a day that have to do a reverse maneuver at work. Man those guys are good and it's great to watch. Give it a go  Cheers M |
|
|
|
|
29
|
Technical Board / Restoration Help / Re: Ignition Barrell Removal
|
on: January 07, 2009, 02:01:37 PM
|
Lizard, put a big something onto the key, so you can't miss it. At home, my kids (and missus) were always losing the keys to the back of the house.  I got a piece of 5 ply, cut it to 6" x 4", painted it in fluorescent orange, and attached it to the keys with some wire.  Keys did not go missing again after I did that. On a similar note, we have a ute at work that is available for everyone to use (it lives at work, it doesn't "belong" to anyone). The storeman was always going home with the keys in his pocket as he used it the most, maintenance dept got sick of it so they made up a ring out of thick stainless wire about 5" in diameter. Yeah try and that in your pocket  Keys never went to his house ever again. Cheers M |
|
|
|
|
30
|
Technical Board / General Technical / Re: Engine Storage
|
on: December 20, 2008, 08:47:59 PM
|
Paul,
Cut down shopping trolleys could do the trick. (So i've heard.) Just planting the seed.
Regards brett
Yeah Brett, sure you have. (must say with a sarcastic voice) I too have "heard" that they are good for this as well. OK I will fess up, I once transported a red motor to a friends place using this method and had a nice walk down a couple of streets in the days before we had our car licenses. |
|
|
|
|
32
|
General / General Board / Re: Help Needed
|
on: November 20, 2008, 09:57:55 PM
|
|
Hi,
Have sent you a PM (personal message) Have a look at the "my messages" in the blue task bar.
Cheers M
|
|
|
|
|
35
|
Technical Board / Modification Help / Re: rear diff for v6 conversion?
|
on: October 25, 2008, 02:51:30 PM
|
Although I do not have a comm diff yet, I had been doing a bit of research on shortening them and this is what I found. I have not done this myself and am open to being corrected. From what I can find out the axle tubes are pushed into the diff housing and can't remember if they are riveted or welded in 3 spots. Undo these rivets or welds on the long tube and pull it out and cut it down to length of the other side (short tube) Push the tube back in to the housing and weld it back in ensuring that the tubes are in line. Buy another short axle slip it in and the job is done, one shortened diff. I did look at it a whole ago but can't remember how wide it was when shortened but someone here will know. Did read that it ends up 1/2 shorter than a UC torana diff. Width of UC  ?? Obviously a basic and condensed version bit you get the basics. When you say it quickly it doesn't seem that hard does it? |
|
|
|
|
38
|
Technical Board / Modification Help / Re: Commodore Diff & Front Brake set-up
|
on: September 23, 2008, 04:47:58 PM
|
In fact I remember a Gold VL Comm on the cover of Street Machine mag with calipers mounted upside down and it was given awards for top engineering.  Ken Ken, I really don't see the problem here, just have to roll the car onto it's roof to bleed the brakes. Simple really. Cheers M |
|
|
|
|
39
|
Galleries / Project Cars - FEs and FCs Under Construction / Re: My old mans FE - Now mine.
|
on: August 24, 2008, 10:10:32 PM
|
Welcome to the forum with what is a very nice set of wheels. About 15 years ago my older sister had a very nice Escort with the number plate DUX 414, only 340 away from yours. What does that mean you say.......... stuff all actually. Just got this stupid thing in my head for remembering useless number plate combinations I bet there will be more pleas for lots more pics if you have them. Cheers M |
|
|
|
|
40
|
Technical Board / Modification Help / Re: Hr front end regarding outrigger and engine mounts.
|
on: August 13, 2008, 08:15:28 PM
|
|
Hi Ed,
After considering your info I have decided to cut off the existing mounts and make stronger ones and as you suggest weld them in the position when I have the motor mocked up in place.
Will be happier with beefier mounts and not happy with weld job on existing mounts either.
Thanks for the help.
Cheers M
|
|
|
|
|