|
FATBOY
|
 |
« Reply #140 on: December 30, 2007, 09:59:12 PM » |
0
|
|
|
|
|
|
 Logged
|
fatboy
0414712441
|
|
|
|
FATBOY
|
|
« Reply #141 on: December 30, 2007, 10:02:55 PM » |
0
|
  started doing the brake booster mounting ill be using a vt brake booster and master cylinder trying to use the original brake pedal and mount the booster hard against the firewall regards fatboy |
|
|
|
|
Logged
|
fatboy
0414712441
|
|
|
|
JB
|
|
« Reply #142 on: January 01, 2008, 11:23:28 AM » |
0
|
Hey Fat,
Starting to take a little shape. I like the idea about getting more room for the rails, every little bit helps.
Cheers
Jason.
|
|
|
|
|
Logged
|
Phone +64 223509263
|
|
|
|
FATBOY
|
|
« Reply #143 on: January 14, 2008, 12:18:10 PM » |
0
|
|
|
|
|
|
Logged
|
fatboy
0414712441
|
|
|
|
minifcvan
Guest
|
|
« Reply #144 on: January 15, 2008, 12:57:56 AM » |
0
|
Hi Fat ...Can you paint it that new commodore GREEN for me? Cheers Mark
|
|
|
|
|
Logged
|
|
|
|
|
ratbox
|
|
« Reply #145 on: January 15, 2008, 05:05:55 PM » |
0
|
which green mark the light or the dark the van is looking for a new colour   |
|
|
|
|
Logged
|
|
|
|
|
minifcvan
Guest
|
|
« Reply #146 on: January 15, 2008, 09:12:21 PM » |
0
|
TOOOOOOOOOOOOOO MANY GREENS hehehehe. the light one i think it is....
|
|
|
|
|
Logged
|
|
|
|
|
FATBOY
|
|
« Reply #147 on: January 20, 2008, 05:31:36 PM » |
0
|
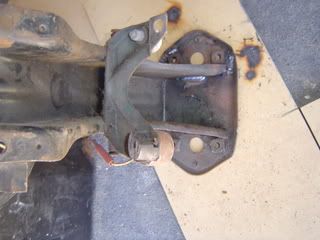
 just another picture of the front end regards fatboy |
|
|
|
|
Logged
|
fatboy
0414712441
|
|
|
|
FATBOY
|
|
« Reply #148 on: January 20, 2008, 05:33:53 PM » |
0
|
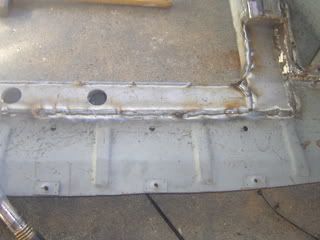
i made a new piece that runs along the front out of 2mm zinc anneal to help tie the two rails together in doing this i deleted the lip on the inside of the rail to match the side rails
|
|
|
|
|
Logged
|
fatboy
0414712441
|
|
|
|
FATBOY
|
|
« Reply #149 on: January 23, 2008, 11:46:44 PM » |
0
|
|
|
|
|
|
Logged
|
fatboy
0414712441
|
|
|
|
Ed
|
|
« Reply #150 on: January 24, 2008, 04:56:42 PM » |
0
|
All looking good Fat,
one thing, I had to do was notch the passenger side rail for more clearance for the oil filter. While you dont have to do it (it will fit) it gives added clearance. I use a small commodore filter.
Cheers
Ed
|
|
|
|
|
Logged
|
in the shed
|
|
|
|
FATBOY
|
|
« Reply #151 on: January 24, 2008, 09:15:17 PM » |
0
|
Thanks for the tip ed
regards fatboy
|
|
|
|
|
Logged
|
fatboy
0414712441
|
|
|
|
FATBOY
|
|
« Reply #152 on: March 11, 2008, 08:59:34 PM » |
0
|
|
|
|
|
|
Logged
|
fatboy
0414712441
|
|
|
|
FATBOY
|
|
« Reply #153 on: March 11, 2008, 09:22:30 PM » |
0
|
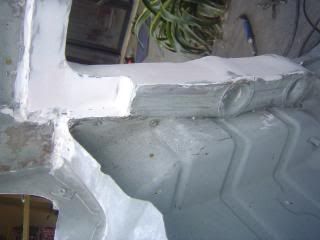 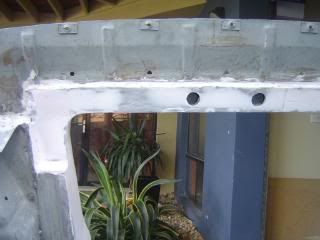 just some more front end pics |
|
|
|
« Last Edit: March 11, 2008, 11:01:42 PM by stinky »
|
Logged
|
fatboy
0414712441
|
|
|
|
FATBOY
|
|
« Reply #154 on: January 04, 2009, 08:49:04 PM » |
0
|
Are well time to get this project back on track ek ute is finished.Have decided on a colour just got to get the ball started again
regards fatboy
|
|
|
|
|
Logged
|
fatboy
0414712441
|
|
|
|
FATBOY
|
|
« Reply #155 on: April 20, 2009, 07:09:46 PM » |
0
|
Ball is finally rolling mounted the vn v8 brake booster today was a really easy job drilled a 54mm hole through the firewall and mount behind then drilled the 4 mounting holes for the booster then i cut the booster rod down then everything bolted up as per factory.
I have been putting this job off for months but it was so easy.Wednesday night ill be into the rear cargo area and fuel tank area .Then i can mount the diff back in and the front subframe can go back on.Then i can bring it home (as long as the ek ute sells).Might have to take it to my mums house to get it out of the way
regards fat
|
|
|
|
|
Logged
|
fatboy
0414712441
|
|
|
|


