 Show Posts Show Posts
|
|
Pages: 1 ... 3 4 [5] 6 7 ... 10
|
|
81
|
Technical Board / General Technical / Re: Remove Bosch Distributor Gear Pin
|
on: December 03, 2023, 07:41:23 PM
|
brand new electronic grey motor distributor on ebay 976-n 109 dollars cheers Steve  Hi Steve, Thanks, I have been watching them. I assume I need a specific coil to to with it. I will still try to bring this old girl back to life. Cheers Craig |
|
|
|
|
82
|
Technical Board / General Technical / Re: Repair/Rechrome damaged badge - is it worth the effort
|
on: December 02, 2023, 07:36:34 AM
|
Jolls ..The guys at All Metal Bumpers at Ingleburn declined to re chrome my FC rh front blinker/ park light body ...It appeared to have some sort of old repair , chrome would fail at that repair , they are one of the more difficult components and costly items to do , would be wouldn't it ???They asked me if I have another , I didn't, started a hunt , but they got me one through their contacts..maybe an avenue to consider ..Vern ..
Thanks for the advice Vern, that is not what I wanted to hear but exactly the purpose of the question. I don't want to waste anymore time and effort on the badge if the end result is that I need to find another anyway. If it can't be rechromed it will get a prime place on the shed wall. If it can, I have saved myself a couple of hundred beer tokens! I'll take it to to the Electroplaters in Queanbeyan and see what they have to say. I have a bumperette that has been dented and torn as well. I have persuaded the dent out but haven't quite got the alignment right yet as it is bent slighly along its length. I will need to do some MIG/TIG work to repair the tear if I can get it realigned. Again - no use wasting the effort if it can't be effectively plated. All of the other chrome bits are solid so I should be able to drop them in and get them done as a job lot. Not looking forward to that invoice! |
|
|
|
|
83
|
Technical Board / General Technical / Re: Repair/Rechrome damaged badge - is it worth the effort
|
on: December 01, 2023, 08:09:57 PM
|
Craig,
in the model railway world, there is low temperature solder. It is used for white metal kits. Some of that might be your filling solution.
Thanks for the heads up, the rods I used for the pot metal are well over solder melting temperature so a low temp solder would be prefect. If the guru in Queanbeyan gives me the all good I will get some and see haw it goes. Cheers n Beers Craig |
|
|
|
|
85
|
Technical Board / General Technical / Repair/Rechrome damaged badge - is it worth the effort
|
on: December 01, 2023, 01:04:25 PM
|
Hi Team I have very limited experience with the chroming trade so I'm seeking some advice on what is and isn't worth the effort of saving. The tailgate badge that came with the ute was snapped in two. I have managed to "weld" it back together; the joint is very strong but there is some porosity in the face side. The trouble being the weld material for pot metal is similar to solder but has a much higher melting point. If I reheat it, at the point it becomes workable, the "weld" material will run out and I will be back to square 1. I could purchase some heat absorption putty (used in the plumbing industry) and try to hold the weld material in and fix the air holes but am wondering if it is worth the effort. My limited understanding of the chroming proces is that it relies on an electrcial current to do the dirty work. So if I have it right as long as I fill the air holes with a conductive material it should be able to be chrome plated. Is it as simple as that? The repair as it currently sits is shown below: 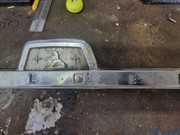 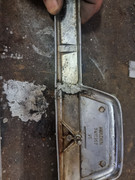 I am thinking of using a high lead content solder to fill in - pretty much the old lead wipe on a small scale Is it worth the effort or am I simply on the lookout for a replacement tailgate badge. |
|
|
|
|
86
|
Technical Board / General Technical / Re: Remove Bosch Distributor Gear Pin
|
on: December 01, 2023, 09:08:57 AM
|
Hi Jolls ..There might be some fabric impregnated resin sheet in the museum workshop where I volunteer , they use it in magneto's , not sure of the thickness ..i'll have a look next week ...I know there is fair amount of shim brass sheet ..Vern ..
Hi Vern, Thanks for the idea. I will start searching to see what I can find. I have been trying to think of where I would find thin bakelite to replace what little there was left. That could be why she was in a parts pile - not working because of an interanl short circuit. Apart from that it is a very tight unit for something 65 years old. |
|
|
|
|
87
|
Technical Board / Restoration Help / Re: AC Bypass Oil Filter Thread Sizes
|
on: December 01, 2023, 09:03:15 AM
|
Hi Jolls ...I can understand companies not wanting to keep slow moving stock , or charging large sums for the privilage to have it for you ..Im pretty sure all BSP male threads are tapered and female parallel ...any BSP parallel male thread would need a sealing face , I dont think that is made as all tapered fittings rely on thread bind to seal along with tape or loctite ..back in the day it would be hemp ...I hear you , esp with your sons , ..the old addage " measure twice , cut once "...Vern ..
Hi Vern, I have been able to find several BSPP male threaded options but not one place with all the bits I am after. I could have cobbled together something in brass from a coule of different suppliers and saved a few beer sheckles. The problem with all of the brass fittings is that the barbs have several tapered sections. The Pirtek gus told me that they could make them work but the correct fitting for the best seal would be a straight shaft. That is the reason I went with Areoflow - the availability of thir straight shaft barbs. I guess it really doesn't matter that much as the pressure is minimal - maybe 25psi. I expect I could have easily got away with a BSPT male into the female thread as I will have to use a fibre washer/teflon tape to get a good seal anyway. I painted up the oil filter in gloss black so it will match the black fittings I have ordered. I am keeping the old girl reasonably close to original for looks but she is certainly not going to be nut and bolt correct to how she came out of the factory. The real lesson for me is to check the detail; had I not gone the extra yard and checked all of the threads it would have been a small problem with a price tag in the order of $50 - 80 wasted. |
|
|
|
|
88
|
Technical Board / General Technical / Re: Remove Bosch Distributor Gear Pin
|
on: November 30, 2023, 04:16:09 PM
|
|
Thanks Rob and Doug
Really appreciate the advice and guidance.
The ends of the pin were definitely peined over. I drilled the ends - no movement. I drilled though the pin with a small bit and then progressively enlarged the hole and tried to persuade the pin out after each time. Got it on the fourth go.
Bakelite washer is in several pieces with bits missing.
After cleaning off as much as I could of 65 years worth of oil and dirt most parts look OK. Quite tight actually.
The advance weight pivot pins also look pretty good. I have it soaking in parts cleaner so I can get through the crud and see what I'm dealing with.
I think the previous owner also owned the bypass oil filter I purchased. It has as much caked on and encrusted oil and mud on the outside as the 1 1/2" of semi solid goo on the inside of the filter. I had to knock the big pits off with a large screwdriver and ball pein hammer. The distributor attached to the engine is in much better exterior order; but it can rest in place for a while yet.
I take it from your advice Rob that parts will be a problem. I may have to come up with a novel solution for the bakelite "washer"; I don't think susperglue is going to save us.
Cheers n Beers
Craig
|
|
|
|
|
89
|
Technical Board / General Technical / Remove Bosch Distributor Gear Pin
|
on: November 30, 2023, 02:25:07 PM
|
|
Hi Team,
Todays project is the a distributor. I almost have it stripped down but am stuck at removing the distributor drive gear pin. My efforts to persuade it out so far have been unsuccessful. The pin in the manual appears to be a straight pin and the manual simply says to knock it out. The head of the pin on both sides is rounded so I am wondering if someone previously has peened them to ensure the pin and the gear stay put. Was peening them over a normal practice?
My plan is the grind one end and then tap it out; however, I thought that before taking that step I would seek the wisdom of the forum; perhaps, I am missing something.
Any and all advice would be greatly appreciated.
Cheers n Beers
Jolls
|
|
|
|
|
90
|
Technical Board / Restoration Help / Re: AC Bypass Oil Filter Thread Sizes
|
on: November 30, 2023, 01:05:58 PM
|
Thanks for the heads up, I was leaning towards BSP because the reproduction T is 1/8" BSP. I did some digging and both 1/8 BSPT and 1/8 NPT fit, but NPT is a slightly better fit. I dropped into Pirtek and had a chat with a mate of Son 2 who is a spanner turner by trade. He was able to get the right size threads but due to all of their gear being pressure fittings the hose size was huge andthe fittings were $40 to 50 each. So the plan is for me to get 1 x 1/8" BSPP and 3 x 1/8 NPT straight shaft barbs and take them in to Pirtek where they will crimp on the appropriate sized stainless hose so they look and feel like to original.
Lucky I did the research and did not opt for the ones off eBay otherwise I would have been fishing for a 1/8" BSPP to 1/8" NPT adaptor.
Cheers n Beers
Craig
I couldn't get BSPP from either places so I opted for aeroflow who could provide 1/8" NPT to 3/16" straight barb with end fare (the preference from Pirtek) and a 1/8" BSPP Male to 1/8"NPT Female adaptor. Cost a bit more and only come in black but will get me out of trouble. Will probably still end up $150 in two hoses, one 12" and one 10", but I can now put that one to bed! |
|
|
|
|
92
|
Technical Board / Restoration Help / Re: AC Bypass Oil Filter Thread Sizes
|
on: November 30, 2023, 12:29:11 PM
|
In some circles , rough mine fitters for example , the belief in what is the difference between NPT ( national pipe thread ) ie American and BSP ( British Standard pipe ) is a bigger shifter ..The pitch is different and the TPI is different ..Except in 1/2 inch which is interchangeable .and BSP is actually Whithworth pitch and NPT is just that NPT ..so UNF and UNC and BSF don't figure when talking BSP.....I dont know if the thread pitch of NPT is UNF or not , I sorta think NPT has its own pitch ..bit of trivia for you ...a lot of errors are made when working with steel pipe , the old English standard is based on the ID of the pipe not the OD of the pipe , and people would want to thread say a piece of gal pipe , BSP taper male thread on outside of pipe , pretty standard old plumbing job , so measure the bore of the pipe.OH ! one inch....so that a one inch pipe thread cutting die , typical BSP thread ,think about it , British Standard Pipe , lot of confusion ,imagine this over the phone, supplier to client .. what size pipe do you have ? , well it measures one and a quarter inches on the OD ..gal pipe or steam pipe , black pipe , water pipe ? answer gal pipe ...Ok, its one inch gal pipe. you work of the id not the od ..Why  because of different wall thicknesses ...go down the shed and get a one inch steel fitting and measure the female thread on the ID..It will be more than one inch , probably one and a quarter inches..but its stamped one inch ...scratch head ? it come back to the fact the piece of pipe male thread that screws into that fitting is one inch on the ID..Vern . You have me smiling. I have british bikes in the shed dating back to the 40s - whitworth, BSP (G), BSPT and all sorts. I have a drawer full of taps and dies and some that have only ever been used for one cut and unless I break that part will probably never be used again. I believed the eBay hype of 100% genuine reproduction and coupled with the AC filter housing being clearly stamped with made in England it made sense that BSP/BSPT would be the go. Fortunatley I sat down and had a think about it before I committed to spending big $ on parts only to find I am stuck with shit I will never need or use. I tell my sons (who work for/with me) that there is never enough time to do it once - but there is always enough time to do it twice. I try to think through the second and third order issues that arise from decisions - but even with 40 plus years of experence in construction I still manage to get caught out at times. |
|
|
|
|
93
|
Galleries / Project Cars - FEs and FCs Under Construction / Re: Jolls FC Ute Project
|
on: November 29, 2023, 05:45:10 PM
|
Being a builder and rain don't go together so I got a bit of time out in the shed this afternoon after doing quotes this morning. I ducked into town before lunch and picked up some model paint and got stuck into the horn button. The paint was flaky and missing in places. I used a combination of scotchbrite and nail polish remover to clean the old girl up. My lion had changed to gold but the rest of the silver remained the same colour. I kept the gold lion but rubbed back outlines around his legs and head so it was back to the resin. I did the same for the GMH symbol in the ball. Then taped him all up in preparation for paint. If you have a close look at the lion you can see where I rubbed the paint back to the resin. 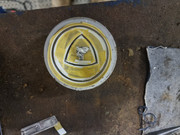 Then it was a matter of layering the paint. Silver first, then blue and finally the red. It turned out pretty well, although you can see in the blue places where I couldn't remove all of the old shitty paint in the creases and also where I missed a bit of silver overspray thet crept under the tape and some red that somehow bled through. I will rub that back tomorrow after the paint has died a little and do another blue coat to sort it out. Turned out OK for my first ever attempt. The silver against the gold for contrast makes the lion much better defined and I like the GMH detail in red. When I find another horn button I think I will soak it in a bit of thinners to see if I can't get the residue out of the creases in the blue and have another crack now that I know a little bit more about what I am doing. Finished off the outside with a clean and a coat of headlight restorer. Restored horn button - must we worth 5 mph?  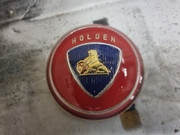 Cheers n Beers Jolls |
|
|
|
|
94
|
Technical Board / Restoration Help / Re: AC Bypass Oil Filter Thread Sizes
|
on: November 29, 2023, 04:57:28 PM
|
I'm certain that the threads will be NPT.
To my knowledge since most of Holden's engine designs were of US origin, all the pipe threads used were NPT. BSP was used for Pommy & Euro (metric) cars.
Dr Terry
Thanks for the heads up, I was leaning towards BSP because the reproduction T is 1/8" BSP. I did some digging and both 1/8 BSPT and 1/8 NPT fit, but NPT is a slightly better fit. I dropped into Pirtek and had a chat with a mate of Son 2 who is a spanner turner by trade. He was able to get the right size threads but due to all of their gear being pressure fittings the hose size was huge andthe fittings were $40 to 50 each. So the plan is for me to get 1 x 1/8" BSPP and 3 x 1/8 NPT straight shaft barbs and take them in to Pirtek where they will crimp on the appropriate sized stainless hose so they look and feel like to original. Lucky I did the research and did not opt for the ones off eBay otherwise I would have been fishing for a 1/8" BSPP to 1/8" NPT adaptor. Cheers n Beers Craig |
|
|
|
|
95
|
Technical Board / Restoration Help / Re: AC Bypass Oil Filter Thread Sizes
|
on: November 29, 2023, 04:48:47 PM
|
Hi Jolls ..Best choice of brass fittings NPT , BSP ,GAS, Metric I have found is either Industrial Fitting Sales at Ingleburn , or Westinghouse Air and Brake ( Wabtec ) at Hornsby or Rydlemere ..They have good range of NPT ..Vern ..
Thanks Vern, I will chase them up. Cheers |
|
|
|
|
96
|
Technical Board / Restoration Help / Re: AC Bypass Oil Filter Thread Sizes
|
on: November 29, 2023, 08:27:54 AM
|
Hi Team
I am in the process of bringing an AC Bypass Oil Filter back to life. Mish have been an inch and half of sludge in the bottom when I opened it up - hadn't been cleaned for a while. Anyway - that's not the issue.
I purchased an aftermarket adaptor for the feed side that is advertised as being exactly the same as the original. That thread is 1/8" BSP (P) - 28 TPI parallel thread . I have identified the return side at the bottom of the filter and at the block as being 1/8" BSP (T) 28 TPI tapered thread.
I have the original hose end for the bottom of the filter; it threads into the bottom of the filter until it is fully home. It will not thread into the adaptor more than a couple of threads due to the taper but it will thread into the feed side of the filter about 1/2 to 2/3 of the way. A 1/8" BSPP is a good fit in the adaptor but feels a little loose in the filter feed until it is fully home.
My gut feel is that the filter feed line is 1/8" BSPP that has had 1/8" BSPT forced in there at some point. Can anyone tell me if the original lines were 1/8" BSPP for both sides of the feed (adaptor and felter) and 1/8" BSPT for the return so that they could not be mixed up or were they all BSPT originally and the aftermarket adaptor done in parallel thread for simplicity?
Not a biggy - just wan't to purchase the right fittings instead of stuffing about with washers and thread tape to get an oil tight seal.
Cheers n Beers
Jolls
Had a thought: that they could be NPT 27 TPI v 28 TPI. Time to get a better set of thread gauges out - will drop into a local bolt shop and confirm the thread count using NPT and BSP. |
|
|
|
|
97
|
Galleries / Project Cars - FEs and FCs Under Construction / Re: FC PMG Van Resto Project
|
on: November 29, 2023, 07:55:35 AM
|
|
Nice work - a good job is always in the preparation!
Enjoying watching your project come to life. I am aways behind with my ute and don't have the space/time (doing a major house reno) to get stuck into the bodywork as yet. I have been focussed on the electrical and small items that I can knock off. I am dropping in to check the prototype glass stickers today for the idiot lights and fuel gauge so will let you know what the come up like as a potential fall back until you find something original.
Cheers
Jolls
|
|
|
|
|
98
|
Technical Board / Restoration Help / AC Bypass Oil Filter Thread Sizes
|
on: November 29, 2023, 07:43:57 AM
|
|
Hi Team
I am in the process of bringing an AC Bypass Oil Filter back to life. Mish have been an inch and half of sludge in the bottom when I opened it up - hadn't been cleaned for a while. Anyway - that's not the issue.
I purchased an aftermarket adaptor for the feed side that is advertised as being exactly the same as the original. That thread is 1/8" BSP (P) - 28 TPI parallel thread . I have identified the return side at the bottom of the filter and at the block as being 1/8" BSP (T) 28 TPI tapered thread.
I have the original hose end for the bottom of the filter; it threads into the bottom of the filter until it is fully home. It will not thread into the adaptor more than a couple of threads due to the taper but it will thread into the feed side of the filter about 1/2 to 2/3 of the way. A 1/8" BSPP is a good fit in the adaptor but feels a little loose in the filter feed until it is fully home.
My gut feel is that the filter feed line is 1/8" BSPP that has had 1/8" BSPT forced in there at some point. Can anyone tell me if the original lines were 1/8" BSPP for both sides of the feed (adaptor and felter) and 1/8" BSPT for the return so that they could not be mixed up or were they all BSPT originally and the aftermarket adaptor done in parallel thread for simplicity?
Not a biggy - just wan't to purchase the right fittings instead of stuffing about with washers and thread tape to get an oil tight seal.
Cheers n Beers
Jolls
|
|
|
|
|
99
|
Technical Board / General Technical / Re: 12V Bosch Generator - Exploded Diagram
|
on: November 27, 2023, 03:12:18 PM
|
|
Thanks Harv,
I have selected a rheostat at 1/3 that rating so hopefully I don't need the additional resistance to keep the current down. I guess time will tell!
Really appreciate the photos and the support.
Where did you manage to find the original meter set? A great find!
Cheers
Craig
|
|
|
|
|
100
|
Technical Board / General Technical / Re: 12V Bosch Generator - Exploded Diagram
|
on: November 26, 2023, 08:13:48 PM
|
|
Thanks @Harv,
That is gold. Thank you so much for taking thos photos. I just love simplicity!
Pretty much as per the design above with the exception of using dual scale meters and shunts to protect the meters from over-current.
I have opted for full scale meters as I couldn't find a cheap dual scale meter on AliExpress, I guess I will find out if that is a design flaw scale wise.
That is a hell of a wire wound rheostat. I trust I have the calcs right and a 100W is suitable. Could you possibly check the resistance between the negative and positive leads to the rheostat with the dial set at in and out? That should give us all the info we need to purchase a suitable clone.
As an aside I had a good chat with an auto sparky over a few beers last night. He had no idea as to how to calculate the rheostat and never in his life had he had any requirement to know the internal resistance of a battery. His approach was... "don't overcomplicate things - run it as a motor - if it works it is good! Then throw it on the car, if it ran as a motor it will run as a generator. Then check the output and adjust the regulator."
When I asked what to do if it wasn't up to speed his response was - throw it out and get a new one.
At the end of the conversation he asked if he could come over and see how it is done - he is really interested to learn the process and see the "witchcraft" as he called it!
I expect that it wasn't such a throw away society in the 60s so they did a lot more in house diagnosis and repair before opting to replace.
So to answer your earlier question about the bench test solution the meter(s) you have there is definitely more than 50% of the requirement. All you need now is an ability to drive the generator at 1500 to 2400 rpm on the bench. A variable drive is the way to go so you can see how the generator operates through its full range. However, if you aren't doing it often the grey motor in the car is a perfect drive and all of the tests can be done with the test box.
Cheers n Beers
Jolls
|
|
|
|
|

