|
1201
|
Technical Board / General Technical / Re: Rocker Gear
|
on: April 12, 2013, 01:43:25 PM
|
|
Keith,
Your EJ motor has FJ-to-early FC rocker gear on it. That's really odd. A recommended upgrade for FX-FJ owners has long been the late-model rocker gear with two long bolts on each pedestal. The early pedestals were quite prone to breaking because the stress of holding the valve springs open is taken on the short-bolt side.
Just for info's sake - where is the oil hole on the rocker arms - right on the top, or closer to the adjusting locknut? Similarly, what does the oil pipe fitting look like? Is it brass and hexagonal, or is it cast, with a screw in the side? Even among "early" rocker gear, there were variations.
Does the cylinder head on the EJ motor have provision for just a temperature sender, or a sender plus a heater outlet as well? If it's a "single-outlet" head, it may be that the motor has had an early-series head fitted, complete with early rocker gear.
Maybe you could read the date code off the head, and that'd put us all out of our misery . . . The date code will have a single digit, a letter, and two digits. I forget the order, but it will tell you when the head was cast.
Rob
|
|
|
|
|
1202
|
General / General Board / Re: Original steering box grease 57 FE
|
on: April 02, 2013, 01:20:04 PM
|
|
John,
Or, you can use CV joint grease. Last time(s) I've overhauled Holden steering boxes I've used Castrol CV joint grease. It's formulated for high speed, high pressure applications, it stains everything black within a mile radius, but does the job well.
Rob
|
|
|
|
|
1204
|
Technical Board / General Technical / Re: Diff Centres
|
on: March 07, 2013, 09:59:16 AM
|
|
For the EH and later diffs the rear uni joint is the same as the front.
Me too. I run a 3.36 diff in my sedan. Maybe a little slower off the mark. I don't have to slip the clutch any more than with a 3.89, but it's a far more relaxed cruise at highway speeds with a 3.36.
Rob
|
|
|
|
|
1207
|
Technical Board / General Technical / Re: window regulators
|
on: December 17, 2012, 03:13:20 PM
|
How hard could it be? Just remove the splined shaft and pinion and put the motor and gearbox in its place . . . Who's got a spare HK-T-G-Q-J-X-Z power window setup they want to donate to a worthy cause?  Rob |
|
|
|
|
1208
|
Technical Board / General Technical / Re: window regulators
|
on: December 17, 2012, 01:30:43 PM
|
Where were we? Most of the way through a teardown. Step 6. Disassemble the “donor” window regulator in exactly the same manner as the RHF. 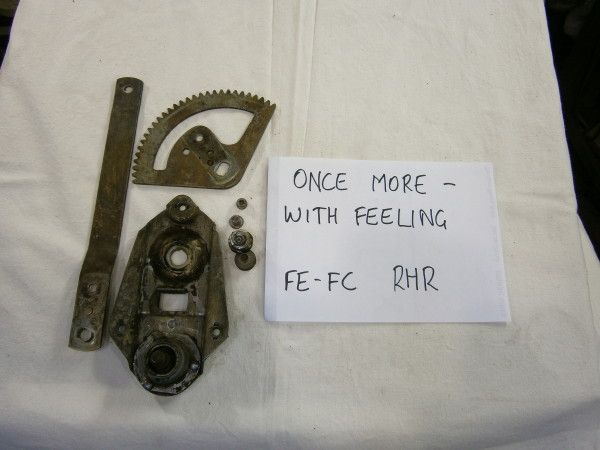 All these parts except the lift arm will be re-used. 7. Reassemble lift pin and sector gear to the RHF lift arm. 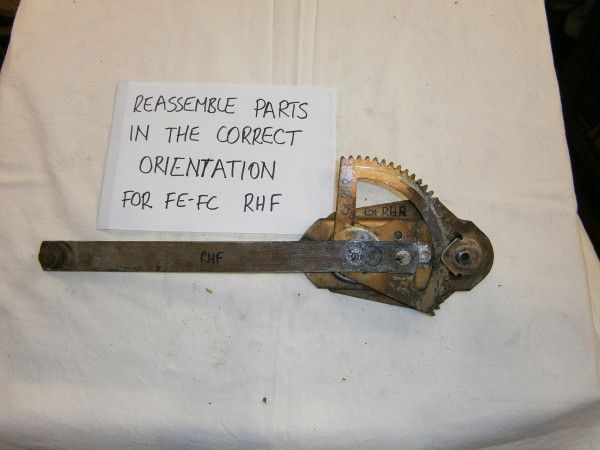 Reassemble the “donor” lift pin and roller to the lift arm, being careful to put it on the right way. When re-using the old rivets, it’s a good idea to make a chamfer in the lift arm with a ½” drill. The marks on the old RHF sector gear will tell you which way to assemble the “donor” sector gear to the RHF lift arm. Grease the recess around the pivot hole, install the sector gear and lift arm to the regulator body, tap the pivot stud into place, and peen it over well. 8. Lubrication, assist spring, limit rivet. 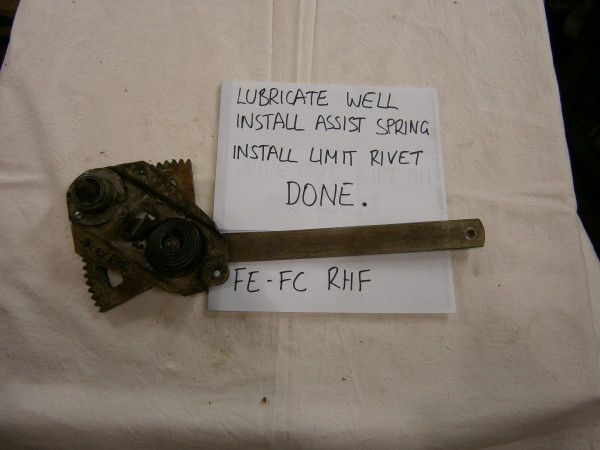 Grease the sector gear well. Grease the assist spring well. Force the grease down between the coils so the spring won’t do the familiar “groan”. Install the assist spring on the pivot stud, the correct way around, and then engage the pinion teeth with the sector. When you hold the window regulator the same way as it’s in the driver’s door and operate it, the “down” direction should be hard and the “up” direction should be easy. Once you are satisfied that the assist spring is in the right way around, re-install the limit rivet. You’ll have to make the flared end of the rivet straight in a vice, and chamfer the hole in the regulator body to make the rivet start in the hole. Job Done. But before installing the rebuilt regulator into the driver’s door, check that the window slides freely in the bailey channel. If the driver’s window is stiff, you’ll only chew out your newly rebuilt regulator. Adjust the division channel, and replace bailey channels if needed. Rob |
|
|
|
|
1209
|
Technical Board / General Technical / Re: window regulators
|
on: December 17, 2012, 01:29:12 PM
|
At long last – the documented window regulator “how-to” guide. Thanks to zulu for providing a rear door window regulator. Here is how to convert a rear window regulator into a driver’s. Required components are a RHF window regulator and a rear door window regulator. The rear door regulator will provide all the components except the lift arm from the RHF regulator. All the other parts of the RHF window regulator will most likely be good for the bin only. The first couple of images show representative FE-FC and FB-EK window regulators. Somewhat naively I thought they’d be exactly the same, but they’re not. To tell them apart, FE-FC regulators are yellow zinc-plated, while FB-EK regulators are bright zinc plated. FB-EK sector gears are different from FE-FC; FB-EK regulator bodies have two holes for the limit rivets compared with one for FE-FC. Finally, the FB-EK front window lift arms are just different enough from FE-FC that they can’t be interchanged – the locating boss is in a different place. 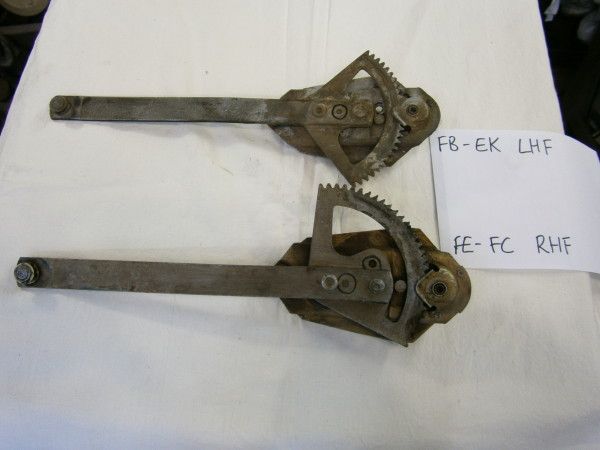 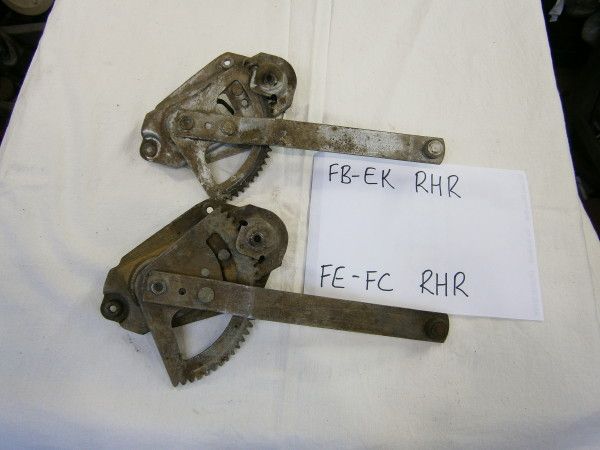 I’m using FE-FC hardware here, but the procedure is valid for FB-EK too. 1. Remove limit rivet. 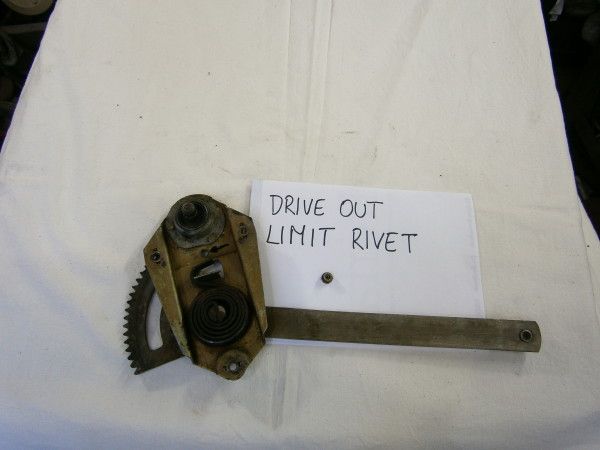 Just drive it out with a hammer and pin punch. The metal will distort around the hole. Tap the metal flat again with a pin punch and suitable dolly. 2. Remove the assist spring. 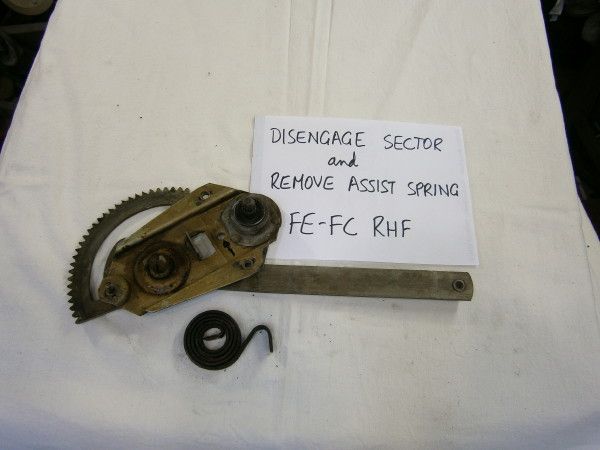 Using a window winder handle, wind the window “up” – that’s in the “easy direction” until the sector gear disengages from the pinion. Rotate the arm until the assist spring is free, then remove the assist spring. 3. Remove the pivot stud. 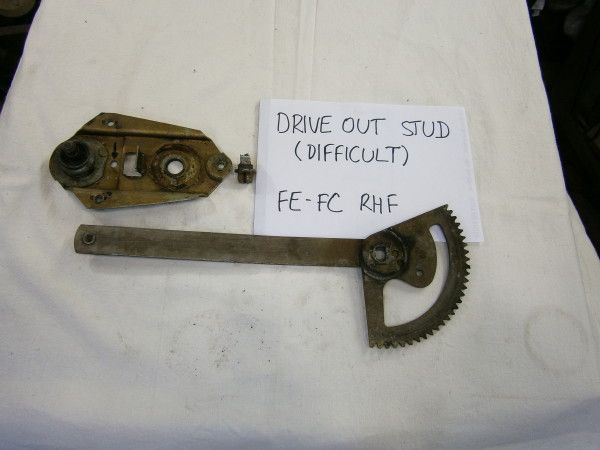 This is a difficult operation. The pivot stud is high-tensile steel. I couldn’t make it budge with a hammer and pin punch, so instead I used a vice as a press, with a 7/8 socket over the large end of the stud and a 5 mm hex socket head driver bit as the drift. Most of the pivot stud’s shoulder will break off. Option: grind the peened-over part of the pivot stud off and use a pin punch. You’ll have to weld the pivot stud back on if you go this way. Remove the sector gear and lift arm from the window regulator body. 4. Separate the lift arm from the sector gear. 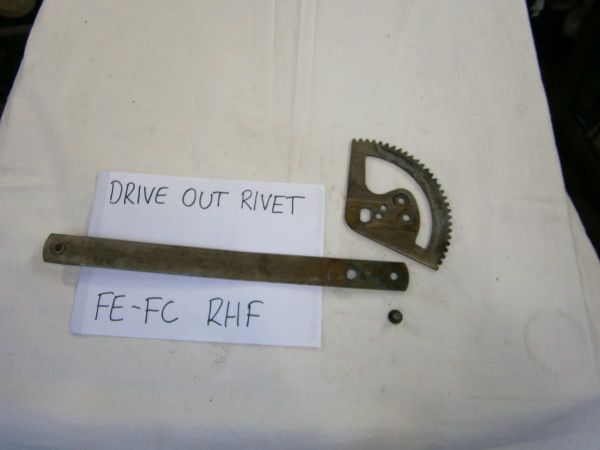 The rivet holding the lift arm to the sector gear is not easy to remove. I used a vice, a 12 mm socket, and a 5 mm hex socket head driver bit. Option: use a grinder and pin punch, but you’ll need to weld the rivet back in. 5. Drive out the lift pin and roller. 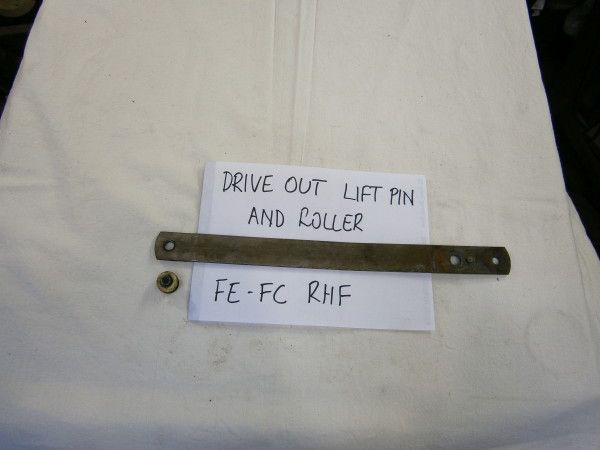 If it’s a driver’s window regulator, the plastic roller will long since have worn out, so use the one from the rear door regulator. That’s the RHF window regulator disassembled. The only part to salvage is the lift arm. And it looks to me as if the lift arm is subtly asymmetric – the rivet holes are not exactly dead centre, and the arm has a slight bend in it. Which means you can’t just use a LHF lift arm on the driver’s side (rats). Bugger. 5000-character limit exceeded (again). Stay tuned. Rob |
|
|
|
|
1210
|
Technical Board / General Technical / Re: window regulators
|
on: November 30, 2012, 09:57:30 PM
|
|
Sorry, I got distracted a bit in the last week. If I can buy an FE-FC rear window regulator from one of the NSW people on the weekend (Christmas bash at Gledswood Estate on Sunday), I'll have a shot at doing the conversion, and taking some photos too . . .
Rob
|
|
|
|
|
1211
|
Technical Board / General Technical / Re: window regulators
|
on: November 24, 2012, 08:25:29 AM
|
Correction 1: window regulator lift arms are the same for both sides, but differ front to rear. Correction 2: FE-FC and FB-EK window regulators are not exactly the same. I think the rears can be interchanged between model series, but the fronts can't. The main difference is in the sector gear. The FE-FC sector gears have two holes, and the lift arm is riveted to either hole depending on front or rear. The FB-EK sector gear has one hole, used for both front and rear FB-EK, and which corresponds to rear FE-FC. The parts I have for comparison are EK LHF, LHR and RHR window regulators; and FC RHF (sector gear worn out). @NES232: No, the spring doesn't look like a broom, instead it's more like a screwdriver jammed between the window and the belt weatherstrip. Does much the same thing though.  Rob |
|
|
|
|
1213
|
Technical Board / General Technical / Re: fe drum brake upgrade
|
on: November 23, 2012, 05:16:03 PM
|
|
And here's another thought: If you are allowed to use an EH rear axle complete, then try finding HR ute/van rear backing plates, because the HR commercials used 2-1/4" rear brakes too.
Rob
|
|
|
|
|
1214
|
Technical Board / General Technical / Re: window regulators
|
on: November 23, 2012, 05:11:53 PM
|
|
Surferboy,
This is a topic I've been meaning to post on for a while.
All FE-EK window regulators share a large number of common parts: the basic "frame" which takes the mounting screws, the splined shaft/pinion gear and spring clutch assembly, and the assist spring (looks like the famous boot spring, only smaller). The sector gear is also common to all window regulators, but is installed one way around or the other depending on front/rear or left/right.
The only major difference is in the lift arm, which is unique to each door.
Your best bet is to salvage the lift arm from the driver's window regulator (and you'll need to put in a new lift pin and roller kit), get a good rear door window regulator (doesn't really matter which side), pull it apart enough to remove the lift arm and install the driver's door lift arm in its place, and reassemble - taking care to install the sector gear in the same way as on the driver's regulator, and also to install the assist spring the right way.
If I'm really keen this weekend, I'll get a couple of window regulators and take photos of the procedure. The major hassle is in removing rivets so they can be re-used.
Stay tuned.
Rob
|
|
|
|
|
1216
|
Galleries / Project Cars - FEs and FCs Under Construction / Re: "Why don't you take the FC on?"
|
on: October 26, 2012, 10:05:57 AM
|
|
To the Forumers,
Thanks for your kind wishes. The ironic "skin-of-your-teeth" thing is that my parents had been in the carport not fifteen minutes earlier getting the Commodore ready for its registration inspection.
It looks like the tree will be taken away next week, so we'll have a better idea what's going on after the Temora weekend.
Rob
|
|
|
|
|
1217
|
Galleries / Project Cars - FEs and FCs Under Construction / Re: "Why don't you take the FC on?"
|
on: October 25, 2012, 04:53:14 PM
|
|
The LORD gives, and the LORD takes away.
The wind blew on Monday, and a tree blew down onto the carport, demolishing it.
My father's Commodore is good for the bin. My mother's i30 is most likely good for the bin. My three cars were further inside the carport. The Monaro and the FC might be repairable, but the tree and the wreckage of the carport will have to be removed first. I think the FX has escaped with minor bruising.
Here is the ever-present dark side of restoring classic motor vehicles: you never know how long your work is going to last.
Rob
|
|
|
|
|
1218
|
Technical Board / General Technical / Re: An Odd Problem
|
on: October 15, 2012, 12:53:01 PM
|
|
Keith,
Your ignition timing is too advanced. The best way to fix it is to run the engine off-idle, but not racing (around 1500-2000 rpm, 30-40mph top gear equivalent), and slowly retard the timing until it stops stumbling, and runs smoothly.
One other way to determine that over-advanced timing is the culprit is to disconnect the vacuum advance pipe at the carburettor. If the engine then runs sweetly as you slowly speed it up from idle to about 2000 rpm, you need to retard the timing.
Now, having said all that, the condition of your centrifugal advance mechanism is really important. Here's a quick check: Take the distributor cap off, but leave the rotor on. Turn the engine over by hand until the points are closed. Turn the rotor conter-clockwise against the spring tension, then release it. Then see whether there's any free travel by turning the rotor clockwise. The distributor cam should return to the stop freely but without any looseness. Worn centrifugal advance tends to leave the timing too advanced.
Grey motors don't ping when there's too much ignition advance, instead they behave much like you describe.
Rob
|
|
|
|
|
1220
|
Galleries / Project Cars - FEs and FCs Under Construction / Re: "Why don't you take the FC on?"
|
on: October 09, 2012, 05:13:47 PM
|
Hey, it's only taken five months to get around to fixing the cylinder head . . . I decided to have another go at finding out where the leak was coming from: fill the radiator up full with water, take the rocker cover off, loosen the locknuts on the exhaust rockers, start the engine, and then one cylinder at at time, tighten the adjuster until the exhaust valve is held well and truly off the seat. Hopefully when I do this, on the "bad" cylinder, the bubbles will stop coming out of the radiator. Wrong. This test was splendidly inconclusive, so there was only one thing to do: remove cylinder head. And on the head gasket I found the marks of two big leaks - the first between No.2, No.3 and the water passage; and the second between No.4, No.5 and the water passage. So I had four leaky cylinders, which was why isolating one at a time wasn't going to show anything up. But the good news was - the head wasn't cracked, it was "only" a leaking head gasket, caused by incredibly crappily machined mating faces. I then had an attempt at fixing the problem in-situ. The joy of lifting a cylinder head out of the engine bay fades after the first attempt, and I lost a weekend stuffing around. October Long Weekend. Remove engine and transmission from vehicle, and set to work. The wise approach would be to strip the head, strip the block, send them both off to be machined flat, and rebuild. I am not wise. I figured that with two full days I'd have a half-way decent chance of matching the two surfaces.  Instead of bearing blue, I drew a cross-hatch pattern on the block with a Texta, laid the head on the block and rubbed the head back and forth a bit. The areas which make contact rub the Texta marks out. I bought a new oilstone, and set to work on the high spots. Not much happened. My father made a sort of sanding float out of a flat piece of 3/4 plywood, with some 60 grit al-ox paper contact-cemented to it. Slowly the contact patches between head and block grew, but oh, so slow . . . 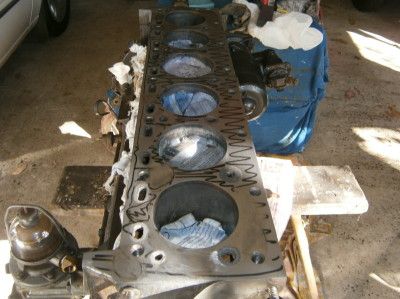 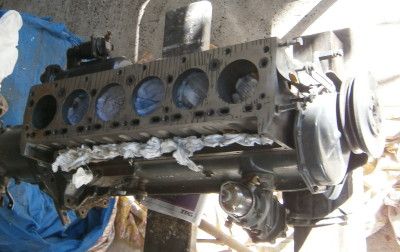 Time for the heavy artillery. Warning: Do Not Attempt This At Home.Angle grinder, with a backing pad, and a new 120 grit sanding disc. A single, very light pass over the high spots, followed by a minute's work with the oilstone, and the sanding marks are removed. 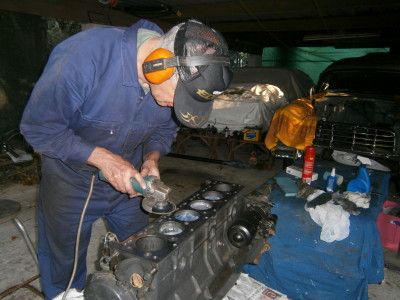 Clean surfaces. Mark block with Texta. Apply cylinder head. Observe contact marks. Gauge both surfaces with a straightedge to keep faces reasonably flat. Repeat many times over. I really didn't want my father to take this photo. "I'll become the laughing-stock of the Forum", I said. Finally I achieve contact all over, including the gaps between 2 and 3, and 4 and 5. A new (old-stock) head gasket, and I set the motor up on stands, and started it. Success! No bubbles out the radiator. While the rest of the country was glued to the screen watching Whincup win, I was doing my patriotic duty assembling a grey motor, test-running it, and putting it back in the car. Phew. |
|
|
|
|


