FE-FC Holden Discussion Forum
November 05, 2024, 08:14:26 AM *
Welcome, Guest. Please login or register.

Login with username, password and session length
News: The FE-FC Holden Car Club of NSW are proud to host the 19th FE-FC Holden Nationals. Check out the announcement video for more.
 
   Home   Help Search Calendar Login Register  
Pages: [1]   Go Down
  Add bookmark  |  Print  
Author Topic: roof lining, windlace/pinchweld  (Read 6818 times)
surferboy
wa-club
Guru
*****
Offline Offline

Model: FE and FC
Posts: 1338


10,000 POINTS !


View Profile
« on: March 22, 2012, 11:46:52 PM »
+1

What do I do ?


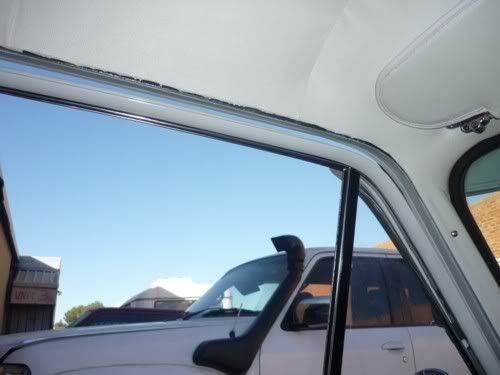
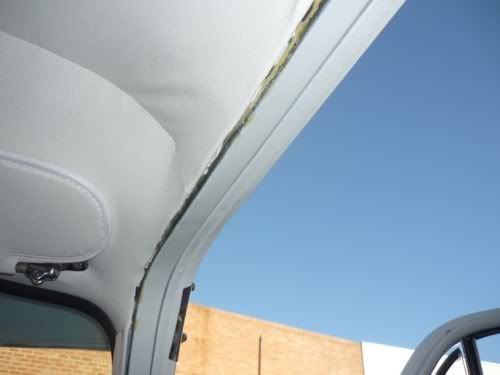
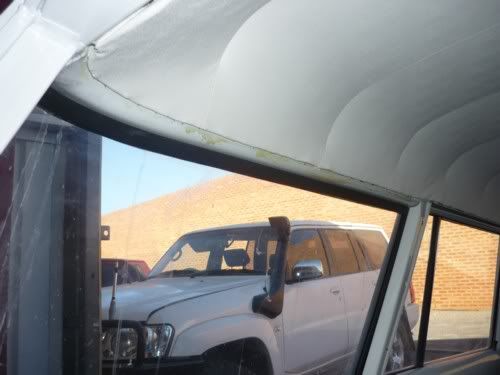
only a couple of weeks to the Nats and the interior is going in to the wagon. But I've got a problem  Roll Eyes

interior man 1 fitted rooflining

we were going to get interior man 2 to fit windlacing (and rest of interior, seats doors,carpet,rear panels)

should windlace have been done at the same time as the lining went in by No1 ?

No 2 says the lining needs to be moved to allow the windlacing to be installed which would be a pig of a job and could damage the lining.

option 2 will be to run pinchweld up the front door opening and around the roof.

option 3 do nothing as its only decorative and has no real purpose.

I think unfinished looks untidy. ( especially the amount of glue around rear windows that will need to be cleaned off  Sad ) So I'm leaning towards pinchweld at the moment. The lining and paint are white so the windlacing would need to be white (Don't think its available in white ?) which would get very dirty very easily. Pinchweld would be cleaner but I'm not sure the plastic finish would look right on an FC. But at least I might be able to paint the patch of blue on it to match the dashboard/Front door colour scheme. (Couldn't I ?)
I read on another post the windlace on a wagon doesn't go into the rear after the C  pillar. The old one did, that was pulled out. I guess it was something the previous owner chose to add. I don't know how it was fitted.

Are there other options just to tidy up the edge of the roof lining ?

Ta
 Cool Cool Cool
Logged

cruisin's great with a 58
moetstockie
Junior Member
**
Offline Offline

Model: FE
Posts: 79


View Profile
« Reply #1 on: March 23, 2012, 09:33:47 AM »
0

G'day Surferboy,  I had my FE wagon wind lacing done 2 weeks ago. By your photos - it looks like the little steel wire rail with the teeth on it that takes the hood lining is not tapped all the way back. If so then you only need enough room for a doubled up piece of windlacing material to fit in. Mine was also glued....then tappped back. The C pillar, I'm guessing, is next to the rear seat and above the wheel arch ?? If so there was a different type of windlacing there. Just a flat folded material/vinyl dress piece from memory. (not reliable).    The purpose of the wind lacing is to prevent the whistling wind noise around the door seals.   Hope it turns out for you.   Cheers Moe`t
Logged
Glenn 'Stinky' Stankevicius
Moderator
Guru
*****
Offline Offline

Model: FE and FC
Posts: 5135


Willaston, South Australia


Glenn.Stankevicius
View Profile
« Reply #2 on: March 23, 2012, 10:45:44 AM »
0

In my experience :
1. Windlace is supposed to be installed at the same time as the rooflining so that the alligator strip can be closed and hold everything together. He used Glue around the alligator clips?
2. You shouldn't need to move the rooflining, you may need to pry open the alligator clips slighty to get windlace in.
3. Windlace is available in a basic range of colours standard, but you can get it custom made. Daleys (http://www.daleys.com.au) and Clark Rubber both sell the rubber profile for this, you could get it made in white vinyl or a blue to match the car.
4. Rear side windows, the glue should rub off but recent experience with a particular car has proven the glue can damage the paint. Get some white spirits on a rag and it should soften up and wipe off.
5. Pinchweld! BLECH!  Lips sealed if your thinking of the Torana era gear.

almost forgot, WTF did he use glue for?
Logged

surferboy
wa-club
Guru
*****
Offline Offline

Model: FE and FC
Posts: 1338


10,000 POINTS !


View Profile
« Reply #3 on: March 23, 2012, 10:24:06 PM »
0

Hi stinky & moe't
I don't know why things got glued ?
Les (my 2nd interior man) seemed a little suprised also.
Les believes that not doing the job properly when the lining went in, and just pushing it in now will most likely lead to it all slowly falling out over time. Also said it is possile to leave the bare edge and just gently flatten the lining against the bodywork over the doors so it lays flat. I'm not to sure it would look much better though
If I had any clue to building cars and had known that the two should have been done together then I would have asked for it to be done properly. We were more worried about rooflining and windows going in together...hadn't even thought about windlace (I'll know better when we build Cathys Ugly Duckling)
I agree pinchweld is not the ideal solution (the sample Les showed me was similar to the torana one. he had a torana that has it has just been replaced on...it's to modern for my liking) but I think it will look tidier than nothing
Old photos of the wagon show the windlacing came down the rear doors AND went around the rear roofline of the windows & tailgate. This (from memory) was very soft. The ugly duckling also has very soft material. The sample Les showed me had material wrapped around a firm rubber core.

 Cool Cool
Logged

cruisin's great with a 58
Glenn 'Stinky' Stankevicius
Moderator
Guru
*****
Offline Offline

Model: FE and FC
Posts: 5135


Willaston, South Australia


Glenn.Stankevicius
View Profile
« Reply #4 on: March 24, 2012, 10:04:38 AM »
0

Probably the best thing you could do is get 2nd interior man to knock up some grey velour windlace (to match the seats), as I mentioned Daleys or Clark Rubber sell the profile.
Tapping down the metal won't look so hot as it wasn't designed for that and will look lumpy.
Logged

Not Happy Jan
nsw-club
Senior Member
****
Offline Offline

Model: FC
Posts: 956


Aussie adventure


View Profile
« Reply #5 on: March 24, 2012, 05:57:31 PM »
0

Im with Stinky on this one ( as he is the expert) but i would probably do it myself. WTF did he use glue for Shocked Shocked
Just a bit at a time but prise open the alligator crimps and push in the windlacing and gently with wooden mallet just tap it down. Should then secure the windlacing as well! Do you have the windlace already?
Nick
Logged

You can never have too many!
Port Macquarie NSW
FCRB26
Guru
*****
Offline Offline

Model: FE and FC
Posts: 3802


peter.mallaby
View Profile
« Reply #6 on: March 24, 2012, 06:18:04 PM »
0

Sounds like trimmer 1 needs an old fashioned knee capping...

I had a reputable trimmer get glue all over my new 2 pack trying to put the belting in the front door pillar i said surelly you know it slides in ?

He didnt..
Or another trimmer did my door trims and belted the retainers for the door trims with a hammer on a steel bench crushing and leaving mark in every  friggin stainless door strip
Logged

Stewy
sa-club
Senior Member
****
Offline Offline

Model: FE
Posts: 881


FErgus 1957 FE Special Station Sedan


Jeff Stewart
View Profile
« Reply #7 on: March 29, 2012, 08:35:44 PM »
0

Hi Surferboy,
When all else fails read the manual  Cheesy
Page 28 in the shop manual titled HEADLINING
It is not specific about the wagon but having a look at my FE wagon the cargo section does just need to be tapped flat gently against
the roof and the glue removed.
Wind lace is still going to be the best to put in, and rare spares do an original FJ dark blue that would compliment your great looking interior.
Your trimmer should have no trouble putting wind lace in but there is a special tool shown in the shop manual to straighten the retainer for
installing.  (just my opinion on windlace)

Hope this helps

Cheers Stewy   Cool
Logged

No matter how much you push the envelope, It'll still be stationery
Pages: [1]   Go Up
  Add bookmark  |  Print  

Share this topic...
In a forum (BBCode) 
In a site/blog (HTML)

 
Jump to:  

Powered by MySQL Powered by PHP Powered by SMF 1.1.21 | SMF © 2015, Simple Machines Valid XHTML 1.0! Valid CSS!
Page created in 0.04 seconds with 22 queries.