 Show Posts Show Posts
|
|
Pages: [1] 2 3 ... 17
|
|
1
|
Galleries / Project Cars - FEs and FCs Under Construction / Re: Jolls FC Ute Project
|
on: July 12, 2025, 08:49:17 PM
|
Craig,
I just read your post in "Parts Wanted". Cam follower with a piece missing from the side . . .
So your engine had a stuck valve at some point.
You'd be surprised how many grey motors have cam followers with pieces missing from the sides. Doesn't affect how the engine runs at all.
Check pushrod carefully to ensure it's not bent; or that it has been straightened successfully.
Rob
Hi Rob, Thanks, yes checking pushrods and the lifter bore for damage. Cheers Craig |
|
|
|
|
3
|
Galleries / Project Cars - FEs and FCs Under Construction / Re: Jolls FC Ute Project
|
on: July 12, 2025, 07:08:02 PM
|
Craig,
A.t.m. I only have the later cam followers. But the service note says you're OK to use them in the earlier engines if you use a late follower with a short pushrod.
If you have no luck finding an earlier follower I'm happy to send you a late follower plus short pushrod.
Rob
Thanks Rob, I appreciate the offer. I think I have secured a couple of the right followers on their way on Monday. Cheers |
|
|
|
|
4
|
Galleries / Project Cars - FEs and FCs Under Construction / Re: Jolls FC Ute Project
|
on: July 12, 2025, 07:06:57 PM
|
Go the SUs Jolls, you wont be sorry. As long as the throttle shafts are in good condition, floats, needle and seats and new jets and hopefully already got the right needles and springs for your tune, they are simple, robust and efficient.
Sent from my iPhone using Tapatalk
The SUs are in good condition and I am fortunate to have a good friend who has a business restoring carbs a few of properties over. I was keeping hold of the twins just in case there is an issue in getting her past the initial blue slip. Not sure how that would be viewed. Once finished she will be a "work ute" in the excavation side of our business. Work as in mobile advertising! This is the first draft of the advertsing concept - not done by me. It is a bit over the top. The Scooby mobile swirls and the modern book now thing will defeintely not get a run and the writing will be less over the top but you can get the gist.  |
|
|
|
|
5
|
Galleries / Project Cars - FEs and FCs Under Construction / Re: Jolls FC Ute Project
|
on: July 11, 2025, 05:14:55 PM
|
So where are we up to: I had rust in 2/3 of the lip around the fuel tank that was beyond saving. I was in the process of doing the research to purchase a bead roller so I could make a replacement. I had thought about it overnight and was going to place an order late last week when I wandered past a damaged door from Son 2's VZ crewman project. I noticed that it had a moulded line down in the middle of the door. It looked close to the lip I needed to create in the rusted sections I had to cut out. I cut it out the section with a grinder and hey presto; almost identical form. That was the inspiration I needed. So armed with a grinder and some cutting discs I went to work on the rusted sections, leaving the reinforced corners so I had something to weld to. I tacked in the straight bits in then sliced some smaller sections through the back so I could bend them to the corner profiles and tacked them in. Once that was done the back of the curved sections were reinforeced and the missing wedge sections plug welded. Back then to finishing the welds on the new lip and one major job completed. From there I plated some rust sections in the rear floor. I still need to go back and plate them from the other side and weld a couple of rusted flange sections of the cross member in place. All in all happy with the progress. 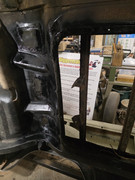 Prepping the cam to go off and be reground I found one of the cam followers was damaged - so I am on the hunt of a replacement (just one). The one I require is to suit a 10 5/16" pushrod. The intenal depth of the lifter is 1 13/16" (1.852"/47.04mm) as opposed to 1 5/8" on the later version. I have posted on FB chasing a replacement - but if you have a spare handy I'd be happy to part with a few beer tokens. 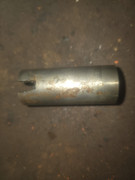 Prepping the engine to go off for a refresh and I found that the oil pressure relief valve in the oil pump was rusted in place. With some advice from Rob I set out to extract it using a a nut and bolt by cutting a thread into the internal of the valve and then using a nut to extract it. The process itself failed but in cutting the thread the valve came loose and I was able to remove it. I need to purchase a new 9mm tap to replace the damaged one but at least the oil pump was saved from the tip. I ordered an oil pump rebuild kit from Auto Surplus (was cheaper on ePay than it was on their site - unusual). So the motor is now good to go to the machine shop to be inspected and we will make a plan for the refresh once we know what needs to be done. The concept at the moment is to up the compression a little, what size slug and from where will depend on the assessment of the block, shave the head a little and machine it to accept 202 valves. I was thinking of lightening the flywheel a bit but have scrapped that idea as I plan to run a .355/.336 diff centre and the mass will be helpful there. I have a set of twin strombergs and triple SU's to handle the fueling side of the house, no decision on which solution as yet, and the extractors have already been purchased. The king pins are in being done so that is the start of the steering refurb. POR arrived during the week so next on the list is to seal the fuel tank and get back to work on the rust issues and reinforcing the floor pan for seat belts. I'm not going to fit the seat belts until after I get the old girl registered to save on having the engineer the whole setup. |
|
|
|
|
6
|
Technical Board / General Technical / Re: Oil pressure regulator valve
|
on: July 11, 2025, 10:30:58 AM
|
1: Tap a thread into the plunger (if the steel's not too hard) then get a length of threaded rod, a washer and a nut. Thread the rod into the plunger, put the washer over the rod so it bears up against the pump housing, screw the nut down onto the washer and keep turning the nut until the plunger is extracted.
Hi Rob, Thanks for the idea - didn't work as planned but the valve is out. I started with a pln to drill out the valve and cut a thread for a grade 8 M10 bolt I had laying about. Killed a drill bit while I was at it, resharpened it and killed it again - so that wasn't progressing. So I decided to work with what I could get into the existing. An M9 tap fit well so I thought I would tap that thread and do an buy some M9 rod/bolt and do ti that way. The M9 tap went in a bit and then started spinning. Would not cut a thread and would not screw itself out. I gave it a couple of taps with a hammer and noticed a bit of diesel from the bath squirting out of the housing - movement. I tried to get the tap out - still no joy so I gave the tap a couple of light hits with the hammer hoping the thread would catch. It did and I was able to turn the tap about 1/4 of a turn and it became really easy to move. I thought that the thread I had started to cut had broken away - but no it was the valve spinning in the body. Pulled on the tap and removed the tap and valve no issues. The valve was not pitted or corroded anywhere except where it has been exposed to air in a small circle. The bore is clean and useable. The tap is not good though - it took some work to get it out - the start threads are gone - so that one will have to be replaced. So I have ordered a rebuild kit and we are good to go. Now I just need to replace a cam follower and the donk will go in to be reborn and the cam and followers will go off to be reground! Really appreciate your idea - didn't work as expected - but got me out of trouble. Cheers Craig |
|
|
|
|
7
|
Technical Board / General Technical / Re: Oil pressure regulator valve
|
on: July 10, 2025, 10:08:22 PM
|
Craig,
This is a train-of-thought post, so bear with me -
FB oil pump, so the relief valve spring is retained by a split pin, and probably washer. The spring seats inside the relief valve plunger. Plunger looks like a miniature cam follower. There are a couple of ways of going at it:
1: Tap a thread into the plunger (if the steel's not too hard) then get a length of threaded rod, a washer and a nut. Thread the rod into the plunger, put the washer over the rod so it bears up against the pump housing, screw the nut down onto the washer and keep turning the nut until the plunger is extracted.
2: Use lots of heat on the pump housing at the relief valve bore. But I can't remember if there's space to get a drift into the relief valve passage so you can start to drive the plunger out.
Red motor relief valve plungers are the same outside diameter as those in late grey motors. You can use a red motor relief valve spring, but may need to pack spacers behind to give the right pressure regulation.
Plan B: I have many grey oil pumps . . .
Rob
Hi Rob, Thanks for your thoughts. There certainly isn't a way to get a drift in to drive the plunger out. My interim plan was to drill the plunger out similar to driling out a snapped bolt. I had not conidered using threaded rod/bolt. That is a much better solution. I'll give it a crack tomorrow and let you know how I go. Cheers Craig |
|
|
|
|
8
|
Technical Board / General Technical / Oil pressure regulator valve
|
on: July 09, 2025, 01:14:15 PM
|
|
Hi team,
I'm in the process of restoring the motor - an old grey out of an FB. I have removed and stripped down the oil pump but at some stage there appears ot have been some water ingress. I was able to persuade the oil pump drive out of the housing but can't for the life of me get the oil pressure regulator valve out. So far it has been soaked in WD40, spent an hour in the ultrasonic cleaner and is now in a deisel batch. I will need to purchase a rebuild kit as no doubt the valve will be pitted (perhaps the housing as well)?
Any thoughts on getting the valve out?
Cheers
|
|
|
|
|
9
|
For Sale and Wanted / Parts Wanted / Cam Follower
|
on: July 08, 2025, 08:51:52 PM
|
|
Just about to send the cam and followers off to be reground and noticed one of the cam followers has a piece missing out of the side. The motor was originally out of an FB.
Does anyone have a spare follower laying about?
Cheers n Beers
Craig
|
|
|
|
|
10
|
Galleries / Project Cars - FEs and FCs Under Construction / Re: Jolls FC Ute Project
|
on: July 03, 2025, 10:26:40 AM
|
Jolls ..I had to clean out the fuel system on a fire fighting pump , left in a shed for ages and probably had E10 fuel go dry ...Citrus based paint stripper , can't recall the brand , but it was in a orange coloured tin , did a brilliant job ... Vern ..
Thanks Vern, Great tip - I think I know the one you are referring to. Will give it a crack while I'm wating for the POR to arrive. Cheers |
|
|
|
|
11
|
Galleries / Project Cars - FEs and FCs Under Construction / Re: Jolls FC Ute Project
|
on: July 02, 2025, 10:32:24 PM
|
So today I completed the leaf packs - new bolts, spring liners and a lovely orange rustoleum finish (Wests Tigers underbody colour scheme  ) The front springs have been rubbed back and repainted to match. 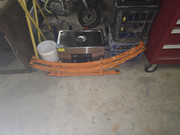 The old girl is now completely stripped less the wiring from the cab to the tailights. I have left them in place so I can pull a draw wire through next time I am out there. The wiring harness is missing a few components so I will need to do an audit on the harness to order the missing components and cables in the right colour schem. That will be a fun task! As it was a commercial vehicle I will need to add the missing bits that I will be adding: - Reverse lights
- Radio
- Cigar Lighter
- Dome light switches
- Brake Warning Light
- Glove Box Light
- Ignition Switch Light and
- Indicators (including converting the brake light indicator to a combination reverse (white) and indicator (orange) LED
I bit the bullet and purchased a rotisserie for this build - why I didn't fork out the $ previouslyis beyond me. It is so much easier to work on. 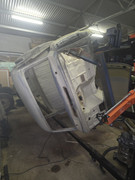 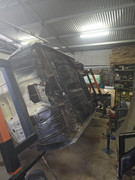 I think I spun her around a dozen times to get most of the dirt and dust out. It is still coming out of the rails so I will need to get some air/leave on rust converter and fish oil in them. Found some addtional rust under the cowl - not too bad and identifed some "bog" based panel damage repairs just behind both doors - so I will have to sand out the bog, beat the dents out a little prep for paint. The rest of the body is straight. I identified a little more rust to be repaired but pretty straight forward repairs. The most challenging being aroudn the fult tank. the POR is in the post so I will get some fuel rated JB weld to deal with any pinholes I find. I found that there wouldn't have been room to pein over solid rivets in the fuel sender. I have riveted it using blind rivets with a standard gun and will seal the rivets with POR to prevent leaks. Progressing slowly but surely! |
|
|
|
|
12
|
Technical Board / General Technical / Re: FC Ute Rear Spring Pack Identification
|
on: July 02, 2025, 08:12:33 PM
|
Hi Jolls,
I had a set on my FE sedan when the springs sagged a bit. They were helpful and also appeared stop some body roll as well. They were also called uplift springs.
Cheers
Thanks Graham, Just finished refurbishing them - replaced the spring liners, rubbers and bolts - repainted in orange (had it on hand) so they are good to go back in. Cheers |
|
|
|
|
13
|
Technical Board / General Technical / Re: FC UTe Shocks
|
on: July 01, 2025, 07:32:33 AM
|
|
Thanks Vern,
I bit the bullet and purchased the Gabriels as I got a great last minute EOFY deal. I couldn't find the Monroe deal I was looking at prior at around the $70 mark so they were back up at $100 plus per corner even with the discount. The Gabriels were on offer at 40% off so I took the punt based on some research I had done inthe background. Your post has reassured me!
Cheers
Craig
|
|
|
|
|
14
|
Technical Board / General Technical / Re: FC UTe Shocks
|
on: June 30, 2025, 09:41:14 PM
|
|
Thanks Blacky,
Appreciate the feedback. I have heard that Monroes are a pretty comfortable ride even on the rougher roads. I plan to have the ute on standard rego so will clock up a few miles around town. No doubt will drive it over the the Landcruiser - so much more style!
|
|
|
|
|
15
|
Technical Board / General Technical / FC UTe Shocks
|
on: June 29, 2025, 09:35:58 PM
|
|
Hi Team,
I need to replace the shocks on the project FC ute. The posts in relation to shocks on the forum are pretty dated. I have sone a bit of research and identifed several options including: Monroe, Gabriel and Sachs at at $60-70 mark per unit, Koni at around $220 per unit and at the bottom end Repco at $50 per unit (rear only). What are your expereinces with these brands and what do you think is the best value for money option. I don't think the FC warrants Koni's!
Cheers
|
|
|
|
|
16
|
Galleries / Project Cars - FEs and FCs Under Construction / Re: Jolls FC Ute Project
|
on: June 27, 2025, 06:33:38 PM
|
Between work today I was able to sneak in a little effort on the ute. I wanted to prep te fuel tank to be sealed with POR 15, but when I went to pull out the fuel sender yesterday I found it had been sealed in with what looked like JB Weld. It was certainly harder than body filler and was grey in colour. My plan was to clean the tank to prevent a vapour explosion from sparks and then grind out the JB Weld with a an angle grinder and the dremmel. When I took it outside in the sun to start this I noticed one edge looke like it was lifting so I grabbed a cold chisel and a hammer and took to it as an experiment. It started to flake off in small chunks so I kept going and half and hour later I had exposed the cap over the sender unit and with a bit of effort I was able to pry it out. The "sealant" material did not stick to the tank itself but was bonded to the sender cover. I was able to get if off with a bit of effort on the wire wheel. I can only imagine that the fuel sender was leaking so it was sealed in. I removed the sender unit - it was stuck solid in the empty postion. The tank insides are heavily varnished so it will take a bit of work to prep it for the POR. I put the tank aside and focussed my effort on the sender unit. 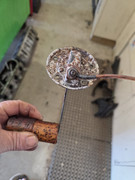 First job was to blast the crud off the outside - took a couple of minutes to do and it looked good I drilled out the rivets and separated the rheostat from the moving contact. 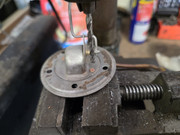 The internals were covered in varnish and stuck solid. I could not get any movement. 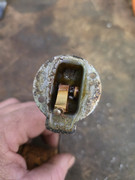 Not wanting to break anything I decided to stick the float and contact into some fresh fuel to "melt" the varnish. I cut off the float so it would fit in a small jar and soaked it for a while - no luck with that. I had the twin carbies lined up to go into the untrasonic cleaner so I hit the added some more fuel to the glass jar and stuck that in with the hot water and finish dishwashing tablets amd let the untrasonic cleaner do its thing. The fuel sender parts came out clean on the outside but still had varnish on the inside - but the varnish just flaked off when touched - so a couple so minutes with a pick and small falt screwdriver and the interior was clean. The heat and vibrations had softened up the fuel varnish so I was bale to slowly get the float arm to move and finally with a few more dips in the warm fuel and a bit of carby cleaner spray the movement freed up. A quick check for continuity and then resistance readings 0.2 ohms at empty and 33 ohms at full and we had enough to make a functioning fuel sender. So I used the MIG to weld the float arm back on and we were good to go. Hand assembled and tested it could get the full range of movement and had 0 ohms at empty and 32 ohms at full. Close enough for me so now it is a matter of finding some brass rivets of the right size and we have saved about 180 beer tokens. As for the carbies - came out clean - still need to go over them. |
|
|
|
|
17
|
Technical Board / General Technical / Re: Fuel Tank Sender - JB Weld Install
|
on: June 27, 2025, 01:10:26 PM
|
I don't think the product used was JB Weld, It was hard as but I was break it off with a hammer and cold chisel. After about 1/2 hour of pain I exposed the cap and was able to lever it out. The sender unit was quite corroded on top. The sender unit was full of varnish and seized up so time to try and bring it back to life. |
|
|
|
|
18
|
Technical Board / General Technical / Re: FC Ute Front Springs - What is the extra bit?
|
on: June 27, 2025, 12:20:04 PM
|
Craig,
I've never seen the steel rings before. In factory springs at the closed-coil end, the spring wire changes in profile from round to rectangular, which tapers. The part number is stamped into the rectangular-profile section. I can't see the closed-coil ends clearly in the photo, but you may have original-equipment front springs.
In aftermarket springs (thinks Lovells or Selbys) the spring wire at the closed-coil end is round in profile.
OK. It could be that your springs are wound from larger-diameter wire and they don't seat properly into the crossmember tower. Maybe not. It could be that the steel rings are a home-made "country pack" which gives an extra 1/2 ride height. Beats me.
I have a loose pair of FE-FC ute/van/wagon front springs. Please hold.
---------------------------------------/---------------------------------
7410727. 7-1/4 active turns of 0.540" diameter spring wire.
FE-FC sedan front springs are 7408860 and both mine have a coil broken off the bottom end. Shop manual says 0.530" diameter spring wire.
Master parts catalog says -
FB, EK, EJ, EH wagon/ute/van and all HD king-pin front springs are 7419138. 0.560" diameter wire.
FB, EJ, EH sedan front springs are 7412465. 0.560" diameter wire.
EK sedan front springs are 7419137. 0.560" diameter wire. Don't know why EK sedan front springs are "sui generis".
Rob
Hi Rob, Thanks for the assistance there. The springs are stamped 7410727, so they are standard FE/FC commercial springs. I checked the spring diameter and they are 0.547" - I expect the extra .007" is rust build up. They fit perfectly in the tower without the addtional ring. Looking at the bigger picture the rear springs have the Rogers Overload Shock Absorber Leaves added so she was clearly a work horse in the day. Being a country ute maybe the extra 3/8" ride height made a difference. So I suspect your poor man's country pack may be on the money. Interested to see if anyone else has come across this. I don't think I will put the addtional coil back in - but will keep it aside justin. Cheers |
|
|
|
|
19
|
Technical Board / General Technical / Re: Fuel Tank Sender - JB Weld Install
|
on: June 27, 2025, 10:11:02 AM
|
Careful with the sparks from the Dremel. Keep the area wet will help.
If you are lucky, their surface prep was bodgy and once you get under it the JB Weld may prize out in chunks.
If its only a pinhole or two, mebbe use JB weld again before the POR. Saves welding in the tank and all the kablooey risk.
Cheers,
Harv
Thanks Harv, Welding/brazing fuel tanks always makes me nervous. JB Weld and POR is my preferred method of treatment; however, I have had to do a few bike tanks as the repairs have been in areas that needed to be painted. Cleaning is the key prior to any heat application - same prior to any grinding operation (or use of a vacuum cleaner). I'm just about to head up to the shed to see what progress can be made. |
|
|
|
|
20
|
Galleries / Project Cars - FEs and FCs Under Construction / Re: Jolls FC Ute Project
|
on: June 27, 2025, 09:59:41 AM
|
Jolls ..My FC sedan 1958 Sydney build never had seperate rear blinkers ..tail/ brake lights blinked in the top red lense ..bottom lense clear but doing nothing ..I got some globe holders , EK wiring diagram , put in the extra couple of wires as per that diagram , new blinker canister , and fitted amber LED globes ...for me its a safety thing , in general traffic we see amber blinkers all the time ..people dont see a blinking brake light in red ..poor old bugger got his wiring mixed up , his brake is blinking not his blinker lense ...win/win ..Vern ..
Thanks Vern, I have purchased some orange/white LEDs and will use the clear lower lens so I can have both the reverse lights and indicators. My original plan was for blinking red as that was how my old FC worked as well - but I saw the logic of this argument. There is still part of me that wants to keep it original though. maybe I can hide a switch to flick between the two and be the poor old bugger when I feel like it. Just kidding - safety wins over! |
|
|
|
|

